What I Do at Work All Day (Part 2)

What I Do at Work All Day (Part 2)

(As promised) The Dart and Drop

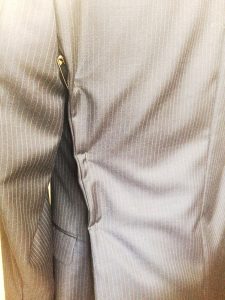
Pinned side back seam.

Pinned side back seam.

I do a lot of suit alterations. Sometimes I alter up to eight suits in a single day.

Often, suit jackets fit well in the shoulders but are a bit too roomy in the body. Because of the inner canvas and the inevitable front pocket, you can’t really successfully alter the front of a suit jacket. You need to take in at the center back or side back seams. While pinning, you’ll usually notice that you need to take in the side back seam all the way into the armseye.

This presents the conundrum of:

  1. Should I also take in the sleeve so it will still fit?
  2. Do I need to get into that seam at all?
  3. Do I really need to take the sleeve out?

The answers are no, yes and yes. Do not take in the sleeve. Do take the bottom part of the sleeve out.

Men’s suit jackets are traditionally cut without an actual side seam. The place where you really want/need to take a jacket in, though, is often in that invisible side seam. The way to accomplish this is by using the dart and drop method.

The Dart

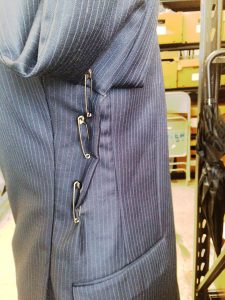
Dart pinned into side seam.

Dart pinned into side seam.

Take the lining out and the underarm sleeve apart from the side back seam to a few inches in the front of the side seam. There should be a notch in the jacket to indicate where the side seam would be if there were one. If no notch is present, lay the jacket flat on a table, buttoned up. Where the jacket naturally folds will indicate basically where that side seam is. Mark with chalk on the wrong side of the fabric in the coat body and in the sleeve.

Next, from the wrong side of the fabric, fold on the notch. At the top, measure in the amount you need to take in (as you determined by pinning your side back seam). Then draw a dart from that point down about 3 or 4 inches (or until you run into the top of the pocket). Sew the dart. You can put the same dart in the lining or you can simply do a tuck. Either is fine.

The Drop

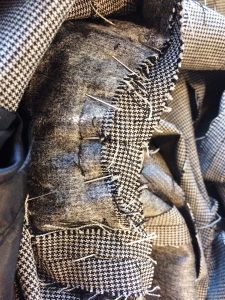
The next step is to redraw your underarm seam. The armseye should remain the same size as it originally was. To do this, drop the underarm seam. I suspect there may be some actual formula for this but I’m more of an intuitive sewer. Dropping an inch is usually a good place to start. Use a curved ruler

to draw the new line making sure the connections are smooth. Pin your sleeve at your new side seam an inch below the original seam line. Then pin the rest. You might have to undo more of the original seam if the sleeve isn’t fitting. Do this in the back until you can easily fit the sleeve back in without any excessive easing.

Don’t Worry

Pinned underarm seam.

Pinned underarm seam.

If you end up having to undo part of the shoulder pad and sleeve header, that’s fine. Just reattach them once you have put your sleeve back in.

You can apply the same principle to jackets (or really anything) that have side seams. Unless you want to narrow the sleeve, dropping the armseye is a more accurate way to accomplish this alteration.

At this point I also want to add a little something about the idea of ‘a right way’ to do something. I don’t believe there is only one right way to do things.

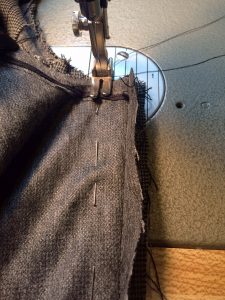
Sewing jacket with side seam.

Sewing jacket with side seam.

I ran the costume building shop for Boardwalk Empire for four years. It was a shop full of talented tailors from all sorts of backgrounds and places (Russia, Uzbekistan, Turkey, Tunisia & various U.S. states). We had a running joke about people who insist that their way of doing things is the only way (We even had a little song called, “There’s only one right way to do things. The other ways are wrong…”).

Walk Your Own Path

You need to figure out the way of doing things that works best for you while accomplishing the desired result. Sometimes someone can show you a whole new way of doing something that makes it easier for you. Sometimes not.

The tips and tricks I write about are the things I’ve learned work best for me over the years. Hopefully they will prove to be useful to someone else as well.

Missed Part 1? Check it out here!

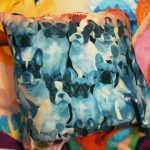
Doggie Leggings Pillowcase

Doggie Leggings Pillowcase

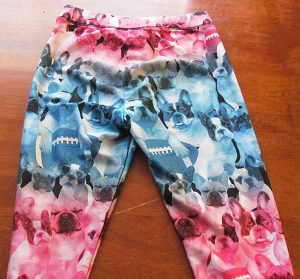
Awesome doggie leggings!

Awesome doggie leggings!

“Mom, my doggie leggings don’t fit anymore!! I love them, Mom, don’t throw them away!” To save these precious doggies for eternity, my daughter’s distress signal turned into the Doggie Leggings Pillowcase.

Leggings are a very popular fashion trend today. I’ve seen hundreds of unique, bright designs on websites, in stores, and worn by passers-by. I’ve admired many of the designs and agreed with my daughter that creating something with them would preserve their awesomeness 🙂

Fair warning, everything except the zipper was measured, cut, and sewn by my 7 yr old daughter. The pieces aren’t straight, the stitching is all off, the corners look funny. But that’s ok, it’s awesome the way it is because she made it. It turned out to be a great learning project for her. She’s super proud of it, and so am I.

Level: Beginner

Time to Complete: In An Evening

Sewn By Machine: 1/4 in. straight stitch

**Tip: Wash all new materials prior to use to avoid shrinkage when you wash it.

**ProTip: Iron cut pieces before sewing and in between each step. This helps in the sewing process as well as setting the stitches to lessen unraveling with age. Often, the end results tend to look more professional.

**All measurements based on a craft pillow I already had. Measurements should be adjusted to fit the size of the pillow you are working with. I typically add an extra 1/2″ to measurements when I do a zippered pillowcase to allow for the extra bulk of the pillow.

Materials:

1 – 13″ L x 13″ W  Leggings (side 2)

1 – 5″ L x 8″ W Leggings (side 1)

2 – 4″ L x 13″ W Pink/Purple Material (side 1)

2 – 6″ L x 3″ W Pink/Purple Material (side 1)

1 Zipper, Cut to Fit After Pillowcase is Finished – measuring for zipper after pillowcase is assembled helps ensure the zipper isn’t too short

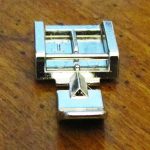
1 Zipper Foot – to use when sewing on zipper

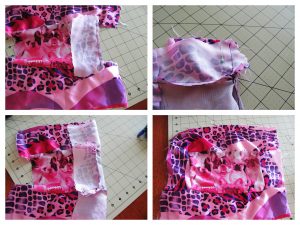
  1. Sew top strip to top of side 2 Leggings, right sides together. Repeat for bottom strip.

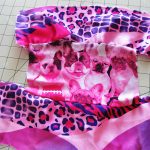
    Step 1

    Step 1

  2. Sew right side strip to right side 2 Leggings, right sides together.
  3. Sew top of side strip to bottom of top strip. Make sure corner with Legging is sewed shut.

    Attaching sides.

    Attaching sides.

  4. Sew bottom of side strip to top of bottom strip. Make sure corner with Legging is sewed shut.
  5. Repeat steps 2-4 for left side strip.

    Zipper foot.

    Zipper foot.

  6. Sew side 1 and side 2 right sides together on three sides only. Leave one side open for zipper.
  7. Trim corners. Turn right side out.
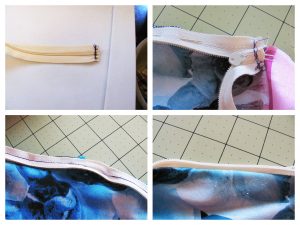
  8. Place open side of zipper on one open end of pillowcase and extend zipper to other end. Cut zipper about 3/8″ – 1/2″ past end of pillowcase. In this case, my zipper measured 12″. I usually buy longer zippers and keep several on hand so I can cut to fit for any project.
    Finished zipper.

    Finished zipper.

    Attaching the zipper.

    Attaching the zipper.

  9. Sew across zipper end several times to make sure the bottom of the zipper never unzips all the way.
  10. Switch to zipper foot on sewing machine.
  11. Unzip zipper.
  12. Place under side of zipper to right side of pillowcase, teeth side outside. Non-tooth side should be end to end with right side of pillowcase. Zipper will be upside down. Pin and sew.

    Naptime!

    Naptime!

  13. Do the same for the other side of the zipper. The placement will be the same, with the underside of zipper to right side of pillowcase, non-tooth side matching end of pillowcase.
  14. Stuff pillow inside the pillowcase, zip up, pop on the bed and take a nap!
Hi all! I’m Stacey Martinez 🙂
I love to design imaginative custom items for my active, crazy family. Bright colors and beautiful fabrics sing “Stacey, Stitch Me!” Let your imagination inspires you to breathe personality into every stitch!

Please leave comments, questions, helpful tips, or pictures of your pillowcase creations. I can’t wait to see what you come up with!

Sew Fine Dress Making

Sew Fine

Need the perfect dress for an upcoming special event? Instead of perusing rack after rack of unimaginative, pricey finery consider making it yourself. Not only will you get exactly what you’re looking for, it’s a sure thing that no one else will be wearing the same dress as you.

Points for Originality

Even if you’re not a someone who designs her own patterns, making and wearing your own dress will definitely get you noticed. You’ll look stunning and you’ll be wearing something completely unique. In this day and age when everyone wants to be recognized for their personality and individual contributions, you’ll certainly earn points for wearing something stunning that you made yourself.

Your Choice

Rather than trying to find something that shows off your style, fits your budget and looks great on you from the limited selections in department store – making a dress yourself means you’ll be able to choose the style, fit and fabric that’s best for you. Show off your natural beauty with a dress that accents your coloring and body type.

Works for Formal Functions Too

Formal events like galas or weddings may not seem like that best opportunity to make your own dress, but it’s actually a great time to do so. Making a more formal dress may take a bit longer, but the results will amaze everyone. If you’ve never taken on something like this, trust me, it’s not as hard as you think!

There are some extra steps like creating the tulle under layer(s), feeding the whale bone (plastic) bodice pieces and/or adding lace or other details. Although these seem intimidating, anyone with basic sewing skills can do them – you just have to be willing to try.

Show It Off

Show It OffAfter all the hard work you put in to making your amazing dress, show it off at the big event. Get up, dance, strut your stuff to and from the buffet table, and when people start complimenting you on your attire, don’t be afraid to say you made it. Although you don’t want to overshadow the guest of honor (unless it’s you, of course) there’s nothing wrong with showing off your finery.

If you can, add some handmade accessories to complete the look. Items like hand made, one-of-a-kind jewelry, scarves or shawls will give your dress the final splash and pizazz it needs. If you don’t make any of these items yourself, maybe you’ve got some crafty friends who do and would like to contribute to your amazing look.

Remember

A few points to remember:

  1. Hem with shoes in mind. If you’re wearing heals to the big event, make sure you have those shoes on when determining hem length so the dress will fall correctly.
  2. Event location. If the event is going to be indoors or outdoors, you may need incorporate layers or a cover up depending on the time of year and your sensitivity to cold/heat.
  3. Make a muslin first. If you’re at all unsure about the dress you’re going to make – how well it’ll fit or will look on you – take the time to make a muslin demo piece first. It does extend the length of time it takes you to arrive at the finished product, but it can also mean the difference between a project you love and one you don’t.