Miter Me This

Miter Me This

One of the alterations I did last week for the television show Blindspot was lengthening the sleeves on a woman’s suit jacket for one of our actresses – a straight-forward and fairly simple task.

Or so it should be

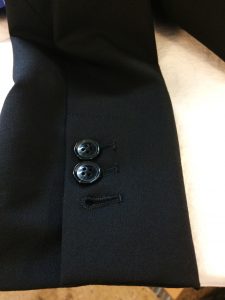
Functional, cut buttonhole, unless you need to lengthen the sleeve.

Functional, cut buttonhole, unless you need to lengthen the sleeve.

This time, though, the alteration gods (and the clever designers at Banana Republic) were against me. The suit jacket had cut, functional buttonholes (three of them) on the sleeves. Not that big of a problem. I just needed to lengthen the sleeves 3/4″ and could get away with leaving the buttonholes as they were as the first hole was only an inch and ¼ from the hem.

No biggie

So, no big deal, I could still re-miter the corner 3/4″ below the original hem and not have to mess with the buttonholes. I might have to cut some of the seam allowance free from the bottom hole but it shouldn’t matter. I would still have enough fabric to do the miter properly.

I pulled both sleeves inside out to find the one with the top stitched opening. Women’s jackets normally just have one sleeve with the lining opening and the entire thing can be pulled through that hole and inside out. This is because, in most cases, the armhole lining isn’t attached all around the seam allowance as it is in men’s suit jackets.

I pulled my two sleeves inside out through the opening and started taking the hem apart. Much to my annoyance, I discovered that the miter corner had been trimmed so it was impossible to redo the miter at a longer length. I also needed to add more seam allowance to be able to lengthen the sleeve the amount I needed.

Take a step back

A simple alteration just got a bit more tedious. First, I dug into my fabric stash to find a wool similar to that of the jacket. In this particular case, the jacket I was working on was a dark brown and black tweed. The jacket was paired with black wool pants so I decided I could get away with using a black wool for my corner and added seam allowance.

I cut two pieces of black wool 2″ wide ( ¾+ ¾+ ¼ for each seam allowance. you need ¾ twice because you need the length for both the lining and the face fabrics) and 10″ long (this length doesn’t matter except it needs to be longer than the sleeve hem) on the bias (or diagonal). I also cut an addition 2″ wide by 6″ long bias piece for the corners.

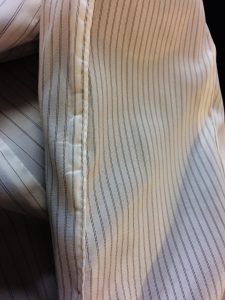
Sleeve lining with topstitched seam (open up from here and pull everything through).

Sleeve lining with topstitched seam (open up from here and pull everything through).

The next thing to do after opening the entire sleeve hem up (don’t press, you’ll want to see the original seam creases) is to sew the black wool to the miter edge. Follow the stitching line from the original miter and make sure to leave additional fabric on both ends. Then, open the sleeve hem up so you can see the straight angles of the bottom and side edges. Draw straight lines to connect those edges, then trim.

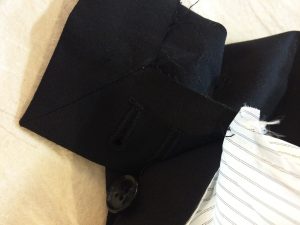
The mitered corner.

The mitered corner.

Next, attach the 2″ piece to hem edge and trim any excess off the ends. At this point, I redraw my miter line. Measure down ¾ from the original hemline exactly on the fold line – that’s your cross line for miter. Use your old miter line as a guide for the proper angle. Sew the miter, press, and turn. Don’t cut. I use a wooden tailor point pressing block, a simple point turner, and generous steam.


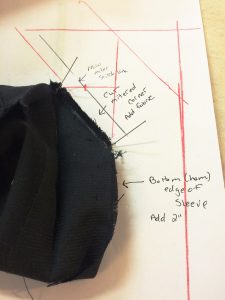
Diagram on where to add fabric and redraw miter seam line.

Diagram on where to add fabric and redraw miter seam line.

Wash, rinse, repeat

Mark the ¾ down on the un-mitered corner and any sleeve underarm seams into your fabric extension so that you can match up the lining properly. Then, pin together your hem edges and sides. Sew. Repeat for the other sleeve, turn everything back right side out, and sew the opening closed in the sleeve lining.
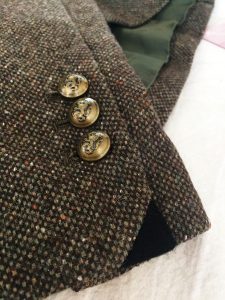
The finished contrasting corner miter: (note: the suit jacket will be worn with black pants so the corner coordinates nicely).

The finished contrasting corner miter: (note: the suit jacket will be worn with black pants so the corner coordinates nicely).

Done. I now have a jacket with a cool little detail. Most people probably won’t notice it but if you happen to watch Blindspot and see it, let me know! I like it and my designer and actress like it, if only for the reason that the sleeves are the proper length.

Sewing Machine Needles 101

Machine Needles

When I first started sewing, broken needles were part of my learning curve. This wasn’t necessary, but I had no one guiding me, and I learned as I sewed. I could have learned to sew without all that trial and error if I only had a basic education on the types and thicknesses of machine needles and their uses.

You’ll save yourself more trouble than just the inconvenience of changing a broken needle by using the right needle for each project that you sew. Your thread could break or shred, and seams could pucker or be otherwise unseemly. No pun intended. You can also mess up the machine’s timing or damage the bobbin hook. All of which would require repair.

Of course this is all true and I promise you don’t want to have to stop sewing and wait for machine repair. To save you the troubles of any broken machines, stitches, or needles, allow me to share this short lesson:

Sewing Machine Needles 101

Now you will know which machine needles to buy and what kind to put on your machine for every project you sew.

The short answer is to buy and keep stocked a variety, because you’ll need to use different sizes and types for different projects and fabrics.

Another rule to live by is to change out your needle with every project. At least be in the habit of considering this between every project. Sometimes when working on a string of small or similar projects, you might take a look at the needle to make certain it is still straight and true, and then decide to keep it for the next project too. Definitely change any needle after sewing with it for six or eight hours max.

Sewing Machine Needles: Types

Machine needles are classified according to their point type and by their gauge, or thickness. The fabric or project determines the needle gauge. While classification and types of fabric is another post, they can be broadly classified into two main types: woven and knit fabrics. Because these two types of fabrics are produced by different means, they require different types of needles.

Universal, or Regular Point Sewing Machine Needles

Use these pointy, sharp, regular machine needles to sew woven fabrics. They come in a wide array of sizes, and different fabrics and projects will need different sizes. We’ll look at needle sizes further on in this post.

Ball Point Needles

Also known as jersey needles, these have a rounded tip. Use them for sewing fabrics that are knit. These also come in various sizes. Knits include stretchy knits in varying thicknesses, and also non stretchy knits such as terry toweling. For the stretchier knits, try a stretch needle instead.

Stretch Needles

For some super stretchy fabrics like Lycra, even a ball point needle will still be prone to skipping stitches. I also find a stretch needle to be the key to working with fleece. For these difficult fabrics, a stretch needle will make the difference in being able to pull your project off well.

Wedge Needles

Used for sewing leather and vinyl, wedge needles are designed for piercing holes into these fabrics which will close in on themselves, minimizing the risk of tearing of these special fabrics.

Specialty Sewing Machine Needles

While one of the major needle types listed above will work for most every sewing project, there are many special uses for which your project might benefit by you using one of these specialty needle types, instead:

  • Jeans needles have sharp tips and strong shafts for sewing heavier fabrics
  • Embroidery needles have larger eyes to avoid breakage or damage of specialty threads
  • Topstitching needles work with heavier threads, or even with multiple threads
  • Quilting needles have tapered points and extra strong shafts for sewing through multiple layers
  • Sharps, or Microtex needles, which are even sharper and thinner than universal points and ideal for sewing on fine fabrics or cottons with a high thread count; these work great for appliqué and piecing
  • Metallics needles have teflon coated eyes, for sewing with metallic threads; other needles ravel and damage metallic threads.
  • Twin Needles, which can be universal, ballpoint, or other needle types

Sewing Machine Needles: Sizes

The thinner the material you are sewing, the thinner gauge needle you need. Heavy fabrics, or thicker projects will need thicker gauge needles. Both regular-point and ball-point needles come in sizes ranging from the thin size 8, to heavy 16 gauge and even heavy-duty sizes up to 19.

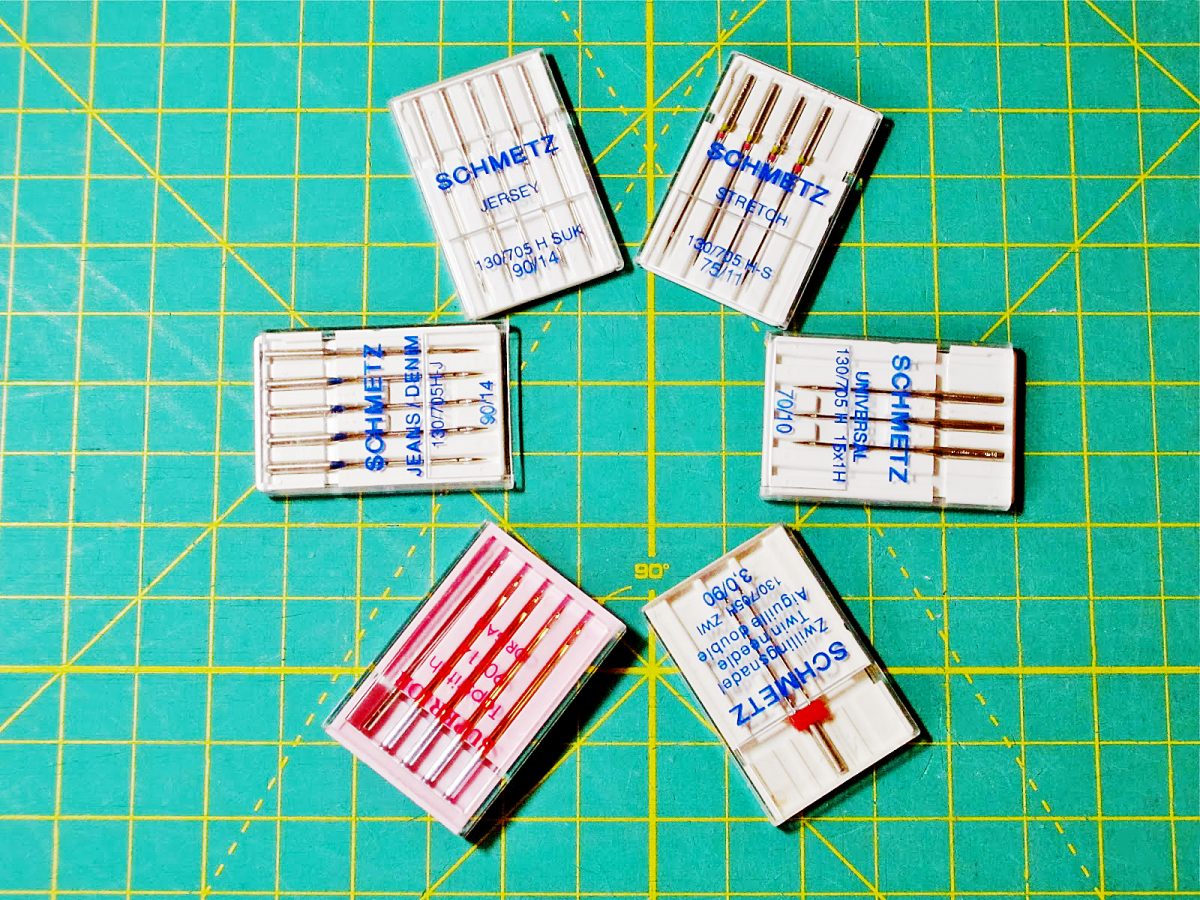
You will sometimes see these needle sizes labeled by gauge and also by needle diameter. So a size 9 gauge needle will sometimes be labeled as size 70/9; size 11 might say 80/11; then there are sizes 90/14, 100/16 and 110/18. The larger numbers refer to the needle’s thickness, in millimeters. US measurements are by gauge, European measurements use diameter.

So which size needle should you choose for which fabric? Here are my choices for the sizes you will use most often and on what fabrics and projects:

Size 9 (European 70) – Use these for sewing sheers and the finest fabrics, such as lace and chiffon.

Size 11 (European 80) – Use these with light-weight fabrics such as silk, muslin, and calicoes.

Size 14 (European 90) – Choose when sewing medium-weight fabrics such as rayon, gabardine, satin, chino, linen, denim; thick quilts. Use ballpoint size 14 for light to medium-weight knits such as tricot or jersey.

Size 16 (European 100) – Sew with a size 16 needle when using medium to heavy-weight fabrics such as: wool or wool blends, canvas, cotton duck, sailcloth, or upholstery fabric, and on thicker projects such as purses.

Size 18 (European 110) – Use these for construction of quilted bags, sewing on nylon web, and other heavy-duty projects.

Here is a helpful chart from Schmetz for further reference.

Be sure to stock needles in all these sizes and in several types so that you are always ready to sew.

Christmas Sewing Projects

Christmas is fast approaching.

Christmas is fast approaching.

Christmas is fast approaching. Thankfully, there’s still time to sew special Christmas decorations or gifts. With so many Christmas themed fabrics to choose from, it may be hard to decide which one(s) you want for your project, but with so many projects, you won’t have to narrow it down too much.

Christmas Tree Skirt Sewing Project

This 50.5” x 50.5” square Christmas tree skirt is easy to make and uses multiple fabrics to create a look that suits any home. Basic quilting skills are necessary as is a template to use for the center circle. An inverted bowl works well. You can make it from fabric scraps and by using washable materials, it’s easy to clean. The red ties in the back are cute and ensure the skirt isn’t pulled off by pets or kids.

Christmas Tree Ornament Project

If love hand sewing, this cute hot cocoa mug ornament is a perfect way to add some whimsy to your tree. The pattern ensures accurate placement of the faces on the mug and marshmallows. You will need to know how to make a French knot for the eyes. If you’ve got felt scraps, you may be able to use those for the bulk of this adorable Christmas sewing project.

Christmas Stocking Sewing Project

Christmas isn’t complete without “stocking hung by the chimney with care.” With this easy Christmas stocking pattern, you can make individualized stockings for everyone in your family. The large size makes it the ideal stocking for creative stocking stuffer gifts and depending on your choice of fabrics, it’s entirely washable. Choose different colors or patterns for each person in your family to personalize the stockings.

Christmas Tree Angel

There’s something about angels…they belong adorning a Christmas tree. This sweet ribbon angel adds a touch of class to any tree. Use different colored ribbons to make each angel a little different. Sewing is optional with this project, but it’s a great opportunity to use some of the wide ribbon you’ve got sitting around from previous projects.

Christmas Garland Sewing Project

Garland doesn’t have to be tinsel and shine. This adorable garland adds Christmas cheer with rows of fabric Christmas trees. You can either use bits of fabric from your stash or buy remnants from your local fabric shop. This is a great project to do with kids! Their small fingers are great for everting and stuffing the little trees. The number of trees you make will depend on the length you want for the finished garland. A coordinating ribbon completes the project. Use it to decorate your tree or string across a doorway.

What other Christmas sewing projects do you enjoy? If you try any of these, please share the results! I’d love to see them.