How to Sew a Luck O’ the Irish Flag Quilt for Your Wall

VIDEO: How to Sew a Luck O’ the Irish Flag Quilt for Your Wall

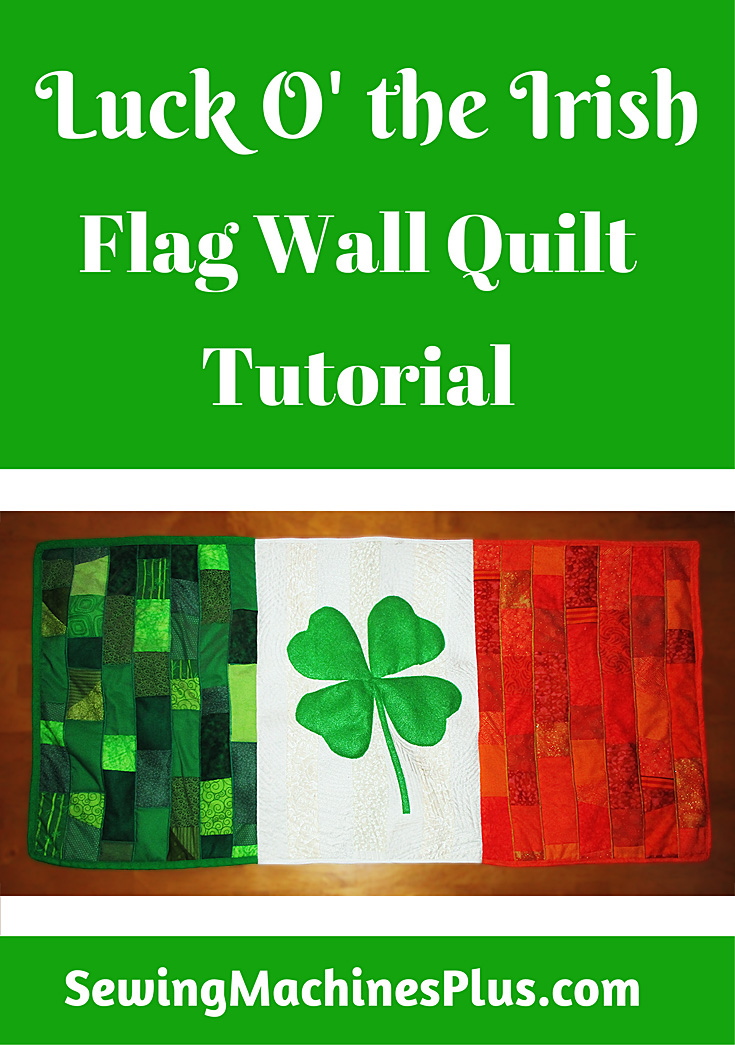
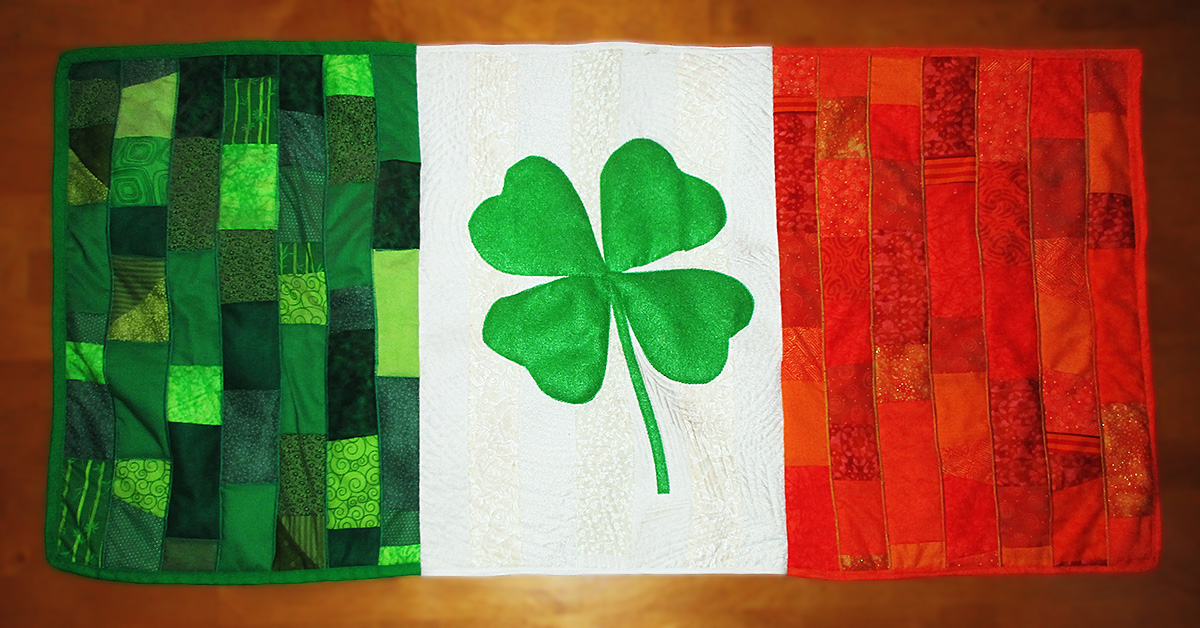
Celebrate St. Patrick’s Day or your heritage with an Irish flag quilt

Luck O' the Irish PIN

We always celebrate St. Patrick’s Day around my house because my dear is a bit obsessed with Ireland. He claims to be Irish, although his parents say his heritage is mostly English and Scottish. I guess he’s just Irish at heart.

So one year I decided to surprise him with a St Patrick’s Day present and I designed this Irish flag quilt for him. He loved it so much that he rearranged all the other décor in his man cave to give it a place of honor on the wall.

Of course the flag of Ireland does not feature a four-leaf clover, but I thought it would be a nice addition to the design.

Here’s how you can make an Irish flag quilt featuring a four-leaf clover for your wall or table, too.

Luck O’ the Irish flag quilt how-to

You will need:

  • Assorted green and orange quilter’s cotton scraps
  • White quilter’s cotton
  • Muslin
  • Green, white and orange bias binding, grosgrain or fabric to make binding
  • Green felt
  • White, green, and orange thread

Please note that this Irish flag quilt is designed to be the same ratio as the official flag of Ireland. So for an authentic look, use these exact dimensions when making this project.

Sew the patchwork sections

For the green and orange sections of this Irish flag quilt, you will need seven strips of muslin 2.5” x 20.5” per section. For the white section, you can do as I did and cut seven strips of white and off white quilter’s cotton, or you can do as I wish I’d done and simply cut one large rectangle 14.5” x 20.5”.

To make the patchwork strips, take one of the long muslin strips and lay a colored scrap right side up at the top of the strip. Then, take another scrap and place it right side down directly on top of the first scrap. Sew a quarter inch seam at the bottom, flip the second fabric down to face right side up, and press. Then repeat, placing the next scrap right side down atop the second, sewing across the bottom, turning, and pressing. Repeat until you reach the end of the strip. Place them right sides down and trim, then set aside.

Here’s a video of me showing how to do this step:

Complete seven green patchwork strips and join these together using quarter inch seams.

Then complete seven orange patchwork strips and join these in the same way.

For the middle section, I went with a patchwork of alternating white and off-white print strips. But I wish I had instead used a single piece of a plain white fabric or a white-on-white print. I think this would show off the echo quilting better. You could choose to do either.

Applique the four-leaf clover

I experimented with constructing the four-leaf clover from a patchwork of fabrics, but I decided it looked better done in a single color of green.

Make the clover from two pieces of green felt. Cut two leaves connected in the middle from each piece. You can freehand your design or you can print mine if you’d rather.

Download: Clover PDF pattern

For the stem, cut a long rectangle 9” x ½”

Layer the top end of the stem at the bottom with the two clover pieces crossed over each other on top of the stem in the middle of your white section. Pin in place and then stitch down. If you use felt, as I did, then you can use a straight stitch. If you use a green quilter’s cotton, you will want to appliqué this with a satin stitch.

Quilting

Because we are going to be using three colors of binding for this Irish flag quilt, we are going to quilt each section separately. Construct three “quilt sandwiches” by layering each section’s top over a piece of batting and then a piece of backing muslin. Make the batting and backing slightly larger all around than the top pieces.  Then pin.

For the orange and green sections, I quilted along the seams using a satin stitch. Satin stitch is just a zig zag with a wide width and a short length. I set my machine to a 3.0 width and a .5 length. This gives extra interest to this small quilt. Use green thread for the green section and orange thread for quilting the orange patchwork.

For the white section, we’ll do the quilting differently. Use white thread and echo the shape of the clover all around. Start close to the design and then make larger outlines. After you have gone around the shape a few times, you will start to run out of fabric on the edges of the design. Just pretend that you didn’t and pick back up on the fabric as the design continues around.

Triangles for hanging

Here is an easy method to prepare small quilts like this for hanging on a wall.

Cut two 4” squares from muslin and press them in half diagonally to make triangles.

Place one triangle on the back outer top corner of the green patchwork section with the raw edges aligned. Sew with a scant eighth inch seam along the top and side edges to attach.

Then do the same with the other triangle on the back upper outside corner of the orange patchwork section.

Once the quilt is assembled, you can insert a dowel into these triangles to hang the quilt flat on the wall.

Binding

We are going to bind each section separately so that we can use different colors of binding for each section. You will bind three sides of the green and orange sections and just the top and bottom of the white section.

When I made mine, I discovered at the last minute that I didn’t have any green binding. I’m all about using what I have, and I had plenty of green grosgrain ribbon, so I used this for the first time as quilt binding and it worked fine. If you have neither bias or grosgrain ribbon, make your own binding strips from fabric.

Sew the green binding continuously along the bottom, left side, and top of the green patchwork section. Sew the orange binding along the top, right side, and bottom of the orange patchwork section. Then sew two pieces of white binding on the white section, one along the top and another along the bottom.

Put it all together

Now sew the green section to the left side of the white section and the orange section to the right side of the white.

Now hang it on your wall.

Now hang it on your wall.

I used my serger to finish these seams neatly on the back.

If you don’t have a serger, you could use an overcast foot to neaten the back seams, or you could encase them in a bit of narrow binding.

Or you could decide that since it is the back of the quilt no one is looking and leave the seams raw if you want to.

The serger really makes them look nicely finished though, and if you don’t have a serger, I suggest you think about getting one. A serger can quickly boost your sewing to pro level.

Cut a dowel to 41” and pop it in the triangles on the back of your Irish flag quilt. Now hang it on your wall.

I hope you have fun making this project and that your Irish flag quilt blesses you with good luck!

Sewing Myths and Sewing Myth Myths

Sewing Myths and Sewing Myth Myths

This week, I decided I’d write a bit about popular sewing myths. I have my own list but thought I’d do a quick Google search to see what others had written about the subject. This brought me to a few sewing myth lists that I found rather odd, and not at all myth-like – meaning I thought the myths were myths. Do you follow me?

I’m going to start with some things I do believe are myths, and then get the myth myths part.

Myth 1: quilting direction

It’s ok to quilt some rows up and some rows down when quilting a garment.

Not true. There will be less possibility of bubbling or puffing if you quilt all the rows in the same direction. Overall, the whole garment will look better.

Myth 2: smaller underlining

The underlining should be smaller than the fashion fabric, especially on a jacket.

Not always true. It really depends on the fabrics being used. Hair canvas should be slightly smaller to prevent buckling but it will also restrict the give or stretch of a fabric it is joined with. Many tailors cut their canvas on the bias to prevent this.

Myth 3: cutting selvage edge

Always cut off the selvage edge.

Not true. If you think the selvage will shrink, clip the edges so it will lie flat. Otherwise, there is no need to cut it off.

Myth 4: basting stitches

Stitch next to basting stitches when sewing a basted seam lines.

Not true. If you do have the need to baste seams together, always sew right on top of the basted lines for accuracy.

Myth 5: necklines

Machine stay stitch necklines to prevent stretching.

Another, more accurate way to prevent any stretching in your necklines (and arms eyes) is to leave a whole bunch of seam allowance until you’ve done your stay stitching.

Another, more accurate way to prevent any stretching in your necklines (and arms eyes) is to leave a whole bunch of seam allowance until you’ve done your stay stitching.

Not always true. You can also hand baste your seam line, also called thread tracing. If you do machine stitch your necklines, take special care not to stretch the fabric as you sew. Another, more accurate way to prevent any stretching in your necklines (and arms eyes) is to leave a whole bunch of seam allowance until you’ve done your stay stitching. When it comes to necklines, I usually cut a straight line from shoulder seam to shoulder, leaving all the extra fabric there. If I’m bias binding the neck edge, I attach my bias without trimming anything away too. This prevents any possibility of the neckline stretching.

Myth 6: top = waistline

The top of your pants or skirt is your waistline.

Very often not true. Your waistline is where your body is the smallest, most times an inch or so above your navel. This is why, often, when you measure a pair of pants that is sized as a 27, the waistband of the pants measures more than 27.

And now, for a few sewing myth myths.

Myth myth 1: $ewing cost too much

Sewing is too expensive.

This really depends on how you look at. Sewing is not necessarily expensive but it isn’t cheap either. Especially, most especially, if you are taking into account your time. I earn my living by sewing. And my years of experience and knowledge aren’t cheap. Sewing is a skill. I always ask people what they pay their car mechanic or plumber an hour. Often, it’s somewhere in the 60 to 100 dollar and hour range. If you don’t want to pay that amount of money, you figure out how to do it yourself. The same goes for sewing.

If you’re making something for yourself or as a gift out of love then it could possibly be cheaper than buying the same thing. But remember, nice high-end fabric and supplies are not cheap, nor should they be. If you want cheap, buy clothing made in Malaysia or Bangladesh sold at Old Navy or someplace like that.

Myth myth 2: sewing is the hardest

Sewing is too hard.

Well isn’t not exactly easy, either. To sew really well takes practice. I find it incredibly annoying when someone says something like, “It’s just an easy alteration, it won’t take long.” If you don’t sew, how do you know? And if you do sew, you should know that sometimes you open a thing up to do what should be an easy alteration and find you’ve just taken the lid off a proverbial can of worms.

Myth myth 3: sewing super powers

Sewers have special creative talents.

I believe everyone, if they put their mind to it, can learn how to sew. But saying that sewers (I actually hate that word) do not have special creative talent is ridiculous. I think I’ve said this before, but really good tailors and pattern makers know the language of fabric. I don’t know how else to put it. And that, is indeed, a special talent.

Must Have Sewing Notions and Supplies

Must Have Sewing Notions and Supplies

Last week, I told you about my dream sewing room furniture. This week, I want to share with you my must have sewing supplies. And no, I don’t actually own all of them since I don’t yet have that dream sewing room. Call this my dream sewing supplies list, I guess.

Must Have Sewing Notions and Supplies

Dress Form

I adore making cute summer sundresses. Right now, I measure myself, cut along what I hope are the right lines in the pattern and hem it by hanging the dress on closet hanger. Not ideal, but so far at least, they’ve all come out fine. I’d love a dress form though so I could check the fit and make minor tweaks and modifications as I go. I’m kind of between dress form sizes right now, so I’d have to make a call on which size to get – or if money was really no object, just get both!

Amazing Sewing Scissors

Alright, so I do have a pair of fabric scissors. I couldn’t consider myself a sewer if I didn’t. But I don’t love them. The handles are hard plastic and someone (not naming any names) used them to cut paper at some point, which kind of screwed up the cutting surface. I’d really love a pair of fabric scissors with a softer handle, especially since breaking my right hand last year. Even better, the ones I linked to have a purple handle! That’s my favorite color. Definitely on my sewing supplies wish list.

How about you?

Long Ruler

I don’t necessarily need to cut long, straight lines making sundresses, but I do need to measure long stretches of fabric to line up pattern pieces. Right now, I use a soft measuring tape. I pin it down on one side and pull it taut to measure. It’s not ideal, but it gets the job done. A yard stick or long ruler would go a long way towards making measuring easier.

What’s on your sewing supplies wish list? Sewing Machines Plus probably has it! Check out the website and let yourself dream.