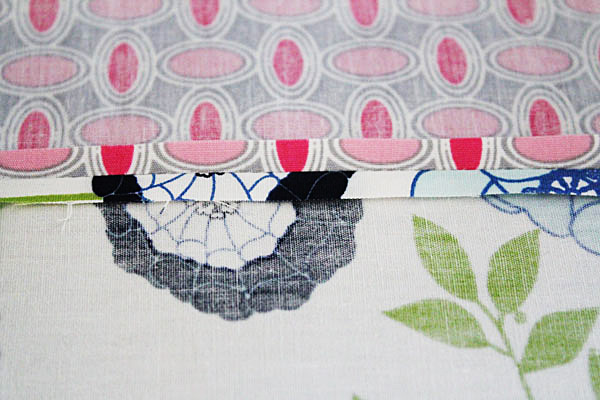
I should be honest however, and not call cat fabric a trend because our love for cats will never go away. To prove this, here are more cat fabric lines for you, including fabrics with things cats love.
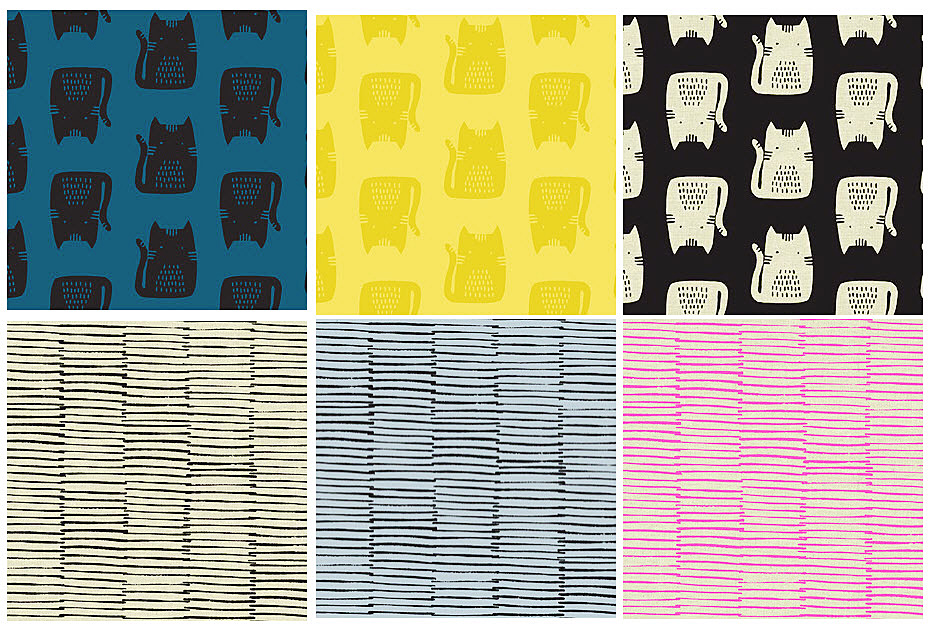
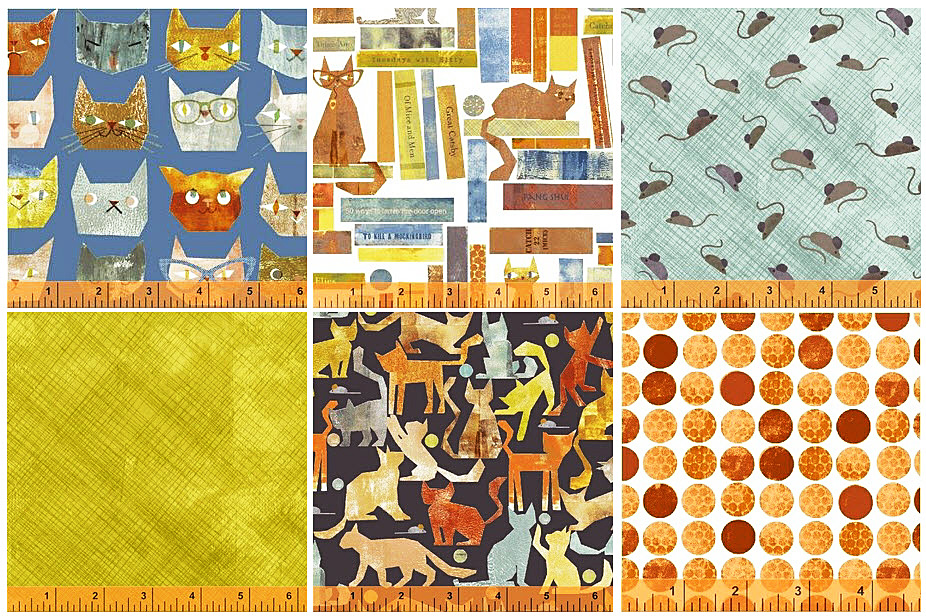
Maker Maker by Andover Fabrics
From Andover Fabrics, you’ll find cats in blue, black and yellow. Along with their coordinating cat scratches.
From Andover Fabrics, you’ll find cats in blue, black and yellow.
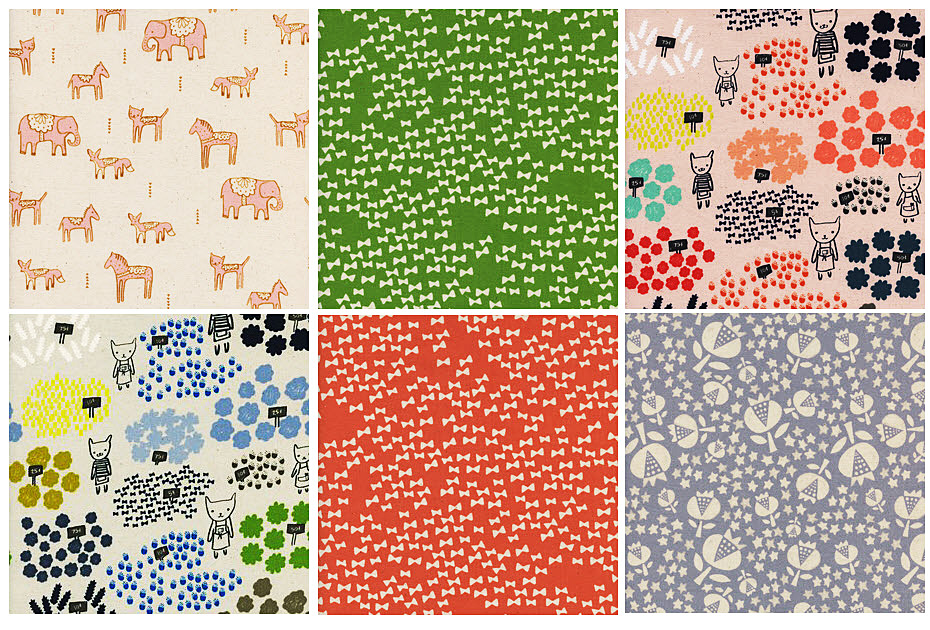
Flower Shop by Alexia Marcelle Abegg
Inspired by walks through Mexico’s outdoor flower markets, Flower Shop brings you cats amongst flowers, bow ties, thistle, and cats with foxes, elephants & donkeys.
Flower Shop brings you cats amongst flowers, bow ties, thistle, and cats with foxes, elephants & donkeys.
Smarty Cats by Maria Carluccio
Maria Carluccio’s Smarty Cats fabric line is for the true lover of traditional fabrics and traditional cats. You’ve got cats on books, playful cats, smarty cats, and mice, string and balls.
Maria Carluccio’s Smarty Cats fabric line is for the true lover of traditional fabrics & traditional cats.
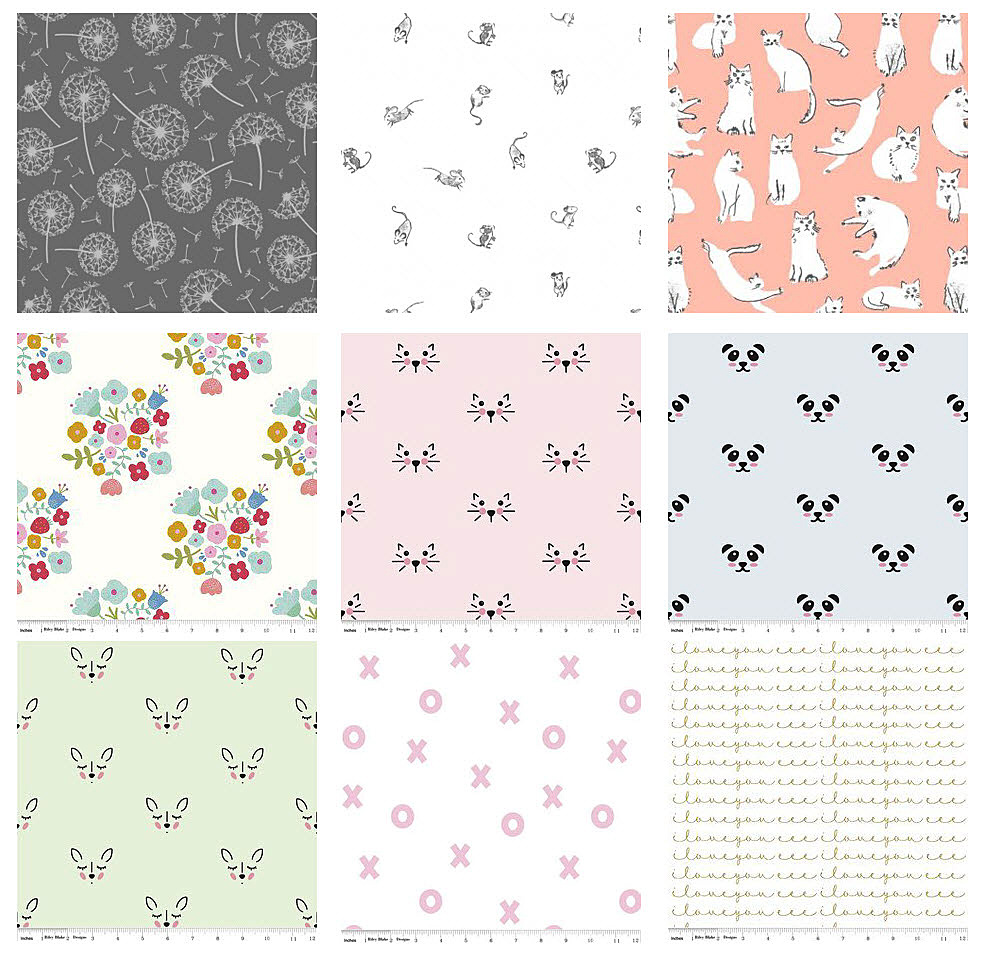
Whisper by Dear Stella and Riley Blake’s Double Gauze
These two fabric lines seem to coordinate seamlessly. Add a dash of Dear Stella with Riley Blake and you have the quilting cottons of Dear Stella on the top row in cats, mice, and dandelions, and the double gauze dreaminess of Riley Blake, featuring delicate cat, deer, and panda faces, with tiny Xs and Os and I Love You’s.
These two fabric lines seem to coordinate seamlessly.
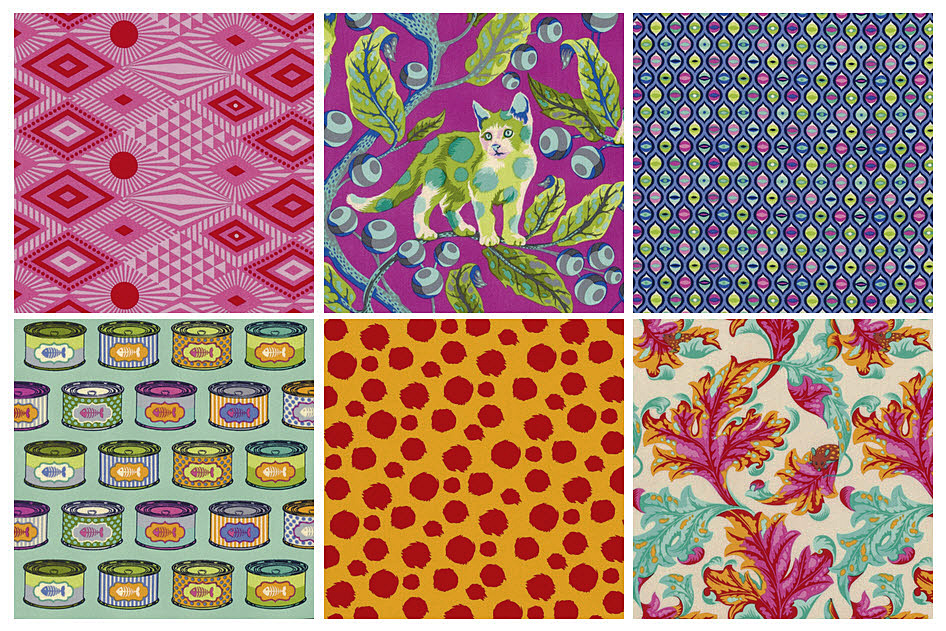
Tabby Road by Tula Pink
Tula Pink takes their coolness to the next level by combining cats + The Beatles. This psychedelic fabric line will arrive in most stores by March and perfectly blends your feline friends with the some of the trippiest nods to Abbey Road. Fabric names include: Tangerine, Strawberry Fields, Fur ball, Lucy, Cat Snacks, Blue Bird and Disco Kitty.
Tula Pink takes their coolness to the next level by combining cats + The Beatles.
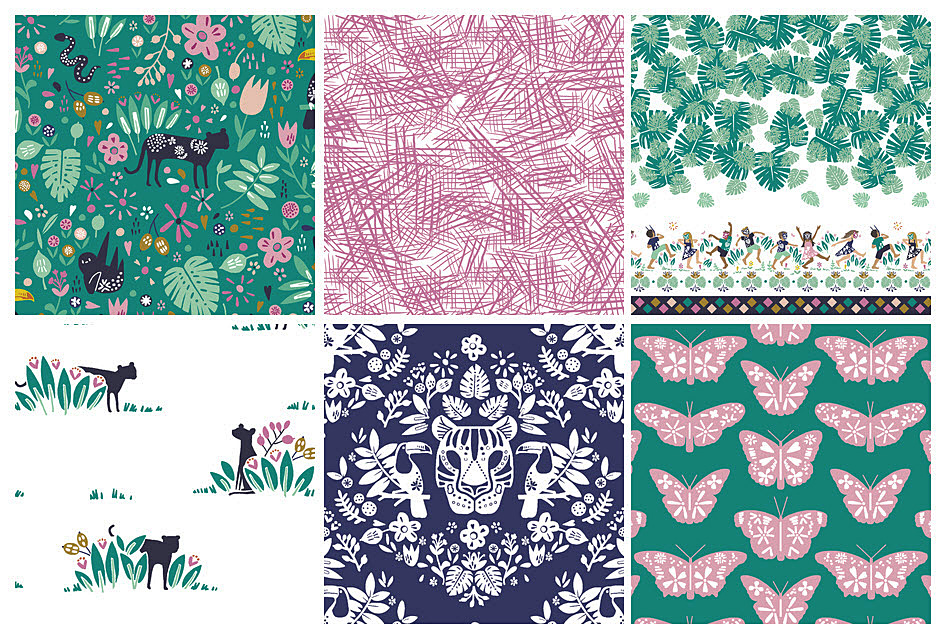
Pura Vida by Hawthorne Threads
Hawthorne Threads Pura Vida line is reminiscent of a Central American jungle and features wild cats and their surroundings.
Hawthorne Threads Pura Vida line is reminiscent of a Central American jungle & features wild cats.
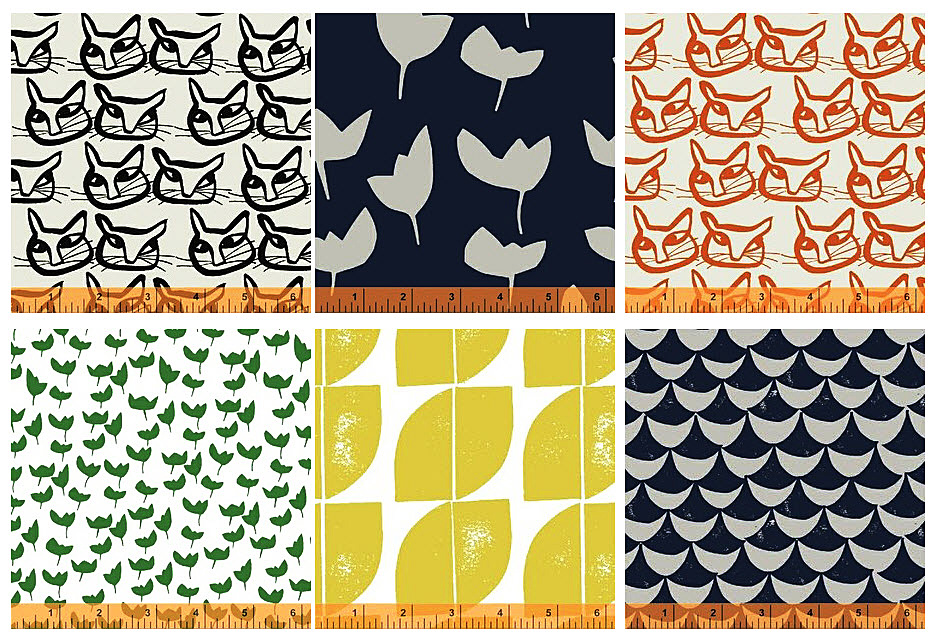
Hemma by Lotta Jansdotter
For the lovers of all things Scandinavian, Lotta Jansdotter fabric line, Hemma, combines cat faces, tulips, lemons, half-moons, and clean & classic colors to give you a modern twist on cat fabric.
For the lovers of all things Scandinavian, Lotta Jansdotter fabric line, Hemma.
Do you have any cat fabric lines you love? Please share them with us in comments!
———————————————————————————– Charlotte Kaufman is a writer and sewist in Mammoth Lakes, California. She specializes in marine and home interiors and continues to fall more and more in love with quilting. You can follow her at charlottekaufman.com.
Once upon a time, I had an extended conversation (argument?) with a friend as we — as adults — threw all of our cards on the table in regard to the matter of who had it worse: Pluto or Goofy.
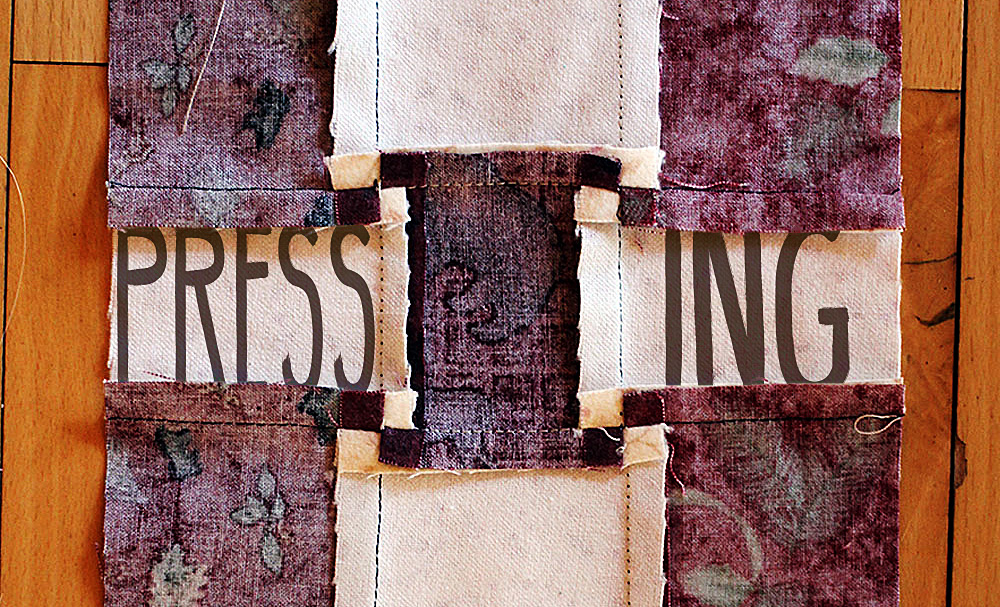
The point of referencing this conversation is that sometimes some of the smallest details can be points of major debate, and that idea is as true in the sewing world as it is for preferred cartoon characters. For instance, pressing your seams while sewing is a common thing, but there are two methods that are seemingly at odds among seam-pressers: side pressing and open pressing. It’s a small detail, but both sides have very real support! Don’t believe me? Do some Googling!
Some of the smallest details can be points of major debate.
I’m not sure I personally lean too heavily in either direction, so let’s go through them and see if we can come up with a winning method! The competition will be based on a point-gained system, and it will include the understood sewing project of a quilt for reference. Sound good? Then let’s go!
Let us begin
How about we start with the to-the-side method?
How about we start with the to-the-side method? One advantage would be that it’s easier to push the material to a single side for ironing than to force the pieces apart and iron openly. That’s something that, to me, a general consideration of the matter would support. You don’t have to hold both pieces of fabric in separate places like you might with the open method, so one point for side pressing!
Another benefit would be that, as a certain source pointed out, open pressing would logically weaken your product. With that technique, you would have an easier time seeing your stitches after the pressing because there isn’t that barrier of fabric to snuggly nestle them. Stitches are more protected with material covering them, and with the effort you put into your quilt, simple things to keep it intact are good! So, two points for the to-the-side notion!
One nice aspect about pressing to the sides is once you start pinning it’s much simpler than pinning fabric pressed in the open fashion.
One other aspect about pressing to the sides is that, should you need to pin things following the pressing, doing so is much simpler than if you attempt it once it’s been pressed in the open fashion. Since I’ve been known to take a straight pin to the finger anyway, this advantage seems very tempting! Side pressing 3, open pressing 0!
Let’s open up
The open method isn’t altogether a bad idea.
But, then again, the open method isn’t altogether a bad idea. For one thing, you don’t have to concern yourself with what direction you’re pressing your material. There’s no need to go back and see how you pressed a nearby seam because you can just assume it was open, like the rest. The uniformity is already there without having to come up with a pattern. Point one for the open strategy, then!
Another detail worth mentioning about this open approach is that you might find that you have a less lumpy final product. Again, this is logical. If you press your material to the right, then on the right, you have both sides of the seam and the fabric it’s laying against. That situation makes for three layers of fabric on the right for every pressed seam (not including batting and backing) while the left side — the one you pressed away from — would only have one. And that’s not counting places where your seams would overlap with other seams. Now, of course, the open approach doesn’t make everything equal across the quilt as not every piece of overlying material would have a seam pressed behind it. Still, for the areas where those seams would be present, having two pieces of material on one side and two on the other would be a more balanced situation and could lead to a smoother quilt (though as one source pointed out, “smooth” might not be your goal). So, one more point for this method!
The open approach doesn’t make everything equal across the quilt as not every piece of overlying material would have a seam pressed behind it.
An additional benefit of open pressing is that it’s more convenient when dealing with different colors of fabric, particularly if you’re pairing a dark one with a light one. If you press them to the side, there’s the chance that you’ll end up seeing darker fabric through a lighter one if you don’t plan and choose the correct side to press to. If you’re pressing them openly though, each color could be behind its own pattern, potentially hiding your dark fabric behind the same type of dark fabric. Seeing as how noticing a different pattern through the top of your quilt might not be aesthetically pleasing, I think the open method gets one more point in this contest!
And the winner is…
That makes the score three-to-three. So, what’s the tiebreaker?
Preference! I can toss all kinds of facts and details at you, but in the end, your quilt is, in fact, yours! Work with what makes you feel the most comfortable for these aspects. For some people, habit might lead the way. For others, it might be a logical deduction of what seems best. In the end though, there’s not an across-the-board right or wrong answer to this dilemma. Either/or, sometimes this one and sometimes that one… Sewing is a world of opportunity, and this small factor is one of the many to choose from!
I was thinking about all the things you can make with fabric. Depending on your sewing skills and your motivation, you could make just about anything your heart desires.
Let’s see. My first sewn article was a red twill skirt in high school. My efforts had very good intentions, but I remember getting frustrated when I could never use the “best” sewing machine in the classroom. I had to rush to finish it so the teacher gave me a “C” grade on it. I couldn’t believe I put the zipper in the back just perfectly. (I’m still scared of zippers, by the way). But the hem of the skirt was about 3 inches in the back and maybe and 1 inch in the front, and very irregular. That was long before the days of the high-low hem which arrived on the scene by stylish fashion designers in the twenty-first century. Oh my, I’m dating myself now.
I learned it from watching you
I watched my Mom sew clothes for me as child, so when I got off on my own, I asked my Dad for a sewing machine. I picked one out from Sears, a basic machine with a couple of stitches. I made a knit T shirt out of multi-striped material and fell in love with stretch fabrics.
My dad called it my “$150.00 T-shirt.” I knew he was thinking I would be done with sewing after finishing that comfy, wearable T-shirt. I proved him wrong.
I went on to make dresses, suits with vests, skirts with zippers, a strapless bathing suit, and other clothes that were worn with pride when I thought, “I did this- I made this jacket”.
So fast forward today, after several years of non-sewing, I have found my passion again with other types of articles. The last couple years, I have made quilts, bed runners, napkins, baby articles and even Korean Quilting called “Pojagi”.
And now for something completely different
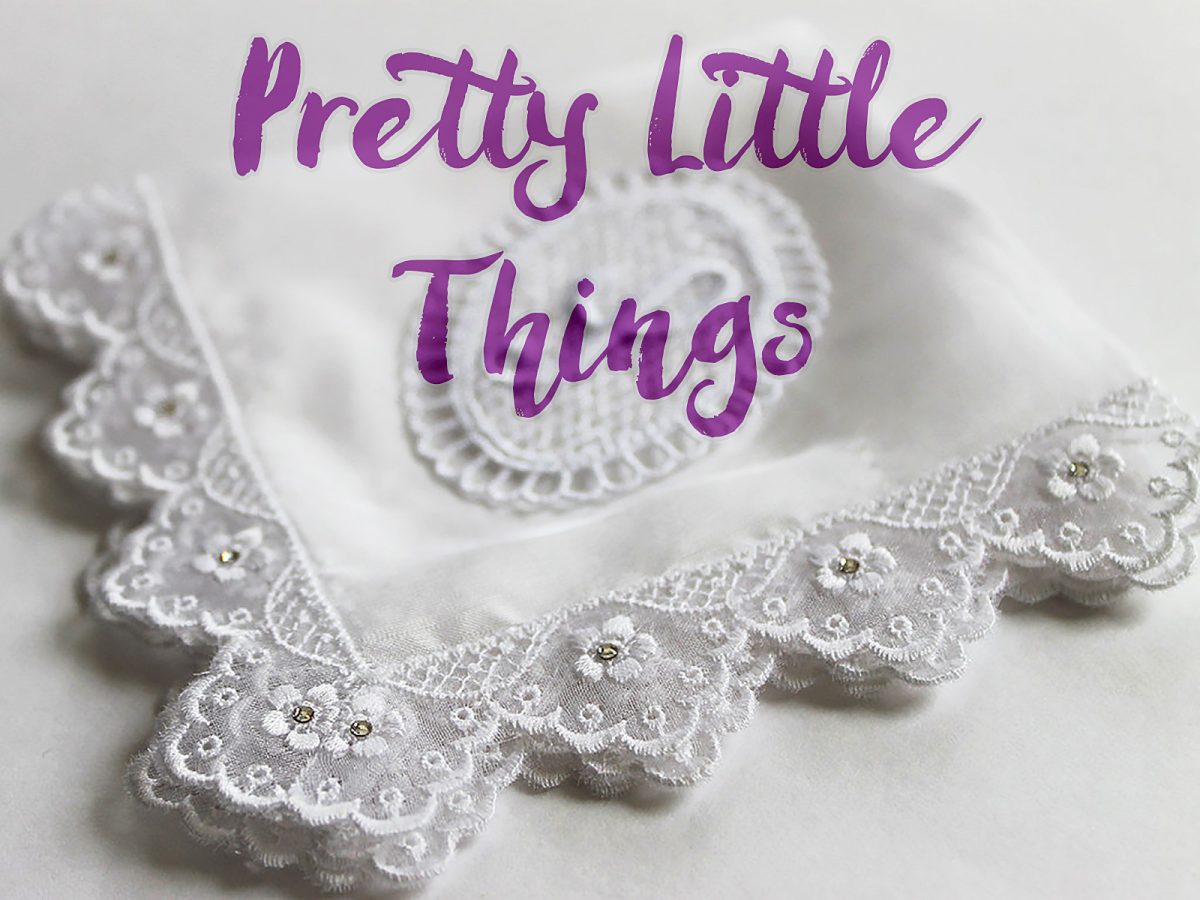
Today, I want to share with you my latest project. First off, I love the Victorian Era.
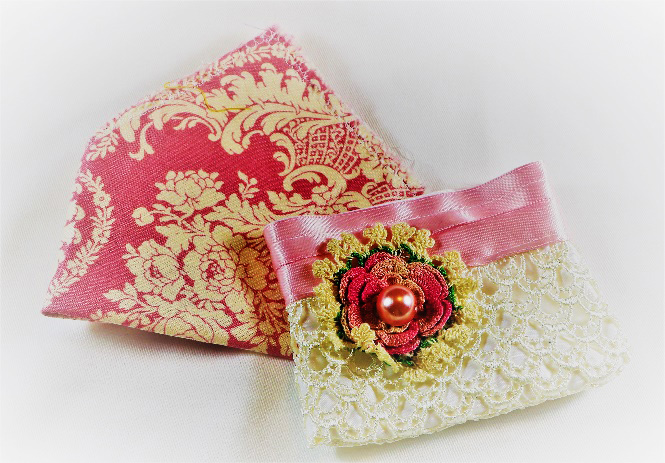
Laces, satins, silks and velvet. I have accumulated many boxes of vintage lace, ribbons, and trims and struggle to find ways to use them. So, I am trying to bring back something that were used by ladies of old. It is something that is considered vintage, or antique, but I still feel the idea is a good one. Many stores carry things similar like paper envelopes filled with lavender seeds, or other dried herbs, but I wanted to design something that was original to appeal to women who love frilly little things like me.
When I made these, I thought the Mother of the Bride & Groom may need the hankies to wipe away their tears during the wedding ceremony!
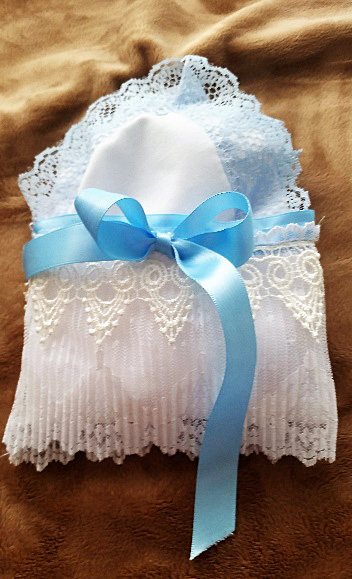
So, I designed a Handkerchief Sachet. The idea is to spray the handmade handkerchief with your favorite cologne or perfume, or fragrance oils. Place it in dresser drawers, on the bath counter top, or even your handbag, so you can enjoy your favorite scent as aromatherapy.
I thought these could be used as a keepsake bag for a special piece of jewelry, a lock of baby’s first haircut, or just a place for a tube of lipstick in your handbag. Just a little frill to enjoy & remember a special time or event.
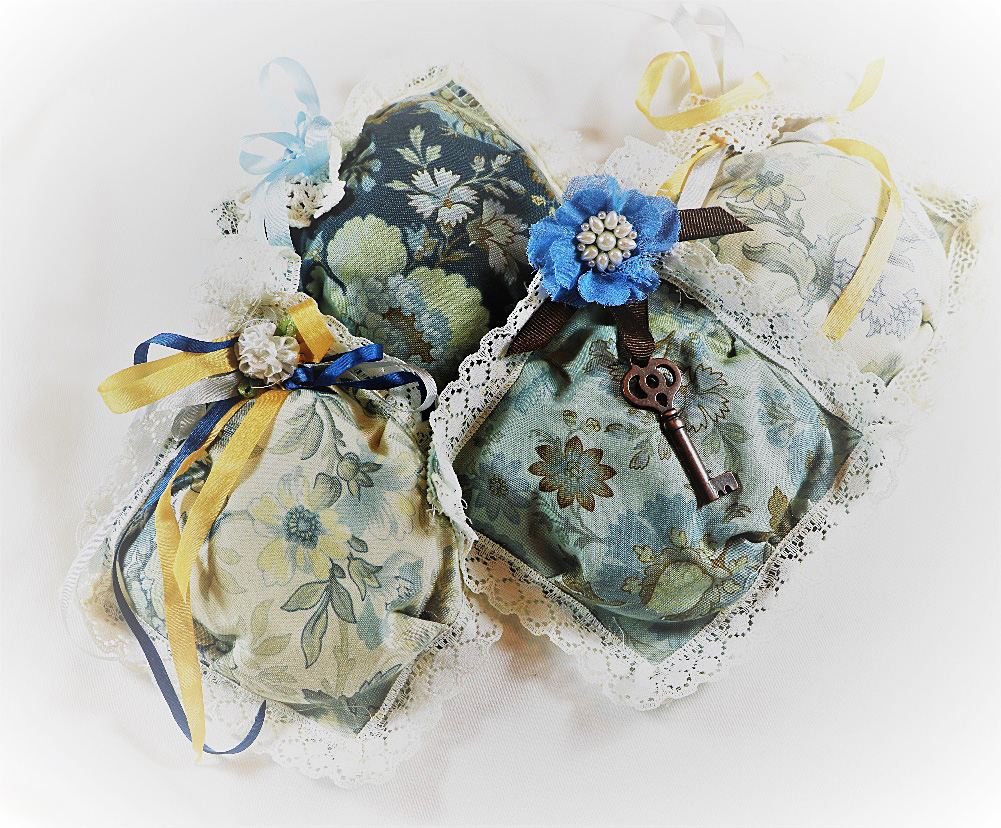
The last picture is the third set of sachets I made with 5” squares, lace, silk ribbon, and some metal vintage ornaments. These are stuffed with eco-friendly snow filling and will absorb your desired scent. Just respray when the scent fades and enjoy!
The last picture is the third set of sachets I made with 5” squares, lace, silk ribbon, & some metal vintage ornaments.
Whereas, the handkerchief can be washed if necessary if a change of scent is desired, these can also be utilized as a pin cushion in your sewing room. Who knows, you may fall in love with Victorian Vintage as I did.
All seams were sewn by machine except for adding flowers and ribbon, these items can be found at NaturaDomani on Etsy.
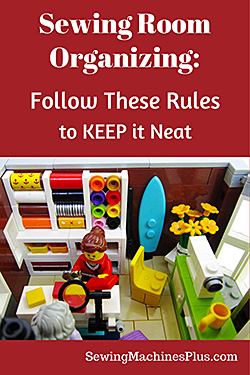
Sewing room organizing can be a constant battle. That’s because creative folks make lots of things, including what my dear calls “creative explosions.” I just call these big messes. You know what I mean: quilt trimmings & other scraps on the floor, piles of fabric or other supplies on the table, idea books scattered about, bins & boxes pulled out with their contents askew and similar messes.
I battled this kind of mess for years. But I seem to have finally developed the skill of keeping order in my creative room. For example, the days between Christmas and New Year have historically been sewing room organizing time for me. But last year after Christmas, I was surprised when I realized I didn’t have any sewing room organizing to do. In years past, I have worked busily making gifts, moving from one project to the next, and letting messes pile up around me until the holiday passed.
I can’t stand to do that anymore. Instead, I clean up thoroughly after every project, before moving to the next. Since learning to do this, and by vigilantly following a few other rules that I have discovered which help to ensure order, I have enjoyed my creative pursuits more than ever before. I think these sewing room organizing rules will help you, too, if you haven’t discovered them for yourself yet.
Whether you need to clean up after your own creative explosions or you want to prevent their occurrence in the first place, keep these rules in mind.
Sewing room organizing rule one: machines first
It might not sound like sewing room organizing, but the very first thing to do is to give all of your machines a thorough cleaning. This is the most important task in cleaning up messes in the sewing room.
If your floor is littered with threads and clippings, I guarantee your machines have similar build-up inside. And continuing to sew with a dirty machine will cause it to break! So get your chosen brush and sweep and clean every machine in your room really well.
It’s easy to miss a spot.
Keeping machines clean
For sewing machines, remove the bobbin casings and take particular care in cleaning out inside and behind these. For sergers, sweep out every nook and cranny. When you think you’ve gotten it clean, sweep it out again. It’s easy to miss multiple spots. You can spend a lot of time sweeping out a serger repeatedly, and still not get it completely clean. Unless you have a magic tool, that is. The best thing you can buy to ensure a longer life for your machines is a tiny vacuum attachment to help get them really clean.
Always cover your machines to prevent unnecessary build up of dirt or dust when these are not in use. If your machine did not come with a hardcover, you can sew a pretty one yourself.
After cleaning, oil your mechanical-only machines according to their user manuals. Don’t oil your computerized or electronic machines at home; take them to Sewing Machines Plus or your local repair shop for yearly maintenance. Go ahead and take them in now so this will be done. If you cannot be without them right now, schedule this on your calendar to be handled as soon as possible. If you neglect your machine maintenance you will regret it. For future reference, a good plan to avoid being without your machines when you need them is to send them out for maintenance while you are on vacation.
Sewing room organizing rules 2 & 3:
Have ample workspaces
Keep them clear
After your machines, the most important things to consider in sewing room organizing are your workspaces. It is not possible to work efficiently without ample space. If you are using more than one machine, such as a sewing machine, a serger and a coverstitch or embroidery machine, you need enough space to have them all set up. You also need table space for cutting and layout.
It is best to have the largest table that will comfortably fit in your room in order to provide ample space for working. I have a kitchen table in my room that I keep clear for cutting, and separate desks for my machines. I reconfigure machine placement depending on the project, however. When I am working on a bed sized quilt, I place my machine on the big table, so it can support the quilt. Having multiple workstations enables flexibility.
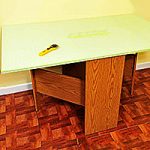
The Arrow Pixie cutting table doesn’t take up much space when folded compactly.
Keep tabletops clear.
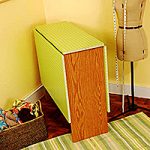
If your sewing room lacks enough space to house such a large table, Sewing Machines Plus has an excellent option for you to consider. The Arrow Pixie cutting table doesn’t take up much space when folded compactly, but opens to provide table space for both cutting and sewing. It even has measurement guides and comes with a cutting board. It’s super cute, too.
Keep tables clear!
Ample work space will do you no good if they are covered with unfinished projects, supplies, or irrelevant items. My favorite rule for making sure that my creative space stays organized and is always ready for working is to keep all work spaces clear. I do not allow myself to store any items on top of my table top or desks, other than machines, of course. But because I reconfigure my machine placement according to what I am working on, I prefer to store most of them, covered, on shelves.
This way, you can keep your table and desks clean and shining, waiting for you to make something new whenever it suits you.
Other rules to remember
There are several other rules that have helped me to keep my sewing room neat and organized. Following these rules will help to keep your room working well for you, too.
You can’t organize clutter; keep unnecessary items out of your room.
Be creative with storage. For example, to maximize working space in my sewing room, I use an antique wardrobe and chest of drawers in the next room. The beauty of these storage pieces blends nicely with my family room décor. These happily hold my fabric, trims and notions, and other less often used items, such as my looms. Here are some DIY projects for creative storage solutions which will work inside the sewing room.
Keep like things together. Rather than storing tools all over the place, use a bin or other storage solution to keep these neatly together. The same goes for thread, notions, and etc.
Let the fabric live at the store. I am no longer tempted by fabric clearance sales and refuse to buy fabric to stash. I have learned that stashed fabric steals time, space, and money, so I do not buy any without a particular project in mind. Pretty quilter cottons are the only exception I make to this rule, as I know for sure that I will put these to use. Be a savvy shopper and take advantage of sales for stocking items you must have and will use. For example, I only buy white and neutral thread, and also cotton batting, when it is on sale.
Finish what you start. It is easy to get excited about new projects, but for keeping order, it is much more sensible to complete each project before starting another.
Do you have any other useful rules for keeping order in your sewing room? If you do, please add a comment and share it with us.
Last week, I waxed on about all the endearing qualities of my Industrial Juki straight stitch machine and I promised that, next, I’d write a little bit about my other favorite sewing machine, a vintage tan and white Singer 401K.
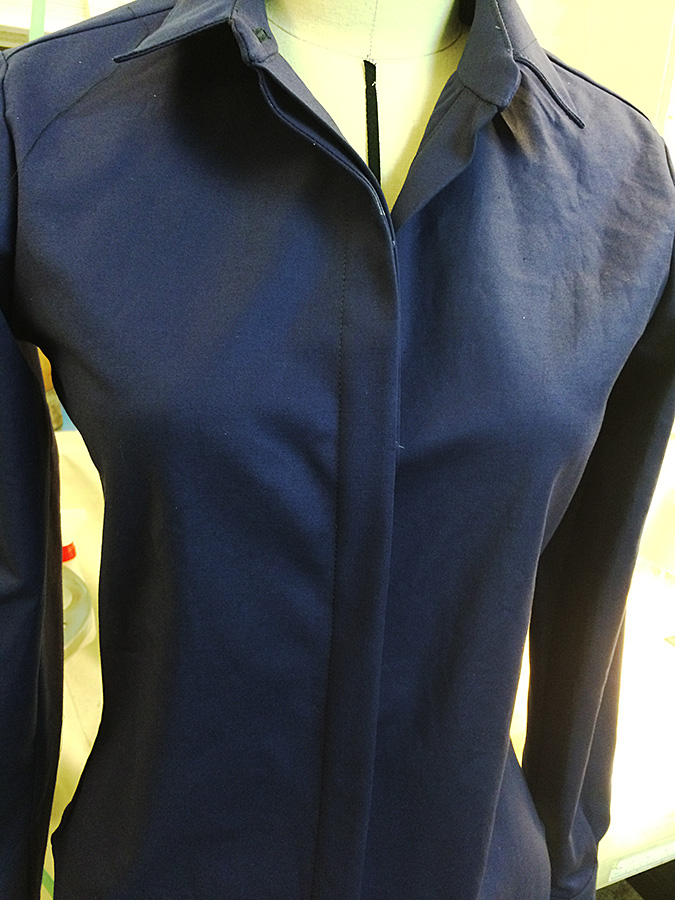
But then, this week at work, I spent a couple days making women’s button front cotton shirts for the character of Zapata on Blindspot. I’ve made her quite a few shirts over the course of this season. I created the pattern from her measurements and referencing how she liked the fit of a few off the rack shirts. She doesn’t fit into any brand without altering (she has a very small waist but is still curvy) so the costume designer and I decided we might as well make custom shirts for her.
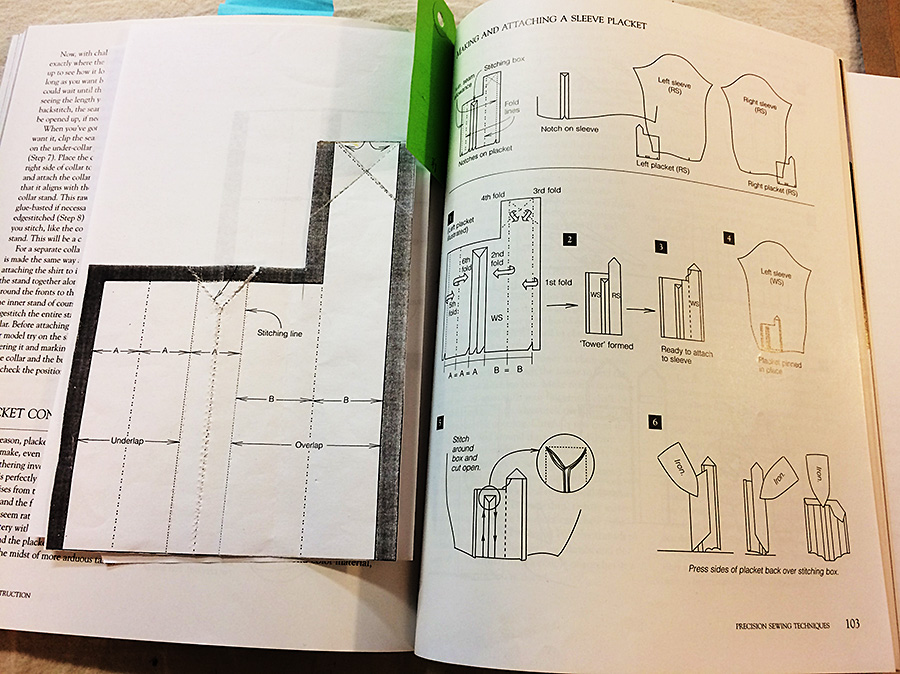
I am not, by any means, a master shirt-maker (those do exist like the man who wrote Shirtmaking, developing skills for fine sewing). His name is David Page Coffin and he is definitely a shirt-making master. His book is filled with many helpful tips and suggestions. I reference it now mainly for the sleeve placket instructions and pattern. For some reason, no matter how many times I make a shirt, I always need a little reminder as to which way to begin a proper sleeve placket attachment.
Sleeve placket instructions from David Page Coffin’s book.
Never feel bad if you need to look something up, especially if it’s a technique you don’t do on a regular basis. There are always new things to learn (or remember).
Concealed buttonhole placket
Another element of shirt making that took me awhile to be able to do without looking up a reference picture was making a concealed buttonhole placket. I’ve finally got it etched in my brain though – at least I think so.
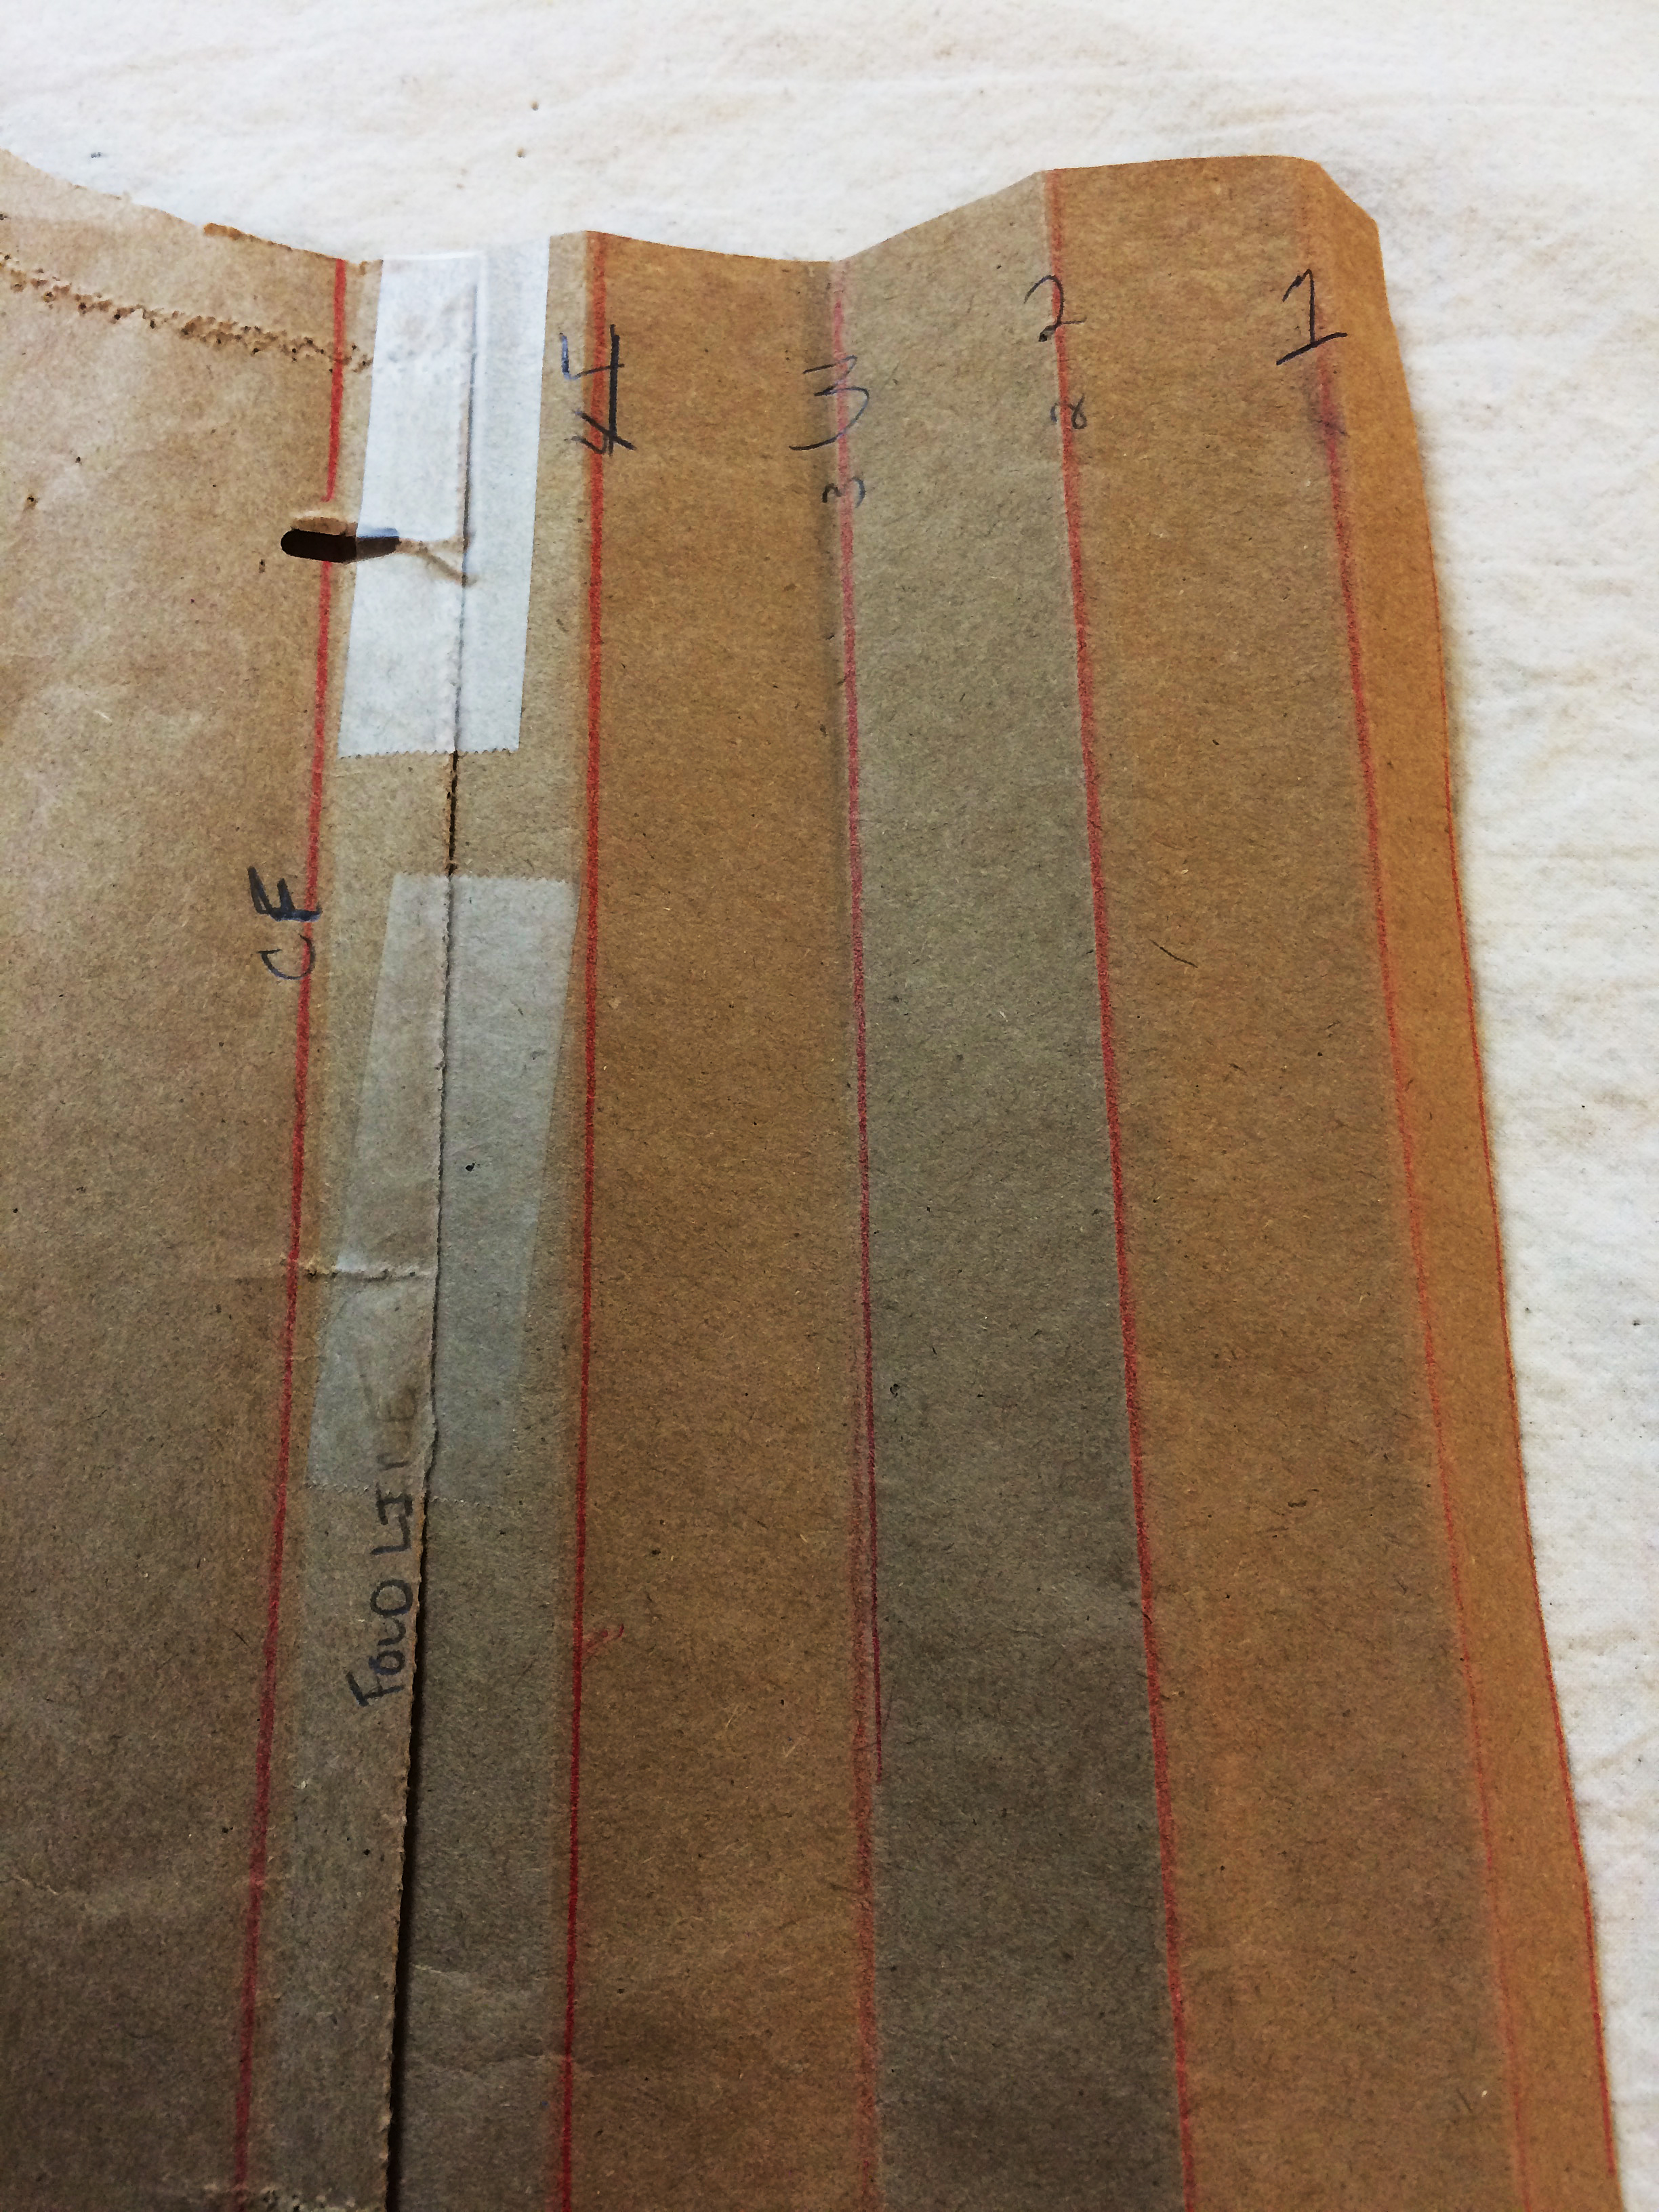
The first step is to decide how wide you want to finished placket to be. I use an inch (1″) for ladies’ shirts but some people do an inch and ¼ (1 ¼”) or an inch and ½ (1 ½”).
Next mark out your fold lines on your pattern or fabric. You’ll need an extra four to six inches past the center fold/finish line.
Fold lines marked a numbered on pattern piece.
Starting out from the center fold line, measure out ½” and draw a parallel line. This is the seam allowance line. Many commercial patterns use 5/8″ as a standard seam allowance so if you’re adding a hidden placket to a store bought pattern, check to see what they’ve used and do the same.
Then draw three more lines, each 1″ apart. Finally, mark your cutting line ½” from the last line (or whatever seam allowance you’re using).
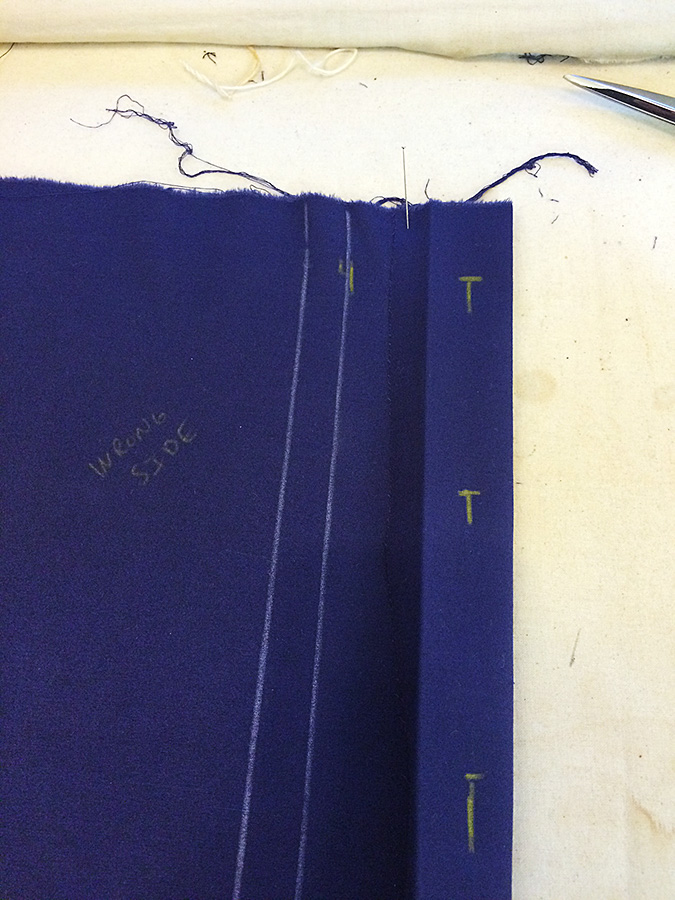
To help explain and keep track of your folds, number your lines starting with the outermost one: 1, 2, 3 and 4.
Press lines 1 and 2, wrong sides together. This is the part that will get the buttonholes. You can mark and do them now or, as I usually do, you can wait until you’ve got everything pressed and secured. I also press the 1/2″ outer seam allowance but do not leave it folded under – it’ll get caught inside the seam once you’re done.
Almost there
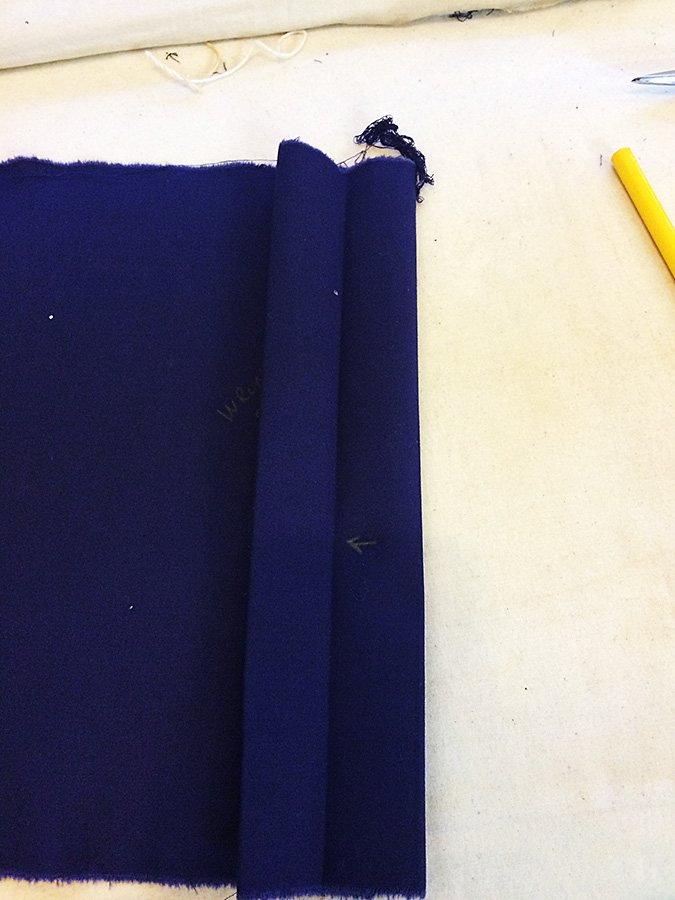
Fold along lines 1 and 2.
Next, accordion fold the remaining fabric. Fold along line 3, right sides together, then line 4, wrong sides together. Press.
Once you’ve done this, open the placket up so that its double wide with the seam allowance toward the front edge of the shirt. Topstitch along line 3 (which will be 1″ or however wide your placket is from the fold center fold line).
Open the placket up to topstitch.
Once you’ve done your button holes, you’ll need to sew small hand tacks in between each hole to keep the placket from opening up (and essentially defeating its purpose of being hidden).
Voila!
Shirt almost finished in dress form.
And next week, unless something more interesting comes up, I’ll continue on with my favorite sewing machine ruminations.
One of the things I love best about sewing as opposed to some of my other creative ventures is that I can do it any time of year. In the fall and winter, I can make blankets, jackets and other warm items. During the spring and summer months, I can make cute skirts and dresses and flowy decorative items. The different material weights and textures means it’s never too hot or too cold to sew! Here are some of my favorite projects for each season.
Sewing for All Seasons
Winter
When it’s cold outside, there’s nothing better than lighting a fire and sewing something with warm, cuddly fabric.
Flannel Blanket
I absolutely adore flannel. It’s always warm and gets softer with each washing. This cozy blanket is easy to do and can be made in any size you like. We’re big on throw blankets in this house, so that’s what I did. Because flannel is available in so many colors and patterns, it’s easy to find something that will match your home and your personal style.
Dinosaur Hoodie
The challenge with winter is that kids are stuck inside. This sewing project will keep you warm and provide them with hours of imaginative play. Can you say “roooarrrr!”? Your kids will love playing dinosaur with this hoodie. Make a couple of the neighbor kids too and have a dino party!
Spring
Spring is a time of renewal. The weather warms up and life starts to return to the great outdoors. It’s still a bit cool to go out and enjoy it without a light cover up and there can be days on end of rain keeping you indoors. That’s where these sewing projects come in!
Napkins
Spring is often a time when we entertain more. We can open the windows and doors and guests can flow in and out without tracking snow, ice and dirt. Depending on the occasion, setting a pretty table can be part of the deal as hostess. Check out these colorful napkins. They’re perfect for spring and summer and a conversation starter too!
Picnic Blanket
It might be a bit cool yet to have a picnic, but it’s never too early to plan for one. This adorable picnic blanket is a great spring sewing project. While you’re inside working on it watching birds and other life return to your yard, you can daydream about that first picnic of the year. Won’t it be great with this new blanket?
Summer
Summer is all about hot days, trips to the beach and keeping cool. You may not be spending too much time with your sewing machine, but that’s okay. These quick projects won’t get you overheated – instead they’ll help you keep cool once they’re done.
Towel Wrap
I don’t know about you, but I’m not a fan of getting out of the pool or ocean having to struggle with my towel. This fabulous towel wrap means I can keep my hands free for a drink and a book while still staying dry. Even better – it upcycles towels that might otherwise get tossed.
Wine Bag
To go with that lovely picnic blanket you made during the spring, you need a wine bag to tote your bottle for that elegant picnic. You could also use it as a wine gift bag if you need to bring a gift to a house party. It works up quickly and can be made for any style you can imagine.
Fall
I love fall! The changing leaves, the crisp air and the smell. It’s somehow romantic in a way. While I’m going to spend as much time outdoors as I can, there are some great fall sewing projects for those dreary fall days when I can’t get out.
Pillow
I love this! Making this pillow means I can bring some of the fall colors inside while using up some of my scrap stash. Don’t have all the colors? No problem! Remnants are cheap and easy to find in every color and pattern you’ll need.
Coasters
As much as I love fall, I dislike rings on the coffee and end tables as strongly. These adorable leaf coasters solve the problem while bringing all my favorite fall colors into the décor. I personally went for more realistic fabric colors, but you can do whatever you like.
What are some of your favorite seasonal sewing projects?
Have you ever gone to the fabric store and been overwhelmed looking at the vast assortment of thread for sale? If so, then fear not, for I will help to break down the mystery of thread and how to use it in all its various types.
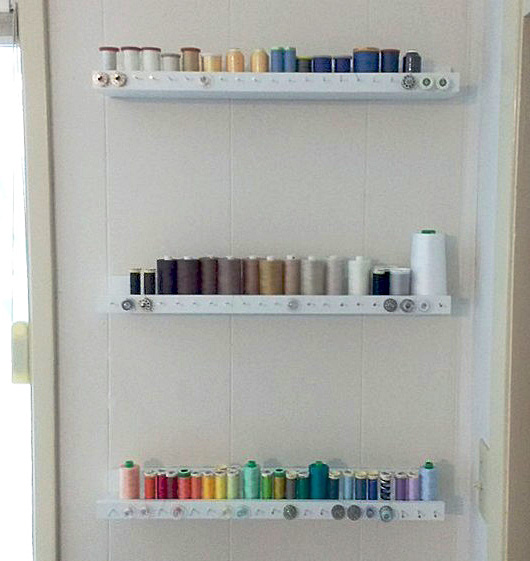
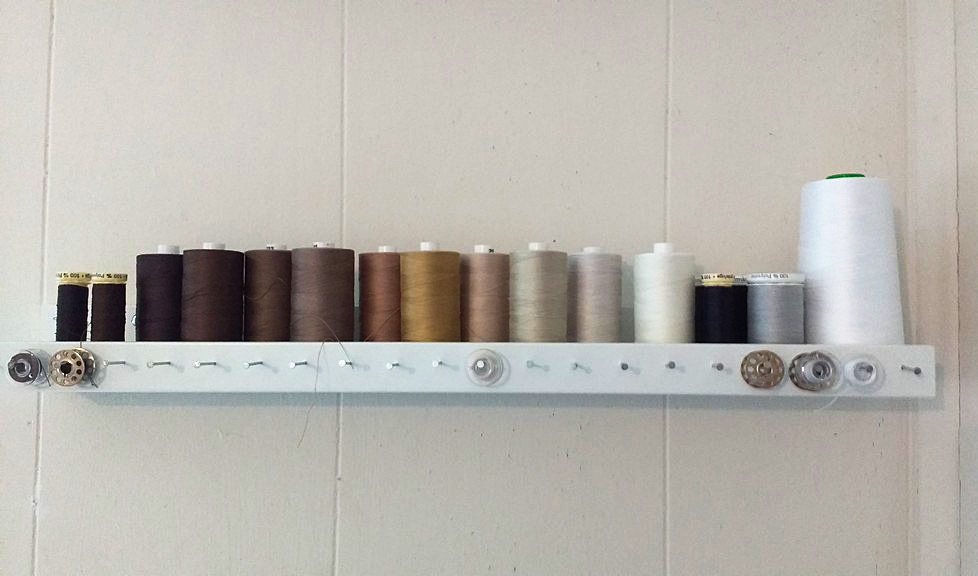
To start, consider where you are going to store your thread. I’m a highly visual person and I like to see what I have on hand. I also find looking at thread to sometimes motivate me or inspires me to begin on new projects. I created this thread display in my sewing room using Ikea picture frame shelves (Ikea Ribba) and I added small nails to hang my bobbins by the corresponding color of thread.
I added small nails to hang my bobbins by the corresponding color of thread.
I live in a rural area, three hours from the nearest Joann Fabrics. Because of that I keep an Aurifil Thread Color Card so I can easily order the exact shade of thread I need. It also looks beautiful too, no?
Because of that I keep an Aurifil Thread Color Card so I can easily order the exact shade of thread I need.
It also looks beautiful too, no?
Thread Weight
When choosing thread, consider the thread weight. A quick breakdown of Aurifil’s brand thread weights (and their many great brands of thread, including Guterman and Coats & Clark) looks like this:
12wt: Use it for sashiko & red work stitchery. This is the thickest thread in the Mako’ range.
28wt: It is strong enough to withstand the stress of hand quilting without needing to be glazed or waxed.
40wt: Favorite thread for machine quilting and all-purpose sewing. A little heavier to show off the quilting stitches.
50wt: Quilters love it for its piecing and quilting. A staple for every sewing studio.
80wt: This is the finest Egyptian cotton, for use by hand or machine. Your new ‘go to’ thread for applique and much more.
~ Thread descriptions from Hawthorne Threads
Buying at a fabric store is actually a little easier than sussing things out online because they divide thread into sections so you can quickly scan for ‘quilting’ or ‘embroidery’ or ‘heavy duty/jeans.’
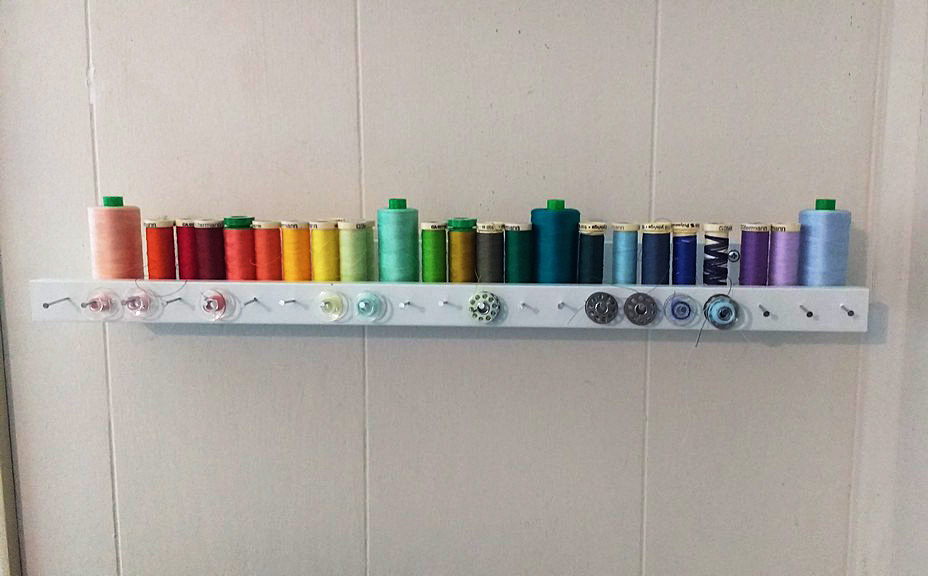
I keep my standard, quilting cotton weight threads organized by ROYGBIV (red, orange, yellow, green, blue, indigo, violet).
I also keep my neutrals and browns organized by gradient.
I keep my neutrals & browns organized by gradient.
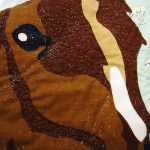
Buying a lot of shades of one color can greatly help when working on projects with a ton of variation in the same tone, like in this quilt I recently finished. I used five different shades of brown and black to finish the horse.
I used five different shades of brown & black to finish the horse.
The specks of white are snowflakes.
It was snowing when I went outside to take pics of this.
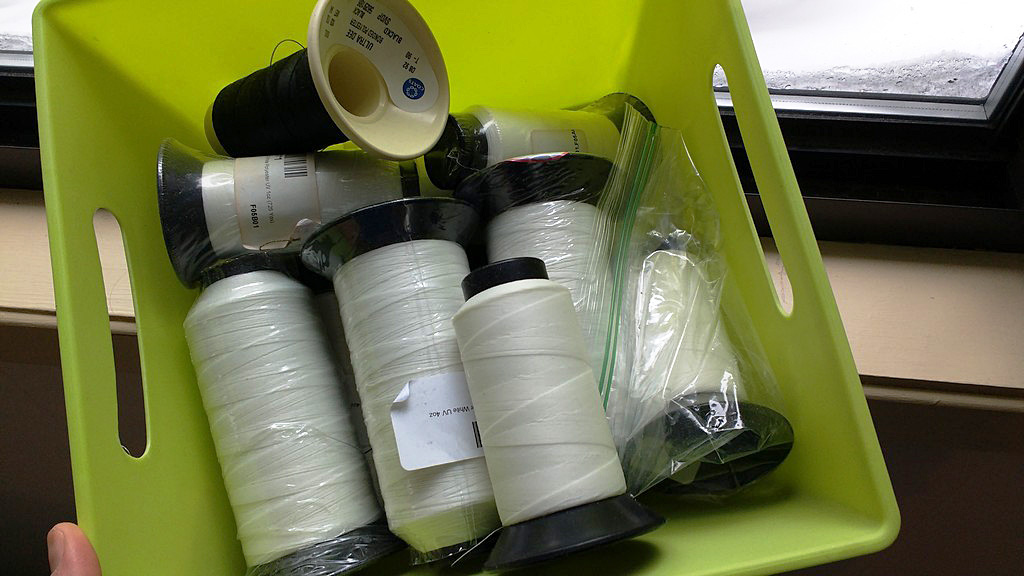
Utility/Novelty Threads
These are threads you reach for when you need to pull out the big guns or you are just doing something different. I use some of these heavy weight threads for upholstery, corduroy, vinyl, or very thick or unique fabrics.
I use some of these heavy weight threads for upholstery, corduroy, vinyl, or very thick or unique fabrics.
This is my tub of very heavy duty threads. I use them on marine projects and with my industrial sewing machine.
This is my tub of very heavy duty threads.
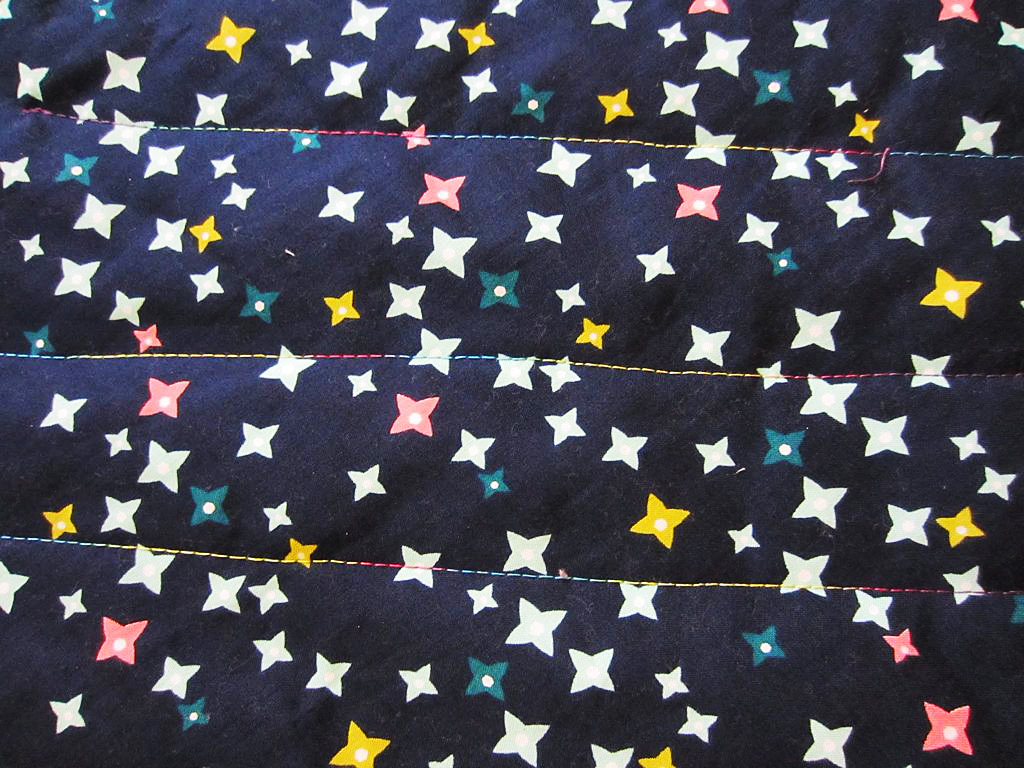
Variegated Thread
I saved these threads for last because they are my favorite. If you haven’t tried sewing with them yet, I encourage you to start today. The richness of their color variation is an absolute delight to the eye and often can take your projects to a whole other level.
I used two spools of variegated thread on this quilt. The blue/rainbow you can see here.
The blue/rainbow you can see here.
And the gorgeous bright yellow here.
You can see the gorgeous bright yellow here.
Of course, with different threads you will need different needles, but I’ll save the topic of needles sizes and shapes for another post. What are your favorite types of threads? Let us know in comments!
—————————– Charlotte Kaufman is a writer and sewist in Mammoth Lakes, California. She specializes in marine and home interiors and continues to fall more and more in love with quilting. You can follow her at charlottekaufman.com.
As I wind down in the steps for making my quilt, I’m finding that I have fabric scraps left over from the endeavor that I really don’t want to toss. One of the problems though is that I have a very lacking fabric storage setup. In fact, it consists of stuffing fabric into a remarkably unprofessional Hello Kitty pail (Note: I don’t even like Hello Kitty). Once that happens, I put the pail into my closet. Since said closet kind of overflows at times, the method is even more lacking than it would otherwise be.
I want to keep this fabric, but I’d like to have a better strategy of doing so. That idea had me browsing some possibilities online, and some of the options I saw were pretty basic.
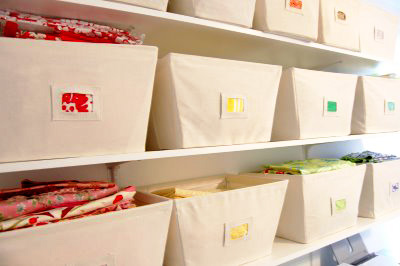
Simple Solutions
For instance, clear storage bins or canvas bins.
For instance, clear storage bins or canvas bins. While these are simple and efficient ideas for keeping my fabric in order, the truth of the matter is that they’re also, at the moment, things that would probably end up getting stashed away in my closet. As one of the qualms is that my fabric is stored in my closet, neither option fixes that detail.
At least, not alone. If I had a method of storing those bins out in the open, they’d work fine. In any event, the insufficiency could certainly lead to more searching in regard to the best (complete) fabric storage option.
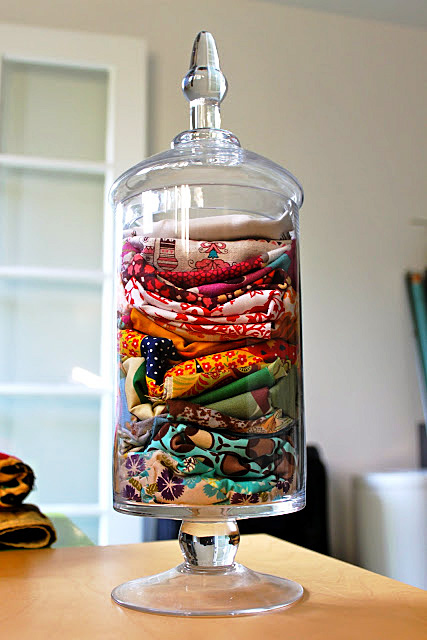
The most fitting right now is the notion of keeping excess fabric pieces in a jar.
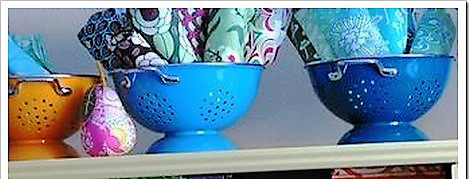
So during my search, did I have find the perfect one? That might be a complex question since I’m not sure there is a perfect one, but I did find some that are worth mentioning. The most fitting right now is the notion of keeping excess fabric pieces in a jar. I’m not sure I’d ever considered using my extra fabric in a way that actually makes it decorative even before I use it for a sewing project, but I like this concept. Most of the fabric that I have remaining is block-ish, and that smallness of leftovers seems spot-on for the store-in-a-jar method. All I’d have to do is get a jar, fold up my scraps nicely, and let the storage add accent to a room before the pieces potentially add accent to a future project. A similar idea is to store those scraps in kitchen bowls or strainers, like you can find here, or maybe a flower vase.
A similar idea is to store those scraps in kitchen bowls or strainers, like you can find here, or maybe a flower vase.
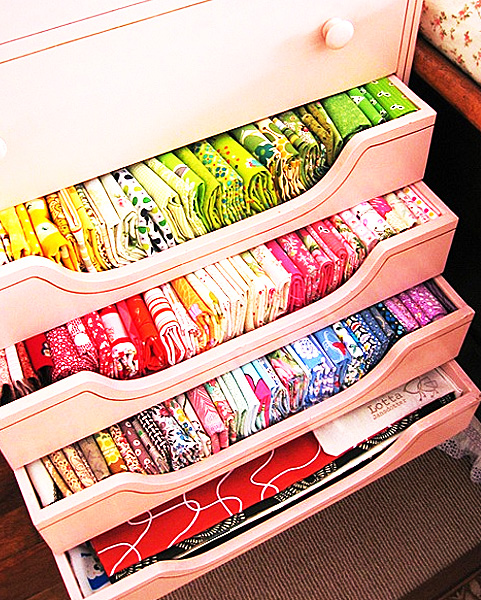
One is to take the drawers out of a dresser, & once the furniture has been treated so that it looks finished and ready, fabric can be stashed where the drawers used to be.
Two of the more intriguing fabric storage options I found might be more suitable for a time when/if I have more room and/or extra cash. One is to take the drawers out of a dresser, and once the furniture has been treated so that it looks finished and ready, fabric can be stashed where the drawers used to be.I adore this idea, but it’s a project itself! Be aware though that if you don’t want to go through all the sanding and painting to prepare the furniture, you could still use a dresser, drawers intact.
Be aware though that if you don’t want to go through all the sanding and painting to prepare the furniture, you could still use a dresser, drawers intact.
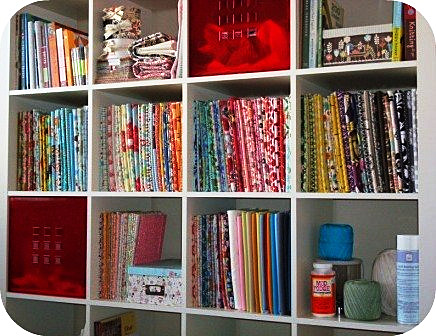
Another option is this square shelf idea that hangs on the wall. This one is particularly of interest if, like me, your bedroom, sewing room, etc. is already pretty full of furniture. When that’s the case, going upward seems like a reasonable option, and that’s exactly what this shelf would do! Being the nerd I am, this square setup appeals to me more than a different shelf idea might because it’s comic-book-ish, but that’s not to say that squares are the only possibility for this method. In fact, you might find that you have some kind of old furniture around your house that can be repurposed for this prospect — like a headboard. There might be plenty of possibilities if you spread your imagination to find them!
Another option is this square shelf idea that hangs on the wall.
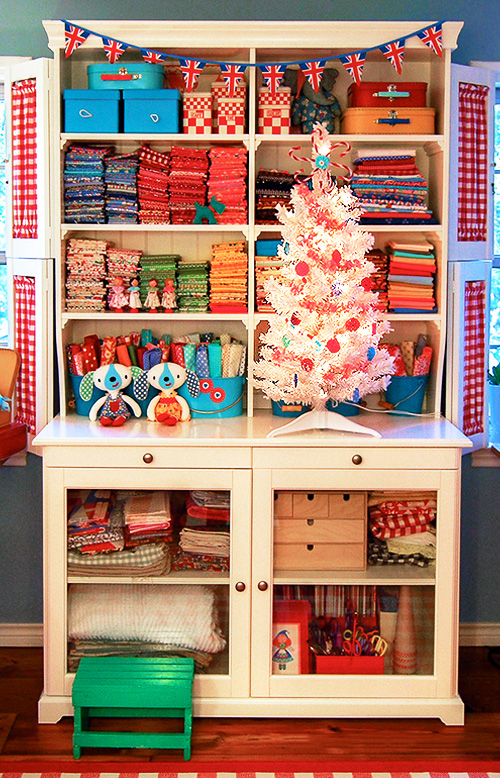
Another option is a lot simpler, but might cost more — and that’s to buy a piece of furniture that’s specifically for this purpose. This hutch, for instance, makes a wonderful and aesthetically pleasing storage area for fabric, and other than price and space, I wouldn’t hesitate to have one of these in my home.
This hutch makes a wonderful storage area for fabric, and other than price & space, I wouldn’t hesitate to have one of these in my home.
But as breathtaking as these furniture options are, the truth of the matter is that I’ll probably have to start with something easier and more money-friendly. Given that the majority of my current fabric collection is scraps and/or block-ish pieces, my best bet for advancement might be the jar or strainer method, which I’m okay with!
Still, someday, that hutch, that shelf, or that dresser would be a wonderful addition to my sewing life!
I don’t know about you, but if you ask me, this Winter can’t end soon enough. I’m dreaming of warm weather and beach trips, but the reality is that it is cold outside. On cold winter days, there is nothing cozier than fleece. So I’ve scoured the net to round up some fun fleece projects for you to sew.
Tips for Sewing with Fleece
Fleece projects are generally easy to sew, but only if you know some tricks for working with this unique fabric:
Needles – Some folks prefer to use a universal point needle when working with fleece. If you choose this type of needle, be aware that fleece will dull these quickly and you will need to change needles often. I find a stretch or ball point needle works better and use these instead for sewing fleece projects. Regardless of needle type, I use use size 14 for fleece.
Foot selection – A roller foot or an even-feed foot (also known as a walking foot) will be most helpful. Reduce presser foot pressure to allow for the extra bulk.
Stitching – I prefer to sew with a stretch stitch for fleece. If your machine does not have a stretch stitch, you can use a narrow zig-zag stitch instead. For straight stitching, use a slightly longer stitch length, about 3.5mm, to prevent skipping.
Thread – Fleece is not only tough on needles; it can also be tough on thread. Don’t try sewing fleece projects with cotton or cotton/poly thread, as this may ravel or break. To prevent breakage, use 100% polyester thread.
Other tips –
Don’t use an iron on fleece, as it has a very low melting point.
To know which side is which, pull the selvedge taut; fleece will roll slightly on the wrong side.
It is difficult to undo stitches from fleece, so work slowly and carefully to avoid mistakes.
Clean your machine frequently when working with fleece, as it has a tendency to shed fibers.
And now, for my favorite fleece projects:
Fleece Projects: Hats and Headbands
A U.S. Army survival manual from 1957 claimed we lose 40-45 percent of heat from our heads. There is some controversy about this figure, and this may be overestimated. Regardless, you lose less heat from your head when it is covered! There are many cute ways to cover heads with fleece, here are just a few.
Martha Stewart shows how to make several styles of fleece hats and includes a handy chart of head measurements for sizing help.
Nothing is more comfy and cozy than fleece pajama pants. Simply Modern Mom shows to make them using your favorite pants as a pattern. The tutorial is for child’s pants, but you can use this method to make them in any size. If you don’t have a favorite pair to use for making your pattern, of course you can make fleece pajama pants using most any pajama pattern in your stash.
Fleece Projects: Sweater
Here is a tutorial for making a lovely cowl-necked sweater from fleece that is as impressive as it is comfortable. The cowl neck is quite versatile. This can be worn in different ways, depending on the temperature outside.
Fleece Project: Caftan
When it’s really cold and all you want to do is stay cozy indoors, you’ll appreciate this easy fleece caftan. This is even better than the popular snuggies, as it covers both your front and your back sides.
Fleece Projects: Coats and Capes
Fleece outerwear is great because it’s warm, comfortable, and even repels water on wet and drizzly days. You can choose something easy and unstructured, such as a poncho or cape, or go with something more detailed, like a jacket or coat.
This instructable shows how to make an easy poncho that’s also pretty.
Here are several ways to make a beautiful long cape, with hood or without.
This little girl’s cape includes a collar and dressier design details.
My personal favorite fleece coat is McCall’s pattern 5987. This coat includes a built-in scarf that can be styled several different ways.
My personal favorite fleece coat is McCall’s pattern 5987. This coat includes a built-in scarf that can be styled several different ways. It has an attractive rounded hem that looks great with both skirts and pants. I have made this coat in camel, in charcoal, in navy, and one in red as a gift for my mother. I get lots of compliments on these coats every time I wear them. While they are fashionable outerwear, they are also so cozy that I wear them as an extra layer in the house all the time. Maybe I should make a fleece robe, because I don’t have any robe that feels near as nice over my nightgown as these coats do.
Fleece Projects are Fun
Don’t be afraid of fleece. It is different than other fabrics, but nothing compares to the comfort fleece offers. I also think of this fabric as being more environmentally friendly than many others, since it is often made from recycled plastic bottles. Sewing on fleece is easy if you know the tips and tricks shared here. I hope you will try some of these fleece projects this season and enjoy them for many winters to come.
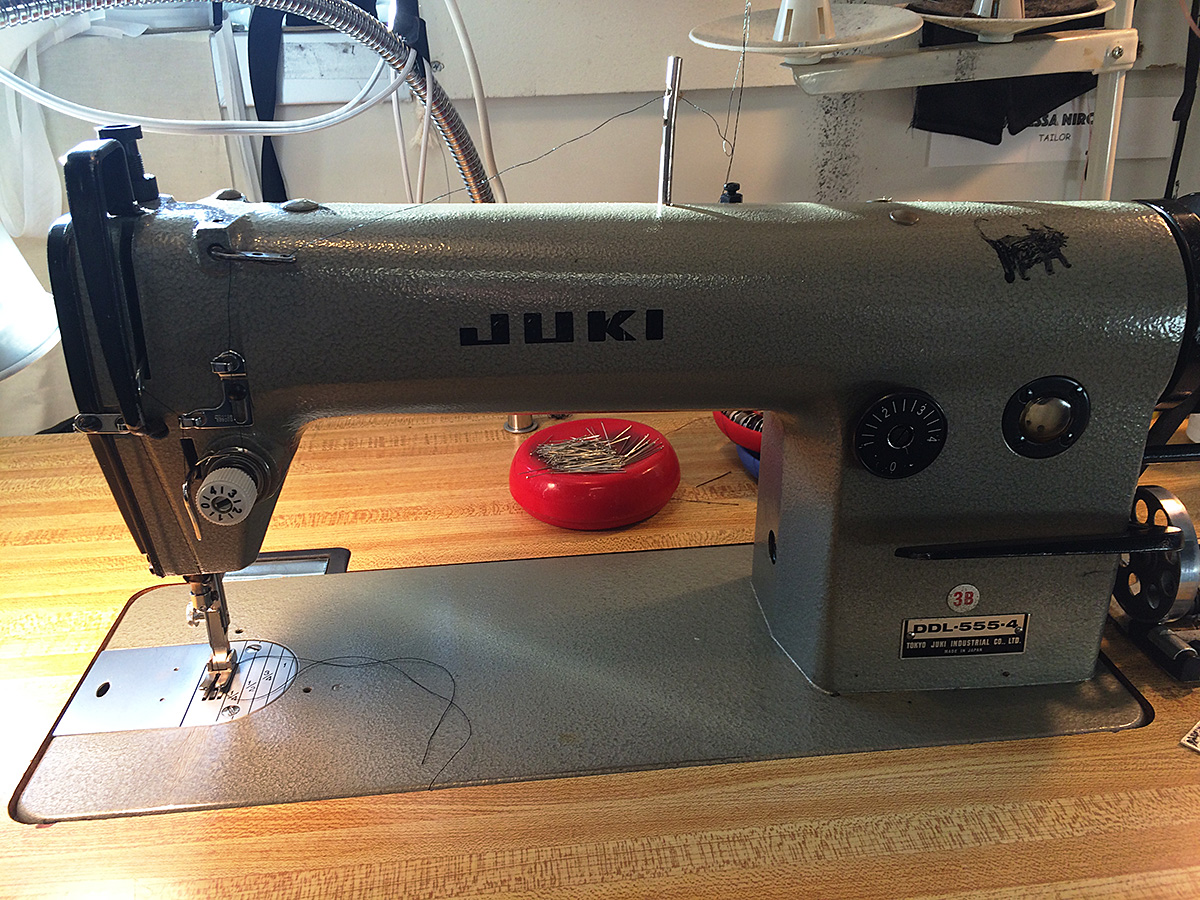
One of the questions I often get when I tell people that I sew for a living is: What sewing machine do you like the best?
I usually respond that it all depends on what I’m doing and I use different machines for different things. Which is mostly true. But if I’m being completely honest, I do have a favorite. Well, actually two favorites.
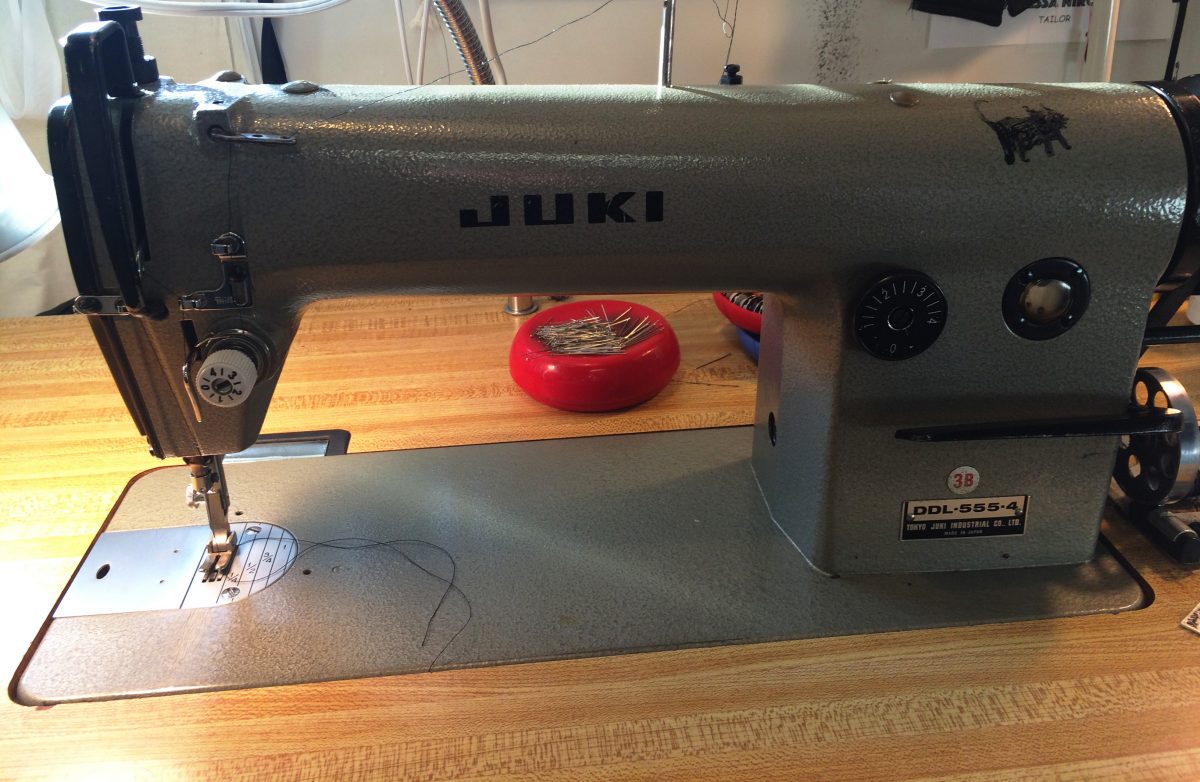
The first is my Juki straight stitch industrial. Mine is an older model, the DDL-555-4, which is no longer made.
The first is my Juki straight stitch industrial. Mine is an older model, the DDL-555-4, which is no longer made. Juki does though, of course, still make straight stitch industrial machines (the updated models for mine are the DDL-8700 and DDL 5550-N).
Many people are a bit hesitant about buying an industrial machine. Lots of people have told me that industrials frighten them because they’re so fast. Well, these days, a lot of industrials come with a speed setting so you can control how fast it goes (even if you accidentally push all the way down on pedal the machine will not ‘take off’ if you have the speed set to ‘slow’). Nothing to fear. You can start out slow and, as you gain confidence, crank up the speed.
It is important to note, though, that the older models, like mine, do not have this feature. And each machine is a bit different in how it responds to the pressure of your foot.
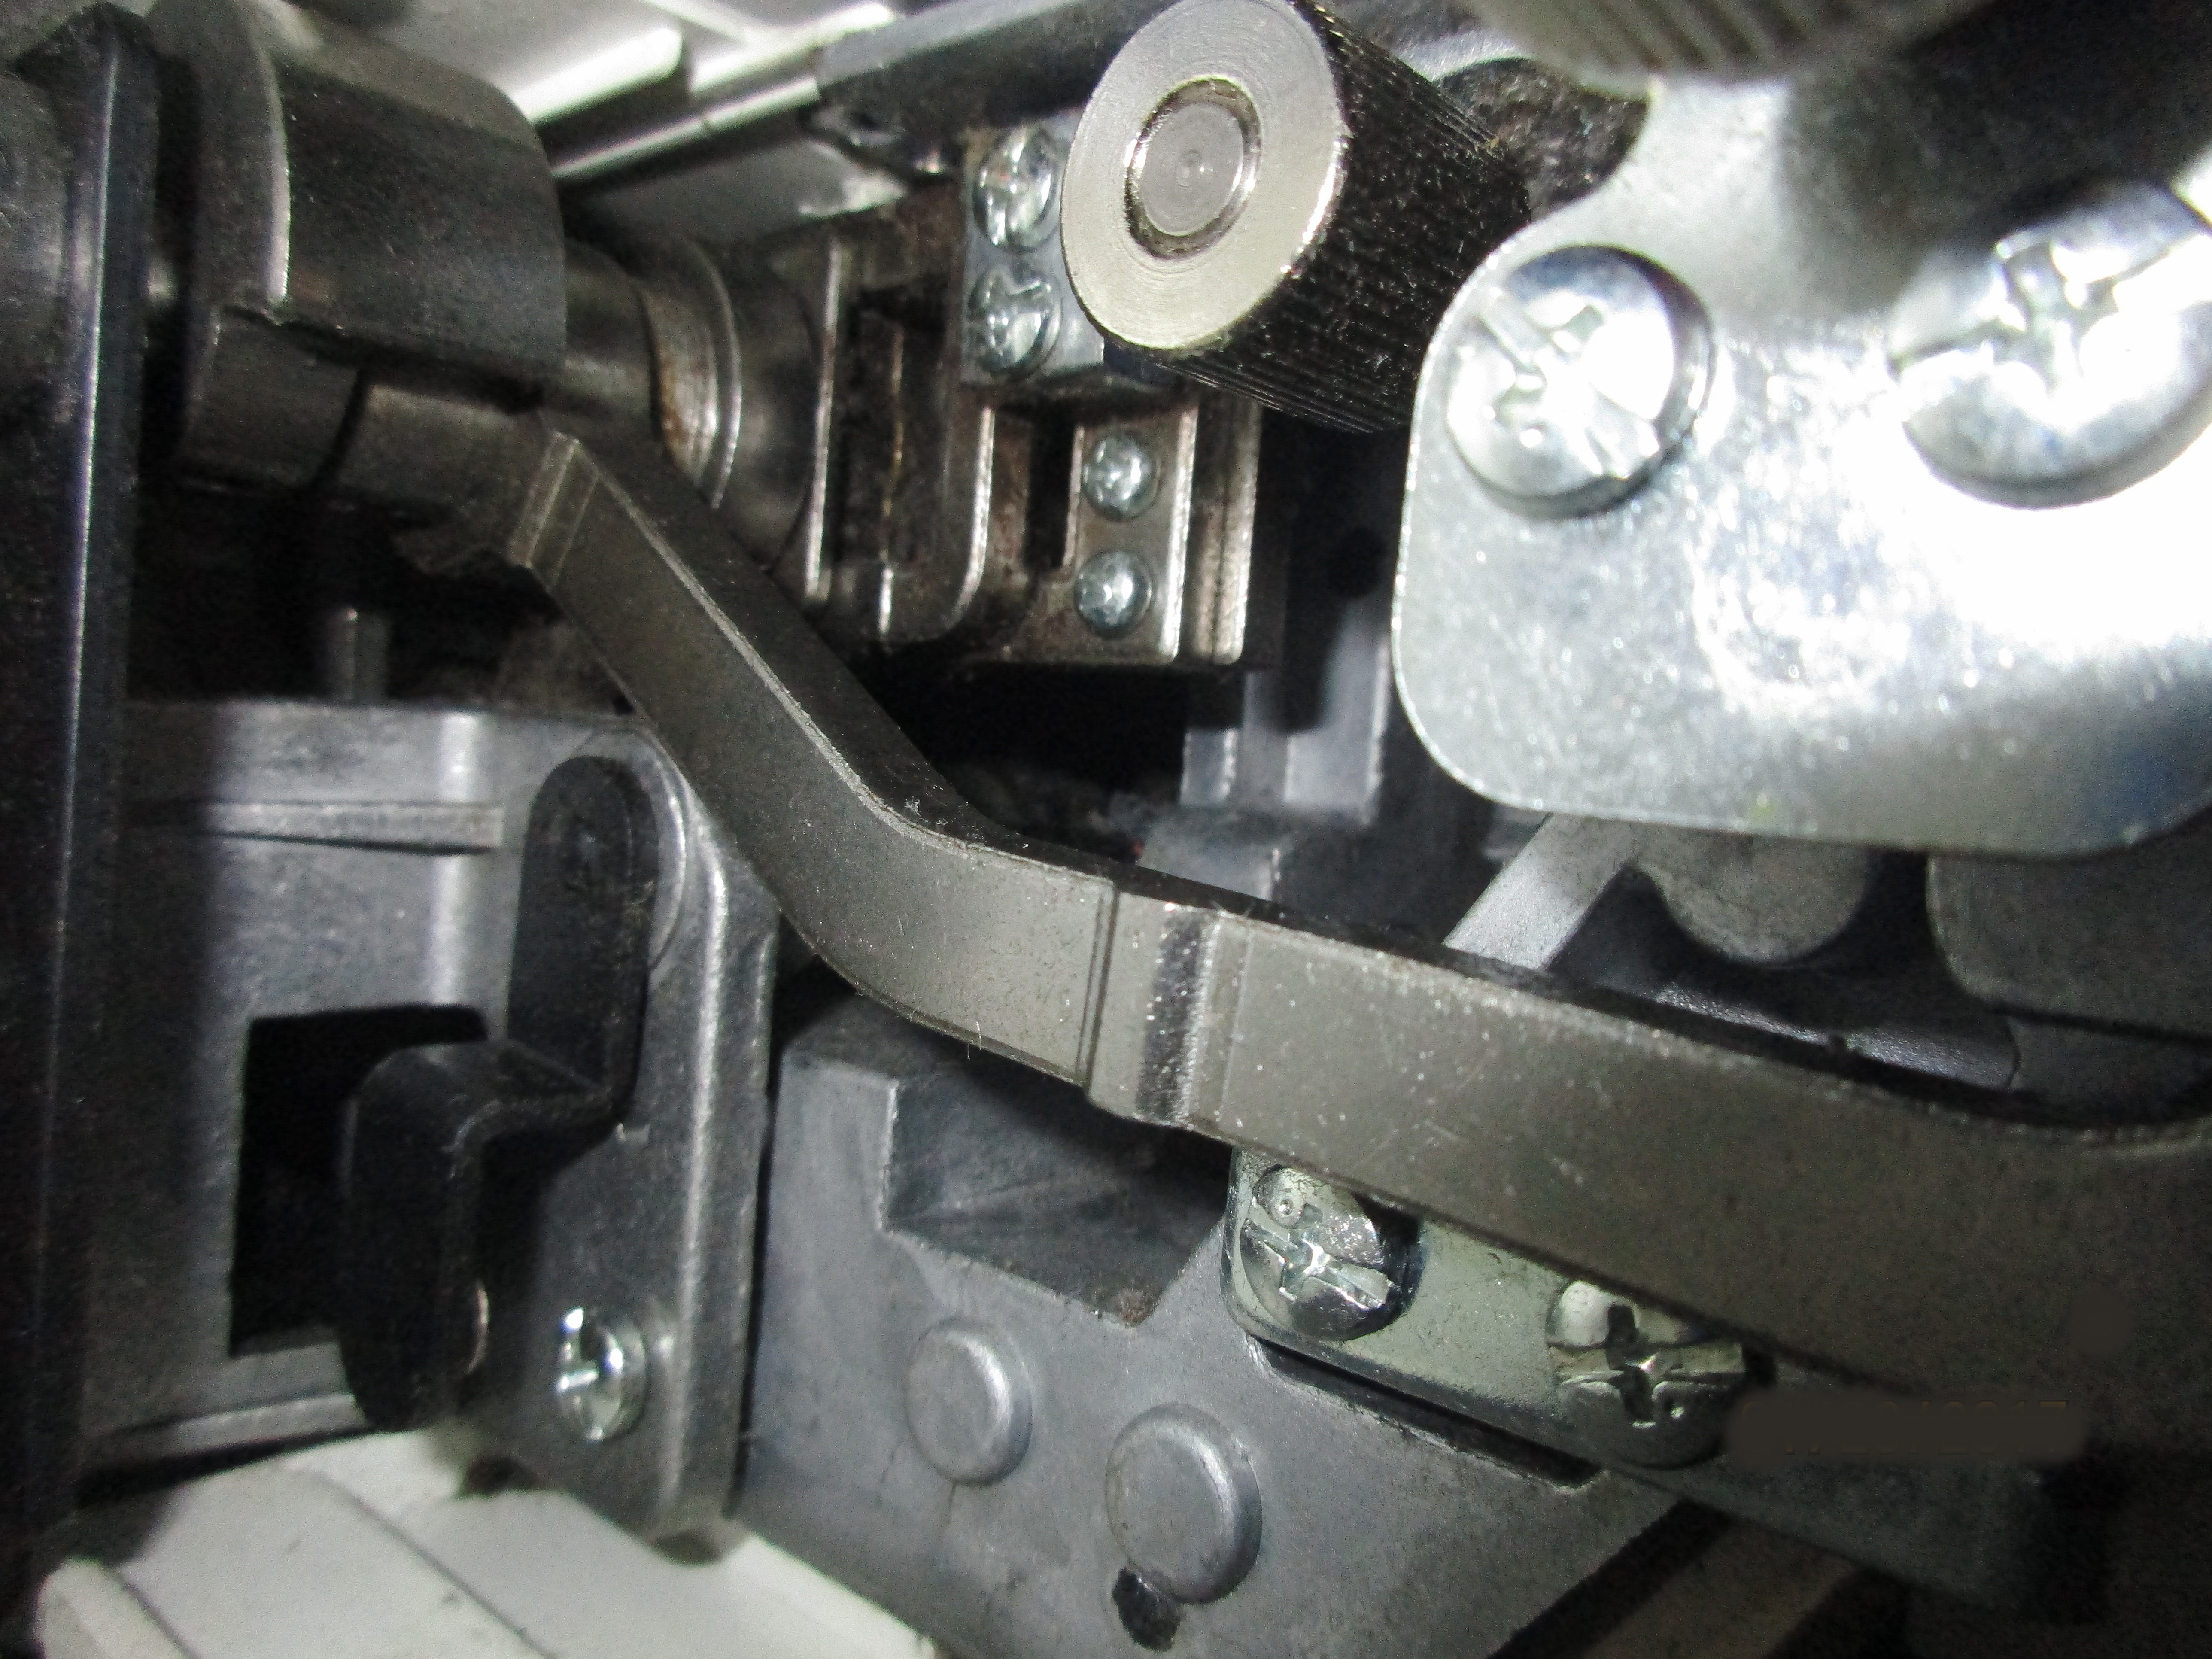
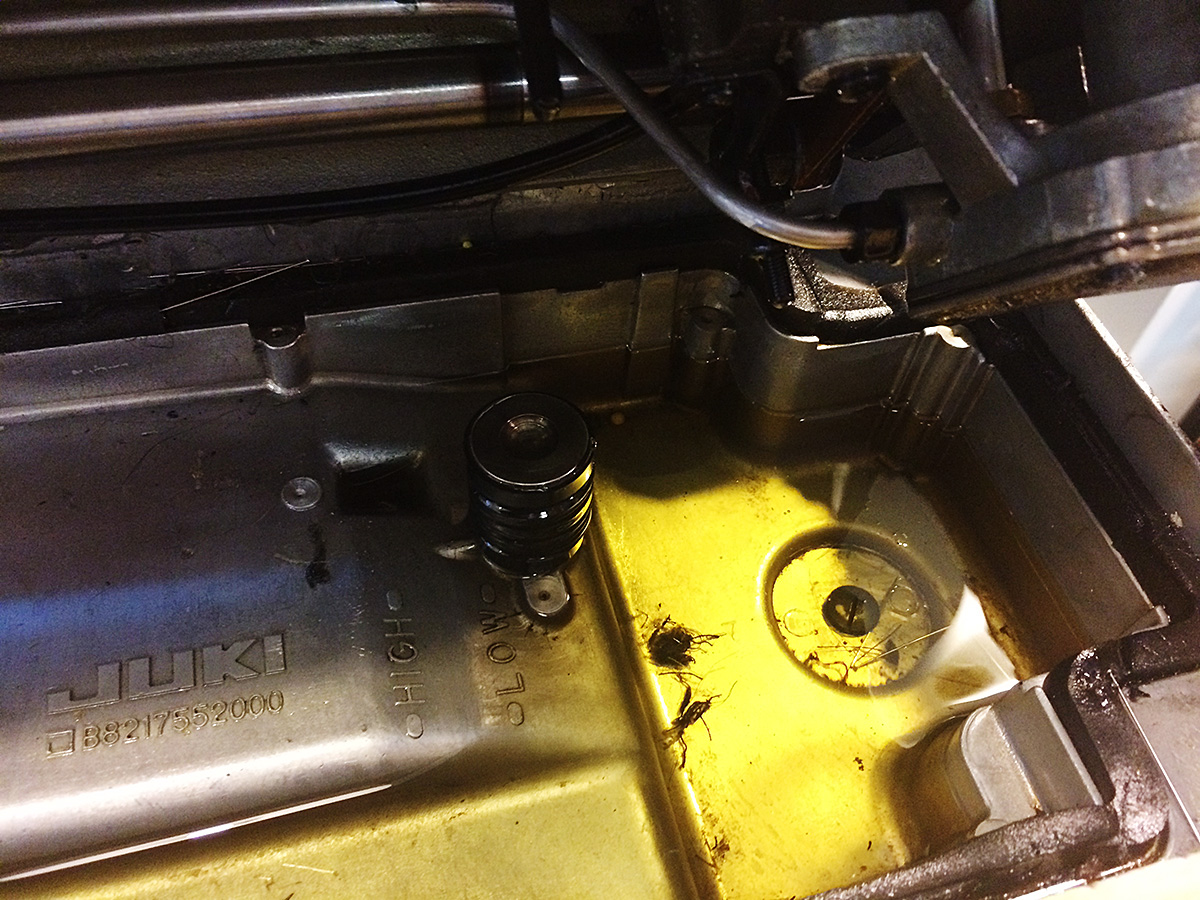
One of the most crucial things to know about using an industrial machine is that, unlike the majority of domestic machines these days, it does indeed need oil to run properly. Once your machine is all assembled, with the machine head sitting securing in the table, simply tip the machine backwards. Underneath, you’ll see a metal bed. Fill it with machine oil.
Underneath, you’ll see a metal bed. Fill it with machine oil.
I think the new models have a line indicating how much oil you should put in. Mine does not but I fill it so that the deeper part of oil pan (the right side) is about half full.
The next thing to remember is that, if you ever have to transport the machine, you need to drain the oil first. Or you’ll end up with quite the mess. On the right side there will a black screw in plug you can loosen and take out (make sure you have a bowl or plan positioned underneath to catch the oil) to drain the oil from the bed.
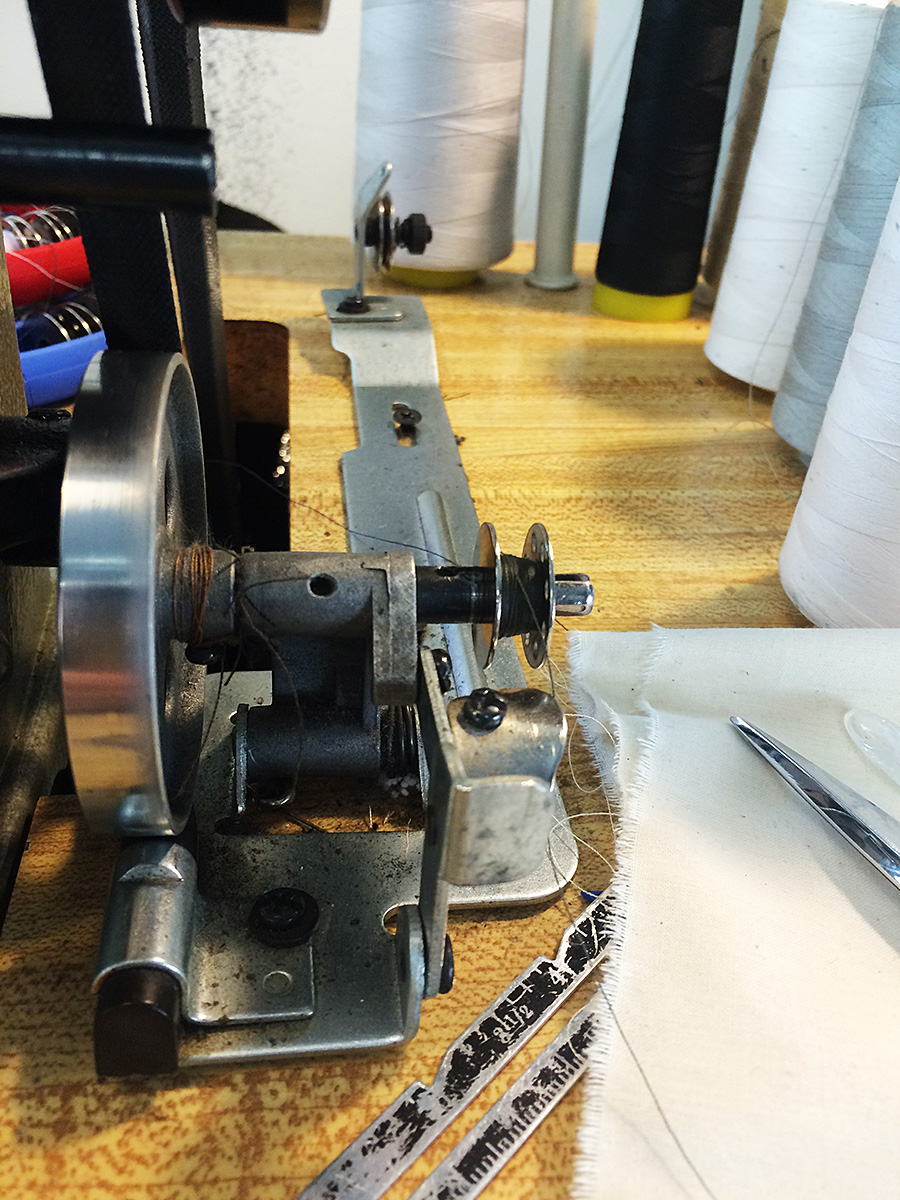
One of my favorite things about industrial machines is that you can wind a bobbin while sewing. Most industrial come with a two spool thread stand and the bobbin winding mechanism is separate from the machine on the right side. Place a spool in the thread stand, then thread from back to front through the bobbin stand tension. Pull the thread to the front and around the bobbin. You’ll need to engage the bobbin by pushing it backwards so that the wheel connects with the belt of the machine.
You’ll need to engage the bobbin by pushing it backwards so that the wheel connects with the belt of the machine.
Unlike, domestic machines, there is no disengaging of the machine needle when bobbin winding so if you are winding a bobbin while not sewing make sure you take the bobbin case out and unthread at least to the pick up thread pick up lever.
The beauty of the industrial machine is that, once you are comfortable with it, they are so much faster than domestic machines. You’ll get a lot more done in a shorter amount of time. They also sew through many layers of fabric without complaining. I find that I never have to mess with the tension on my Juki, it’ll sew through light weight chiffon and six layers of denim without needing any adjustment. Brilliant.
Sometimes people are concerned about the lack of a free arm but I can confidently say that you don’t need one. If you need to sew a small circumference like a sleeve hem, turn it the opposite way out you would if you were using a free arm: meaning if you want to stitch on the wrong side or inside of the hem, leave the sleeve right side out, then position it under the presser foot like so:
If you need to sew a small circumference like a sleeve hem, turn it the opposite way out you would if you were using a free arm.
See, easy!
If you’ve been debating about getting an industrial, debate no more! Take the plunge. You won’t regret it.
PS: I’ll tell you all about my other favorite machine next week: a vintage Sing