Sewing Machine Needles 101

Machine Needles

When I first started sewing, broken needles were part of my learning curve. This wasn’t necessary, but I had no one guiding me, and I learned as I sewed. I could have learned to sew without all that trial and error if I only had a basic education on the types and thicknesses of machine needles and their uses.

You’ll save yourself more trouble than just the inconvenience of changing a broken needle by using the right needle for each project that you sew. Your thread could break or shred, and seams could pucker or be otherwise unseemly. No pun intended. You can also mess up the machine’s timing or damage the bobbin hook. All of which would require repair.

Of course this is all true and I promise you don’t want to have to stop sewing and wait for machine repair. To save you the troubles of any broken machines, stitches, or needles, allow me to share this short lesson:

Sewing Machine Needles 101

Now you will know which machine needles to buy and what kind to put on your machine for every project you sew.

The short answer is to buy and keep stocked a variety, because you’ll need to use different sizes and types for different projects and fabrics.

Another rule to live by is to change out your needle with every project. At least be in the habit of considering this between every project. Sometimes when working on a string of small or similar projects, you might take a look at the needle to make certain it is still straight and true, and then decide to keep it for the next project too. Definitely change any needle after sewing with it for six or eight hours max.

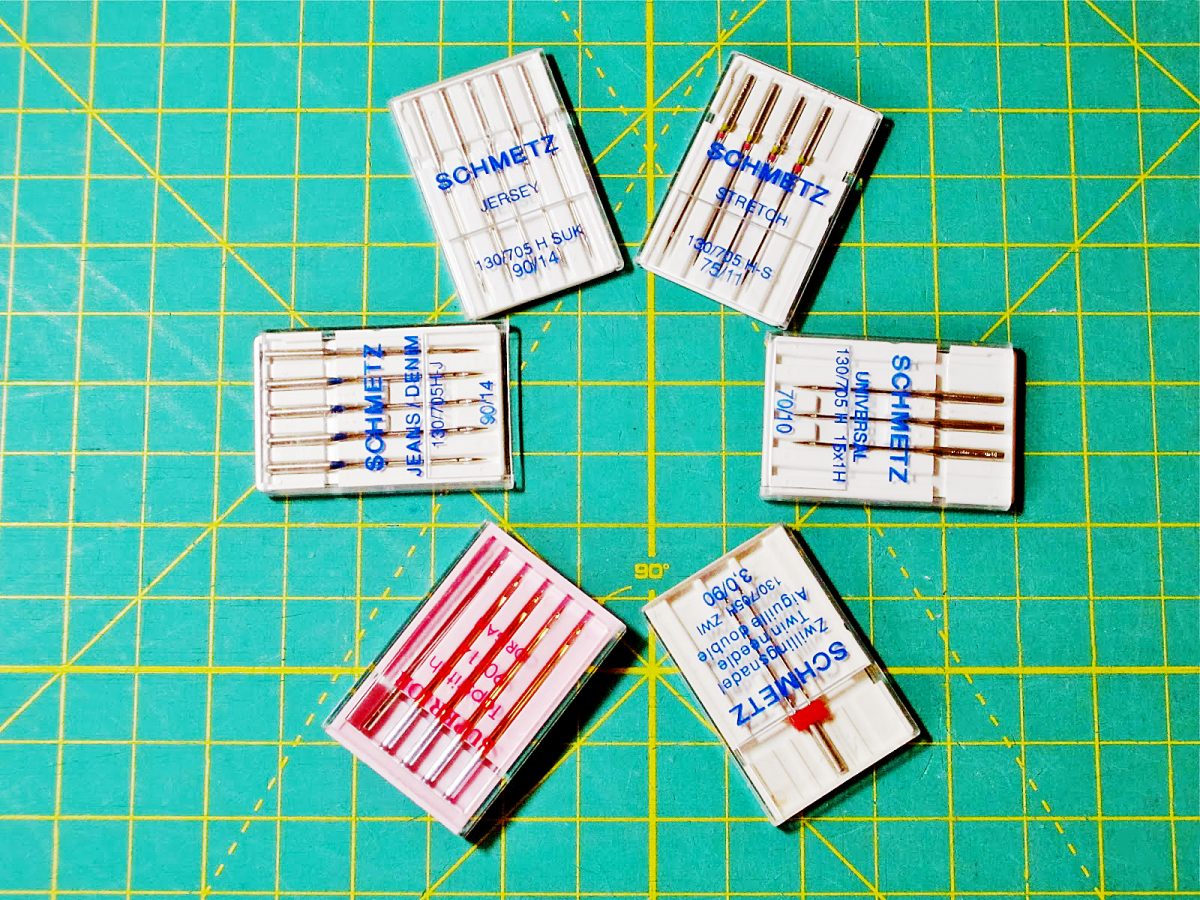
Sewing Machine Needles: Types

Machine needles are classified according to their point type and by their gauge, or thickness. The fabric or project determines the needle gauge. While classification and types of fabric is another post, they can be broadly classified into two main types: woven and knit fabrics. Because these two types of fabrics are produced by different means, they require different types of needles.

Universal, or Regular Point Sewing Machine Needles

Use these pointy, sharp, regular machine needles to sew woven fabrics. They come in a wide array of sizes, and different fabrics and projects will need different sizes. We’ll look at needle sizes further on in this post.

Ball Point Needles

Also known as jersey needles, these have a rounded tip. Use them for sewing fabrics that are knit. These also come in various sizes. Knits include stretchy knits in varying thicknesses, and also non stretchy knits such as terry toweling. For the stretchier knits, try a stretch needle instead.

Stretch Needles

For some super stretchy fabrics like Lycra, even a ball point needle will still be prone to skipping stitches. I also find a stretch needle to be the key to working with fleece. For these difficult fabrics, a stretch needle will make the difference in being able to pull your project off well.

Wedge Needles

Used for sewing leather and vinyl, wedge needles are designed for piercing holes into these fabrics which will close in on themselves, minimizing the risk of tearing of these special fabrics.

Specialty Sewing Machine Needles

While one of the major needle types listed above will work for most every sewing project, there are many special uses for which your project might benefit by you using one of these specialty needle types, instead:

  • Jeans needles have sharp tips and strong shafts for sewing heavier fabrics
  • Embroidery needles have larger eyes to avoid breakage or damage of specialty threads
  • Topstitching needles work with heavier threads, or even with multiple threads
  • Quilting needles have tapered points and extra strong shafts for sewing through multiple layers
  • Sharps, or Microtex needles, which are even sharper and thinner than universal points and ideal for sewing on fine fabrics or cottons with a high thread count; these work great for appliqué and piecing
  • Metallics needles have teflon coated eyes, for sewing with metallic threads; other needles ravel and damage metallic threads.
  • Twin Needles, which can be universal, ballpoint, or other needle types

Sewing Machine Needles: Sizes

The thinner the material you are sewing, the thinner gauge needle you need. Heavy fabrics, or thicker projects will need thicker gauge needles. Both regular-point and ball-point needles come in sizes ranging from the thin size 8, to heavy 16 gauge and even heavy-duty sizes up to 19.

You will sometimes see these needle sizes labeled by gauge and also by needle diameter. So a size 9 gauge needle will sometimes be labeled as size 70/9; size 11 might say 80/11; then there are sizes 90/14, 100/16 and 110/18. The larger numbers refer to the needle’s thickness, in millimeters. US measurements are by gauge, European measurements use diameter.

So which size needle should you choose for which fabric? Here are my choices for the sizes you will use most often and on what fabrics and projects:

Size 9 (European 70) – Use these for sewing sheers and the finest fabrics, such as lace and chiffon.

Size 11 (European 80) – Use these with light-weight fabrics such as silk, muslin, and calicoes.

Size 14 (European 90) – Choose when sewing medium-weight fabrics such as rayon, gabardine, satin, chino, linen, denim; thick quilts. Use ballpoint size 14 for light to medium-weight knits such as tricot or jersey.

Size 16 (European 100) – Sew with a size 16 needle when using medium to heavy-weight fabrics such as: wool or wool blends, canvas, cotton duck, sailcloth, or upholstery fabric, and on thicker projects such as purses.

Size 18 (European 110) – Use these for construction of quilted bags, sewing on nylon web, and other heavy-duty projects.

Here is a helpful chart from Schmetz for further reference.

Be sure to stock needles in all these sizes and in several types so that you are always ready to sew.

Christmas Sewing Projects

Christmas is fast approaching.

Christmas is fast approaching.

Christmas is fast approaching. Thankfully, there’s still time to sew special Christmas decorations or gifts. With so many Christmas themed fabrics to choose from, it may be hard to decide which one(s) you want for your project, but with so many projects, you won’t have to narrow it down too much.

Christmas Tree Skirt Sewing Project

This 50.5” x 50.5” square Christmas tree skirt is easy to make and uses multiple fabrics to create a look that suits any home. Basic quilting skills are necessary as is a template to use for the center circle. An inverted bowl works well. You can make it from fabric scraps and by using washable materials, it’s easy to clean. The red ties in the back are cute and ensure the skirt isn’t pulled off by pets or kids.

Christmas Tree Ornament Project

If love hand sewing, this cute hot cocoa mug ornament is a perfect way to add some whimsy to your tree. The pattern ensures accurate placement of the faces on the mug and marshmallows. You will need to know how to make a French knot for the eyes. If you’ve got felt scraps, you may be able to use those for the bulk of this adorable Christmas sewing project.

Christmas Stocking Sewing Project

Christmas isn’t complete without “stocking hung by the chimney with care.” With this easy Christmas stocking pattern, you can make individualized stockings for everyone in your family. The large size makes it the ideal stocking for creative stocking stuffer gifts and depending on your choice of fabrics, it’s entirely washable. Choose different colors or patterns for each person in your family to personalize the stockings.

Christmas Tree Angel

There’s something about angels…they belong adorning a Christmas tree. This sweet ribbon angel adds a touch of class to any tree. Use different colored ribbons to make each angel a little different. Sewing is optional with this project, but it’s a great opportunity to use some of the wide ribbon you’ve got sitting around from previous projects.

Christmas Garland Sewing Project

Garland doesn’t have to be tinsel and shine. This adorable garland adds Christmas cheer with rows of fabric Christmas trees. You can either use bits of fabric from your stash or buy remnants from your local fabric shop. This is a great project to do with kids! Their small fingers are great for everting and stuffing the little trees. The number of trees you make will depend on the length you want for the finished garland. A coordinating ribbon completes the project. Use it to decorate your tree or string across a doorway.

What other Christmas sewing projects do you enjoy? If you try any of these, please share the results! I’d love to see them.

The Safety Pin

The Safety Pin

I try to collect them all in one drawer, but they escaping & disburse themselves all about the apartment.

I try to collect them all in one drawer, but they escaping & disburse themselves all about the apartment.

Almost every pocket in every article of clothing I own, there are a couple of safety pins. I can also usually find at least three of four of the little buggers on the bedroom floor. Sometimes they end up outside my apartment door because I reached for my keys and pulled out a fistful of safety pins instead. I try to collect them all together in one drawer but seem intent on escaping and disbursing themselves all about the apartment.

I use safety pins for fitting clothing, for hanging patterns, to attaching notes to things. Of course, there are different sizes and flavors of safety pins.

Size matters

I use the tiny gold ones when I’m fitting something very delicate like silk or gauze so that they don’t make an unsightly pin hole.

I use the tiny gold ones when I’m fitting something very delicate like silk or gauze so that they don’t make an unsightly pin hole.

I use the tiny gold ones when I’m fitting something very delicate like silk or gauze so that they don’t make an unsightly pin hole. For some reason, someone thought that gold pins without the end spiral were good idea. I suspect because sometimes things snag on the little coil but, without that coil, the pin is free to slide about so it’s hard to know exactly where/what the mark is.

I use the big number 3s for the majority of my fitting needs. And the number 2s if I need a thinner pin.

History Hunt

Walter Hunt invented the safety pin in 1849. He was the first one to create a pin with the coiled spring on one end and the clasp or catch on the other end to keep the pointy bit safe from tender fingers. Hunt sold his idea outright for $400.00 so never collected any royalties or anything from it. Legend has it that he needed to pay off a debt and thus invented the safety pin and sold the rights within a few hours.

I use safety pins for fitting clothing, for hanging patterns, to attaching notes to things.

I use safety pins for fitting clothing, for hanging patterns, to attaching notes to things.

Selling his safety pin idea wasn’t Hunt’s only unfortunate business decision though. He was also the first one to invent many of the significant parts of the sewing machine, including a curved needle and a shuttle. Hunt created the first sewing machine prototype in wood, which didn’t work all that well so he ended up selling his idea to Elias Howe and Isaac Singer.

Hunt invented a plethora of other things including a streetcar bell, a knife sharpener, paper collars, and an antipodean walking device – or suction cup shoes!

Alas, Hunt didn’t seem to have much business savvy or any true idea of what his inventions could be worth, and just how wide spread and common place they would become.

A modern twist

The safety pin has found its way onto the catwalk and into high fashion with decorated, embellished safety pin broaches and large dangling safety pin earrings.

The safety pin returns as punk becomes more relevant than ever – via Independent.

The humble safety pin also has a rich symbolic history and significance. Punk culture has long used the safety pin as an expression of individual freedom and DIY culture. In the wake of the UK’s Brexit and the US presidential election it has come to symbolize tolerance and unity with all people.

Wonder what Walter Hunt would have sold his idea for back in 1849 if he had been able to foresee even a small fraction of what his pin would become.

Pet Sewing Project Roundup

Pet Sewing Project Roundup

Do you have four-legged family members? I’ve got four cats. They’re my kids. My fur babies won’t take well to clothes, but I often imagine how cute they’d look in certain outfits. They’re also not awesome about sleeping in beds I make them, but that doesn’t stop me from trying! If your four-legged family members are better about using or wearing the projects you make them, check out these cool projects.

Dog Boots

Does your dog hate going out in the snow? Make them a set of boots. Their feet won’t get cold and the boots protect their pads from the salt and sand used to keep you from slipping. They’re also adorable and stylish. The grippy bottoms on these boots help your dog keep their balance and the fleece lining dries out quickly.

Each boot takes less than 10 minutes to make and fit on any of their four feet. The quick and easy nature of these boots means you don’t have to worry about making new ones when they inevitably wear out. If you’ve got a small dog, you might be able to make these dog boots with your scrap stash.

Pet Beds

Does your pet destroy blankets trying to make themselves a bed? Or maybe, like my cats, they take up more space on the bed than they give you? Show them you love them and save yourself money on new blankets or a bigger bed with these cute pet beds. They come in three sizes and styles suitable for any pet. Each one has a contrasting inner pillow for added comfort. Give your pet a comfortable place to sleep and choose easy care fabrics so you can wash it any time you need!

Dog Coat

Pet Sewing Project Roundup

Dogs who get shaved regularly as part of their grooming regimen feel the cold more deeply than those who keep their full body of fur. Help your dog withstand cold weather by making them a dog coat (Note: this can also be adapted to make a coat for hairless cat breeds). Depending on your dog’s tolerance, you can add additional lining for more insulation or use snaps or buttons instead of Velcro if your dog is skittish with noises.


Dog Pullovers

Does your dog already have a coat, but still looks cold? Maybe they need a hood! Or maybe they’ll just look adorable with a hood pulled up and their nose peeking out. Either way, try this cute pullover pattern. It comes in four sizes, so you’ll be sure to find one that fits your pup – big or small.

What items have you sewed for your pet? Take some pics and share!

Pressing Accessories: Essentials To Buy and DIY

Pressing Accessories: Essentials To Buy and DIY

Last week, Charlotte Kaufman showed us her precious pressing station she made for her sewing room. Vanessa Nirode wrote about irons a while ago. But we haven’t discussed pressing accessories on this blog yet. We need to, because there are a few things that you really must have near your iron to get things done well.

While I am on the subject, I want to explain the important difference between pressing and ironing, because they are not the same thing. Ironing is when you move the iron back and forth across a fabric or garment, smoothing wrinkles out. In pressing, you don’t move the iron back and forth in the same manner, but rather press down with the iron, moving it slowly or not at all. You can iron clothes or fabric, but usually use pressing in sewing. Press seams open or to one side. Press to shape garments during construction. And press to affix fusible web and other heat treated adhesives to fabric.

Proper pressing technique makes the difference between a perfect finished product and a mess. Quilters who press every seam know that it’s key to success. Other things that can make a difference to your finished products are pressing cloths, a seam roll, pressing ham, and spray starch- or something better than starch. Useful but not as essential are a clapper, seam board, and pressing mitt. If you are lacking these things, you fix that with DIY; here is a link to a detailed page with instructions for making them: Make your own pressing equipment

Let’s take a closer look at the pressing accessories that are essential, so that you can understand why these items are must haves.

Pressing Accessories: Essentials

Don’t be without these:

Pressing Cloth

These serve more than one purpose. They can protect delicate fabrics from too much direct heat, and protect your iron from gunk and goo when you are affixing glue. A pressing cloth is essential for fabrics like linen and rayon, which develop a sheen if pressed without one. For most projects, I prefer to use a large square of T-shirt knit that I cut for this purpose. However, a see-thru pressing cloth is essential as well, to see what you are doing when working with small pieces and applique.

Seam Roll

A seam roll is helpful to have for pressing small curved seams and darts.

A seam roll is helpful to have for pressing small curved seams and darts.

A seam roll is helpful to have for pressing small curved seams and darts. It also prevents seam allowances from impressing through to the front of the fabric when you iron garment seams open. The way to do it is to place the spread open seam down over the roll, then press the right side of the fabric instead of the seam itself. I made a seam roll following the directions linked above, except I made one variation. I started with a couple of magazines, rolled tightly together as the base. Then I covered these completely by wrapping electrical tape tightly around. I added the extra layer of a felted wool sweater sleeve, and then wrapped the whole thing with another piece of cotton canvas and hand sewed it closed.

Tailor’s Ham

It's called a ham because it looks just like one. It's a stuffed and curved helper.

It’s called a ham because it looks just like one. It’s a stuffed and curved helper.

It’s called a ham because it looks just like one. It’s a stuffed and curved helper. You can use a tailor’s ham for many purposes, most importantly and often to shape garments and curved seams. You’ll use it on collars, sleeves, sleeve caps, cuffs, bustlines and darts, waistlines, hip seams, and more. You want a ham made from two fabrics: wool on one side for pressing wool, synthetics, and other fabrics that need low or medium heat; cotton on the other side for high heat tolerant fabrics like cotton and linen.

Here’s the one that I made, instructions are linked at the top of this page. Or you could save time and stuffing and just order one from our store.

Best-Press

I’m not a big fan of starch. It can be messy and it smells, polluting my room. Anyway, aerosol cans are environmental bad guys and I try to be environmentally conscious. Treating fabrics is essential,though, so I use Mary Ellen’s Best Press instead. I love this stuff and go through it quickly, because I never use my iron without it. As opposed to starch, it smells really nice. It doesn’t flake or leave any residue, which starch sometimes does. It provides a crisp finish and makes fabrics soil-resistant. I really recommend ditching the starch and switching to Best-Press instead; you’ll be glad that you did. Order some right now. In fact, do yourself a favor and get two bottles, because you will love this stuff and not want to be without it.

Be sure that your sewing room has all of these items so you can conquer any pressing job.

These will make gorgeous DIY gifts.

DIY Pom Pom Fleece Blanket

I rarely meet someone who doesn’t like pom poms or fleece. They are two great unifiers and when you put them together, magic happens. They became my inspiration recently when perusing through Pinterest for ideas for our handmade holiday gifts for the girls’ teachers. I began my search for ideas in September, well in advance of December, so I knew that I’d have time to get them done.

This DIY tutorial was my starting template. However it is a no-sew version of what I’m about to show you. Here is how to make a DIY pom pom fleece throw blanket.

Assemble your Materials

Order a bunch of fleece. I waited until Joann’s had a 50% off coupon and I ordered 9 yards. I want to make 6 blankets and each blanket will be 1.5 yards in length. 1.5 x 6 = 9. Do the math for however many blankets you need.

This is Joann’s anti-pill fleece fabric in Ivory.

This is Joann’s anti-pill fleece fabric in Ivory.

This is Joann’s anti-pill fleece fabric in Ivory. The roll arrives with the fabric doubled on the roll. Carefully measure out 1.5 yards for each blanket and then square up the sides as needed.

Carefully measure out 1.5 yards for each blanket and then square up the sides as needed.

Carefully measure out 1.5 yards for each blanket and then square up the sides as needed.

Voila, six blankets awaiting their pom poms.

Voila, six blankets awaiting their pom poms.

Voila, six blankets awaiting their pom poms.

I wanted to do an ombre, triple row of pom poms on each end of the blankets. I did the math here again. The fabric I ordered is 58” wide, by 1.5 yards (54”). I planned to add the pom poms on the shorter side, so I’d need 3 yards (1.5 yards per end) for each blanket. 3 yards time six blankets is 18 yards of EACH color of pom poms.

I got these from IchiMyLove on Etsy. Handily, they sold pom poms in bulk by 18 yards (IT’S LIKE IT WAS MEANT TO BE!) And their color selection was fantastic. They ship from Thailand but the shipping was only a little longer than the wait for a US shipped product. Plan ahead!

Their color selection was fantastic.

Their color selection was fantastic.

Know Your Fabric

A few tips when sewing fleece:

  1. Use a longer stitch length.
  2. I saw a lot of tutorials that said to use a ball point needle but I didn’t have any. I used a quilting needle, size 14, and it worked out great.
  3. Don’t mess up. It’s really difficult to rip out stitching on fleece. To prevent mess ups, practice on a bit of scrap to make sure you have stitch length and tension set correctly.
  4. Fleece doesn’t fray when cut. Because of this, you can decide to add reinforced stitching on the longer (non-pom pom) side or not.

Fleece doesn’t fray when cut. Because of this, you can decide to add reinforced stitching on the longer (non-pom pom) side or not.

Take Your Time

Stitching on the triple rows of pom poms on each side is time consuming. Put on some music or your favorite podcast and zen out.

If you have a tag to include, plan out between which layers you want to add it.

If you have a tag to include, plan out between which layers you want to add it.

If you have a tag to include, plan out between which layers you want to add it.

Take it slowly, pushing each pom pom out of the way of the foot, or you’ll end up like this, with your needle in the middle of a pom pom and your project on hold until you get yourself out of that mess. Don’t be me like me!

Take it slowly, pushing each pom pom out of the way of the foot, or you’ll end up like this, with your needle in the middle of a pom pom and your project on hold until you get yourself out of that mess.

Take it slowly, pushing each pom pom out of the way of the foot, or you’ll end up like this, with your needle in the middle of a pom pom and your project on hold until you get yourself out of that mess.

Once completed, I washed the blankets on the gentle cycle in warm, not hot, and did not use fabric softener. Tumble dry on the gentle cycle as well. I added a Shout Color Catcher just to make sure the pom poms didn’t bleed.

Here is the finished product. These will make gorgeous DIY gifts.

Do you give handmade gifts during the holidays? What are your plans for this year?

—————————–
Charlotte Kaufman is a writer and sewist in Mammoth Lakes, California. She specializes in marine and home interiors and continues to fall more and more in love with quilting. You can follow her at charlottekaufman.com.
As Pinned: Sewing Alterations in the Film Biz

As Pinned: Sewing Alterations in the Film Biz

Most film and television costume departments in New York City use bright pink oak tags to identify a garment as needing an alteration.

Most film and television costume departments in New York City use bright pink oak tags to identify a garment as needing an alteration.

Most film and television costume departments in New York City use bright pink oak tags to identify a garment as needing an alteration. Larger (and usually period) shows, like Boardwalk Empire, The Deuce, The Get Down, have two or three Costume Fitters who run the fittings for the background actors. They keep everything organized in the fitting rooms, take measurements and photos, assist the designers, do a lot of the pinning (unless something really wacky is going on, then they’ll usually call the Head Tailor in to check it out), and write the alteration notes on the tag.

Inevitably, a high percentage of alteration notes will read something like: “Take in as pinned” or “CB as pinned”. ‘CB’ means center back if you didn’t know. And ‘AP’ is the abbreviation for ‘as pinned’.

So, anyway: “Take in as pinned.”

Measure twice, cut once.

Take in as pinned

Here’s the thing, even if I pinned the alteration myself in the fitting room, ‘take in as pinned’ shouldn’t necessarily be followed literally. Seriously. It is indeed true that humans in general are not always symmetrical but it’s rare that you honestly need to take in one side more than the other. I also cannot tell you how many times an initial, “he has one arm longer than the other” turned out to be a jacket not sitting evenly upon the shoulders.

The garment can, of course, be lopsided to begin with – always a possibility if you’re dealing with vintage clothing. Measuring is always a good idea. As my Dad always says, “Measure twice, cut once.” He was talking about lumber and carpentry but the same advice applies to sewing as well.

I usually mark (or just measure) the pinned out alteration with chalk or wax on the wrong side of the garment. Then I take the pins out and assess the situation. If two side back seams were pinned in and one is considerably larger than the other, even them out. Do the same thing on both sides.

This is actually one of the top five laws of sewing – if there are laws of sewing.

I just pin everything out in through the center back then figure out later the best place to take it out.

I just pin everything out in through the center back then figure out later the best place to take it out.

I often only pin one side of a thing. More often, I just pin everything out in through the center back then figure out later the best place to take it out. A large amount will look better if you distribute it through more than one seam.

For example, if you pinned out 5 inches at the center back waist of a shirt or jacket, split the amount up between the center back, side back and side seams. The end result will look much better.

An alteration I do a lot is taking in the backs of men’s button front dress shirts. Unless it’s a slim cut John Varvatos, most men’s dress shirts are excessively roomy in the back. The quick and easy solution to this is to add side back darts.

If I have time, and the shirt has back pleats going into the yoke, I’ll take the whole back off and take out the pleats – re-cutting the bottom part of the armseye and the side seams. This can take quite a bit longer, especially if you are dealing with a shirt by Brooks Brothers, who insist on gluing their side seams as well as sewing them.

Take in as pinned.

Take in as pinned.

Speaking the same language

At Blindspot, since I’m the Head and only tailor, we just put blank pink tags on the garments as indications that they need altering. If I pinned it, I don’t need any notes. The Costume Designer for the show is also an excellent tailor (which is rare) so if I wasn’t in a fitting for some reason, he can easily tell me what needs to happen – often without pinning.

He’ll come to me and say, “I threw this on so and so, it just needs to be taken in about this much in the back.” Then he’ll show me by pinching an amount out with his fingers.

Tailoring and patterning is indeed a language all its own and it’s a beautiful thing when you work with someone who speaks it as well as you do.

Color Theory for Quilters

Color Theory for Quilters

Color Theory for QuiltersColor theory and scheme play an essential part in any design, and color choices are most important in planning any quilt. Choosing a color scheme that works for your quilt prevents muddy color or boring results from your hours of work.  You want quilts that both stand out and fit in, and the key to this is using color theory to your advantage. Using colors that work together as a quilting team in your design can enable you to do any or all of the following:

  • Achieve harmonious results using a wide array of many fabrics
  • Make some colors pop and others recede, to emphasize or unify block patterns
  • Design quilts to complement interiors without any clash, and without being boring
  • Have backgrounds that work well, rather than as competition to spoil design effects
  • Balance any design and make all your quilts sing
  • Add extra Oomph and Wow Factor, for perfect success

You can do all this with ease when you understand color theory and recognize the logical choices available.  We don’t have to reinvent the wheel, and so we can choose from a preselected menu of color scheme styles, or teams, that we know will always work wonderfully together.

The Color Wheel

Color theory and schemes

What are some of these tried-and-true color teams? Let’s look at them all:

Monochromatic

A monochromatic color scheme uses only one color, choosing from all shades and tones of that color. How many greens are in the garden, and all of nature? It feels like shades of blue are unlimited when you think of the many colors for sky and sea.  The brown palette includes all colors of dirt and soil layers, skin tones, fur shades, tree barks, and more. You could use hundreds of different fabrics in one quilt and stick to one color. Or limit yourself to less, if you like, but know that a monochromatic quilt is a viable option in any color. You can also use a monochromatic palette as an element of your quilt, rather than the whole thing. This trick will enable you to paint with your fabric and achieve dramatic landscapes or picturesque quilts.

Analogous

Analogous colors are next to each other in the color wheel.  You can choose a narrow or a wide analogous scheme. You could choose to use all shades of just red, orange, and what is between them, or include all the way to yellow for more contrast. Choose from the other side of the wheel using blues and indigos, or including violets. Or go with yellow, green, and blue, including everything in between them, or blue, purple, and red with shades in between these. There are a lot of options for analogous quilts. I made one using blues and indigo, I showed how to make it on this blog a while ago.

Complementary

Complementary colors really set each other off.

Complementary colors really set each other off.

Complementary colors are opposites on the color wheel. They go well together as natural pairs and seem to reflect their differences pleasingly. Complementary pairs are: red and green, blue and orange, yellow and purple, and more.  Indigo is between blue and purple, so its opposite shade is between yellow and orange. You could also choose two analogous colors and also use both color’s complementary colors. For example, I have never used indigo and violet with yellow and orange yellow as a color scheme, but I know that it would work well.

Triadic – primary, secondary and tertiary

The familiar primary color scheme of red, yellow, and blue is triadic. Triadic colors are evenly balanced and play well together without competition. The secondary triadic trio includes green, purple, and orange. Tertiary triads include indigo, red-orange, and yellow-green together, or yellow-orange, blue-green, and violet red. Remember that you can choose from different shades of each color. For example, the familiar pastel trio of pink, pale yellow, and light blue used so often for babies, is a just a lightened up version of the primary color triad.

This rainbow book of colors is one of my favorite gifts ever.

I used a Rainbow color scheme for the cover of this baby color book.

Rainbow

The rainbow color scheme includes, you guessed it, every color of the rainbow. Don’t leave any out; a rainbow palette must include red, orange, yellow, green, blue, indigo, and purple. You can decide for yourself whether to include the tertiary colors that fall between these or not. A rainbow scheme will work with or without these colors. A rainbow scheme always results in a vibrant quilt.

Warm and cool

Warm and Cool

Warm and Cool.

Warm colors range from red to yellow, like the colors of the sun. Browns and sands are included in this group, too. Cool colors go from blue-green to purple, like the seas and the skies, including at night. Warm colors advance; cool colors retreat. Cool colors separate and warm colors unify. Stars pieced from warm colors really pop against a cool background.  Pairing warm and cool colors differently can make dramatic differences in blocks, and changing this up may provide a lot of interest in repeating motifs.

Light and dark

This is the ultimate contrast, like black and white. Shapes are emphasized and the look is simple and uncluttered. Use your choice of colors for the light and dark pairing. You could choose light and dark shades of the same color or a complementary pair to contrast between light and dark, for example. While black and white can be starkly dramatic, this can also be downplayed in a light/dark combo by choosing a mix of lights and darks and gradating the tone.

Neutral

Natural colors: the seashore and shells; barks and stems; wood; dried grasses; crinkly leaves; skin-tones; rocks and soil. Grays like the sky sometimes and clouds, or concrete, and silvery steel. Creams, ivories, bone, and every shade of brown are all neutral colors. Neutrals can be light or dark. They are non-competitive, and help other colors. This is why they work so well as backgrounds. Neutrals are peaceful and offer support, so in general they are always welcome.

Traditional

A traditional quilt color scheme depends less on color than value. It is traditional to choose three colors for quilting: one that is dominant, one that is subordinate, and one as an accent. The dominant and subordinate colors play off each other, and the accent provides a pop. The red squares traditionally used as the centers of Log Cabin blocks both provide pop and serve to unify and define this classic design. You can use your dominant color to emphasize a repeating motif and the subordinate color as the background, sprinkling the accent color about to add sparkle and interest.

Scrap bag

It is a valid choice to use no color scheme at all and choose indiscriminately from among a plethora of colorful scraps. Scrap quilts, with their confetti of riotous colors, are endlessly pleasing, both to make and to look at. You can piece together a pleasing string or strip patchwork quilt by choosing blindly from an abundant scrap pile.

Choose a variety of fabrics

Color Theory for QuiltersYou can use a favorite fabric as a starting point to choose your scheme around, or you can begin choosing fabrics according to a predetermined scheme. The unlimited choices available to quilters are a big part of what makes quilt-making fun. You can increase your enjoyment in making any quilt by widening your variety of fabric choices. If you choose a triadic color scheme, for example, but then choose only one fabric of each color to complete your quilt, you may be bored by the lack of variety.  Choose several fabrics in each color to increase interest instead.

Don’t be daunted by color choices. Choose any one of these color schemes and your quilt is sure to be a success. I hope that you understand color theory now and that this has helped you.

DIY Fun Jeans Project

DIY Fun Jeans Project

I think jeans are one of the most comfortable items in my wardrobe. They’re also a little boring. Sometimes I want to express myself while still enjoying the comfort of my favorite pair of jeans. With this awesome DIY jeans project, I can – and so can you.

Patches

DIY Fun Jeans Project

I’m not great at embroidery, but with the abundance of patches available in craft stores and online, I don’t have to be – and neither do you. Pick up patches in a variety of sizes. Any that you think are fun and express your personality. You may not use them all on one project. That’s okay.

Lay out the pair of jeans you’re going to spruce up and place patches to see what they’ll look like. Do one side at a time and sew them down with hand stitches. Don’t forget the waistline, pockets and cuffs. Well placed patches give jeans personality and character. Best of all, if that pair of jeans gets worn out or no longer fits, you can easily move them to another pair.

Contrasting Fabric

This is a great way to use up some of your fabric stash while making a great item for your wardrobe. Choose some contrasting fabric you really love. You should have about a yard or so of the fabric depending on how wide you plan to go with the next step.

Slit the jeans on the outside from the bottom of the cuff up the seam to about half way to the knee. Using a triangular piece of contrasting fabric as an insert, resew the seam edges on the fabric creating a flared bottom. The more fabric you use, the wider the flare will be. Do both legs if you want the jeans to be symmetrical or do just one leg to create a unique look.

Combine It

You can do either of these DIY jeans projects alone and wind up with a fabulous pair of jeans or you can combine them to create a pair of jeans like none other. I love both of these DIY projects because no special machinery or equipment is needed. Patches are inexpensive and I can use up some of my fabric stash.

If you give either of these DIY jeans projects a try, share the pictures of your results. I’d love to see them!

DIY Ironing Board Ideas

I recently decided to upgrade my ironing station from two towels placed on top of my new DIY work station to something fancier. I went from this:

I recently decided to upgrade my ironing station from two towels placed on top of my new DIY work station to something fancier.

DIY work station.

To this:

Fancy, right?

Fancy, right?

Fancy, right? Before I made my own ironing station I did a little research. Here’s what I learned.

Be Creative

Images from left to right: BH&G, Hometalk, Crazy Mary Revista, Sew We Quilt.

Images from left to right: BH&G, Hometalk, Crazy Mary Revista, Sew We Quilt.

Images from left to right: BH&G, Hometalk, Crazy Mary Revista, Sew We Quilt

The sky is really the limit when planning where you want to iron. Do you want to be able to iron a lot of fabric at a time? Go big. Do you want to save space? Go between the studs or hang from the wall. Almost anything with a flat top can be converted into an ironing board.

Thing Long Term

Images from left to right: Flaming Toes, Stitchery Dickery Dock, A Diamond in the Stuff, A Crafty Fox.

Images from left to right: Flaming Toes, Stitchery Dickery Dock, A Diamond in the Stuff, A Crafty Fox.

Images from left to right: Flaming Toes, Stitchery Dickery Dock, A Diamond in the Stuff, A Crafty Fox

Will you want your ironing board to always be on display? Consider the fabric you choose and if it coordinates or clashes with the space you’ll be ironing in.

Consider the fabric you choose and if it coordinates or clashes with the space you’ll be ironing in.

Consider the fabric you choose and if it coordinates or clashes with the space you’ll be ironing in.

I made my cover removable. It snaps firmly into place on my work station, but I can slip it off in a moment if I want the whole space.

Be Resourceful

Want to save money? You can line your ironing board cover with many things. Try using old wool blankets, receiving blankets, towels, or the innards of your former ironing board covers. Layers of batting work as well. If you want to use Insul-Bright, make sure to include a layer of batting to absorb extra moisture.

Go Vintage

Images from left to right: Simply Pallets, Recyclart.org, The Rustic Pig.

Images from left to right: Simply Pallets, Recyclart.org, The Rustic Pig.

Images from left to right: Simply Pallets, Recyclart.org, The Rustic Pig

If you are retiring a vintage ironing board for a newer one, don’t let the old board go to waste.
Use it as a wine station, to store your thread, or for holiday decorations.

Have Fun!

Have you ever made a DIY ironing station? Tell us about it!

Have you ever made a DIY ironing station? Tell us about it!

Have you ever made a DIY ironing station? Tell us about it!

—————————–
Charlotte Kaufman is a writer and sewist in Mammoth Lakes, California. She specializes in marine and home interiors and continues to fall more and more in love with quilting. You can follow her at charlottekaufman.com.