One Day Sewing Projects

One Day Sewing Projects

one-day-sewing

Sometimes I don’t want a big sewing project. If I’m pressed for time or simply need to fill an afternoon or one day out of the weekend, I don’t necessarily want to start a project that will take days, weeks, or months to complete. Nor do I want the hassle and expense of shopping for supplies for a larger project. I just want to sew for a couple of hours and have something to show for it. If that’s ever happened to you, these sewing projects you can do in a day are the perfect solution.

Circle Skirt

Make this for yourself or your daughter…or making a matching mother/daughter pair. This circle skirt can be done in just a couple of hours and it’s perfect for whirling and twirling when it’s done. Unless you have large amounts of the same fabric on hand (cause you just buy fabrics you like when you see them, maybe?) you’ll need to hit the store for material. If you’ve got enough fabric on hand, you’re good to go.

Vendor Apron

Are you the one they ask to help out with bake sales, garage sales, and other school fund raisers? You need this vendor apron to keep your notepads, pens, and other supplies close at hand. It’s super simple to make with an old pillowcase or one you fell in love with at the thrift store and now need a use for. Make a bunch so the whole PTA will have one.

Trendy Fashion Tank

With this awesome pattern there’s no need to spend your hard earned money on brand name t-shirts and tanks. The trendy fashion tank is patterned after a popular JCrew top, but made by you. You’ll need jersey sheets or another source of that same material to make this pattern. Flat jersey sheets can be bought at discount stores for around $7, so it’s well worth the investment to make this shirt yourself.

Hair Bows

Not only do these work up fast, they’re a great way to use up your scraps. Hair bows never really go out of style, so make a bunch. Give them as gifts or sell them at craft fairs. Depending on the material you choose they can be vintage, modern, or anything in between. No matter what, they’re sure to be a hit!

The next time you’re looking for a quick project, try one of these projects. They take a day (or less in most cases) and leave you with a great finished piece, a feeling of accomplishment, and instant gratification. Many of these projects are also great for sew sewers since they can quickly see the results of their efforts.

Fast and Easy Way to Hem Pants

Fast and Easy Way to Hem Pants

My fast and easy way to hem jeans & pants.

My fast and easy way to hem jeans & pants.

I’m barely over 5’ tall. It used to be that clothing companies made pants in “short” lengths to accommodate people of my stature. More and more often now, though, I’m finding that clothing companies, particularly jeans producers, make pants in “regular” and “tall.” I’m not sure why they think all the short (or as I prefer to call it, concentrated awesome) people no longer need pants, but there you have it. As you can imagine, this leaves me with the choice of either patching jeans and pants until there’s nothing left to them, or buying clothes that are too long and hemming them. Hemming something I’ve paid money for ticks me off, so I want to get it done and over with quickly. I developed a fast and easy way to hem jeans and pants.

First

Find a pair of pants that are a length you like. These will act as your template or guide. Lay them flat and smooth. If possible, I suggest pinning them down to keep them flat. Next, turn the pair of pants you’re going to hem inside out. Lay them on top of the pants that are the correct length.

Let’s begin

Choose a place on the leg of the pants where you’ll be okay with seeing a line. I often opt for the upper thigh. In that spot, pull the leg of the pants that are too long up, gathering the extra fabric in a straight fold that goes around the entire leg as you go. When the pants are the right length, pin this fold so that it comes directly out from the leg itself. Do this on both legs.

Almost done…

Sew around the fold to create your shortened pants, then cut off the extra fabric. Whip stitch around the cut edge for extra strength in the seam and reassurance that it won’t split apart while you’re wearing your new pants. Again, do the same thing on both legs.

Viola!

Hemmed pants, perfect for your height – no measuring or marking required. This is one of my favorite “sewing cheats” because it’s so quick and helps me buy pants and jeans affordably, even clothing companies no longer feel the need to cater to people my size. Give it a try next time you need to hem pants and let me know what you think!

Make More Time to Sew, Part Two

Make More Time to Sew, Part Two

Here are more tips to make more time to sew
Here are more tips to make more time to sew.
Hi! I hope you found part one of this series helpful for making more time to sew. I saved my favorite productivity hacks for this week. Here are new ideas for how to make more time to sew; hopefully these will help you, too.

Automate systems

If you can’t get someone else to go for your groceries, could you streamline and automate your system by meal planning and ordering the groceries online, for example, rather than wandering grocery store aisles with your cart?

An easy system for meal planning definitely helps me to make more time.

Another example: some people do laundry on a certain day of the week, but I can’t imagine that. I do laundry every day, automatically. Or I did, anyway; I battled laundry and gave up significant amounts of time to taking care of laundry with love for my family.

Finally, I managed to eliminate laundry backups and piles by doing a load or two — through to completion of putting them away, without exception — every day.

And my work on getting this system into an automated rhythm paid off for me even further. My husband surprised me by offering to take over this daily management! I happily loaded laundry onto my don’t do list and that gives me more time every day.

Keep reading to see more ideas for easy automation of regularly recurring tasks.

Keep reading to see more ideas for easy automation of regularly recurring tasks.

Just having an automated system of where you always put your keys, phone, and other items, for example, could potentially save many minutes of time spent searching for your things.

The same goes for your sewing tools and space, of course. Keep your machines next to their thread, for example. Arrange a hot iron and pressing board within your reach from your sewing machine when you make patchwork. Always know exactly where everything you need is by having a dedicated place for everything and keep everything always in its place when not in use. These little tweaks can save a lot of time for more sewing.

Speaking of systems:

Take a tip from the king of Twitter. I am talking about Jack Dorsey. Dorsey is one of Twitter’s founders and its first CEO. And when Twitter performance was lagging in 2011, he came back as CEO to turn the company around. Dorsey also founded Square, the app that turns a cell phone into a card scanner and enabled everyday folks to easily accept credit card payments.  For a time, he was CEO of both giant operations.

This productivity whiz shared his secret by talking about how he themes his days. When I read his descriptions about how he handles marketing, communications, and growth on Wednesdays, and culture and recruiting on Fridays, for example, I sensed a way to make more time and I started thinking about this.

Keep it simple, silly: easy to remember themes

For this to work for me, it had to be simple and easy to remember. After working with different iterations of this idea, my current themes for my days include things like:

Monday

Mail and management on Mondays. Some folks might prefer to use the OHIO rule (only handle it once) for mail. For me, though, I prefer to deal with the last week’s incoming mail quickly and all at once on Mondays.
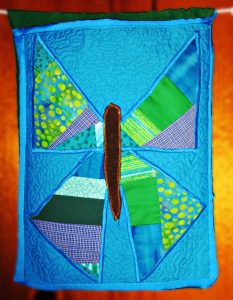
I made this butterfly organizer pocket to hold my mail for dealing with on Mondays.

I made this butterfly organizer pocket to hold my mail for dealing with on Mondays.

Management for me means I am paying bills, scheduling tasks, planning my next week and reviewing the previous week, following up on things, etc.

You could have Making on Mondays, and fit sewing and other projects in on this day every week.

Tuesday

I clean tubs, toilets, and tile on Tuesdays.

Or how about teaching on Tuesdays? You could teach yourself or someone else how to do something new.

Wednesday

For me, Wednesdays are devoted exclusively to writing, and I try to do not much else, because I am currently writing more than one book.

If you don’t have much writing to do, you might like to have whatever Wednesdays instead, for maximum scheduling freedom on hump days.

Sewing could definitely fit into Whatever Wednesday!

If you are in the once a week laundry camp, you could do your washing on Wednesdays.

Thursday

Thrifty Thursdays. I used to choose to do my shopping on this day, since following the thrifty theme helped me not to make impulse purchases or otherwise spend unwisely.

Now that shopping is on my don’t do list, I am helping to free time from excess management on Mondays by theming Thursdays for thinking, too. I allow myself to invest a larger percentage of this day for reading and learning new things.

Friday

Floors, FUN, fitness, and friends on Fridays- I use Fridays for fitting in all these things.

I try to schedule most of our outings, field trips, hikes and other outdoor activities, and also playdates or informal dinner parties with friends, on Fridays.

I also do a good bit of sewing under the umbrella of fun on Fridays. This would be for fun new project ideas, just playing with patchwork or starting a new quilt, stuff that is fun. I wouldn’t do mending on a Friday, since that isn’t as much fun.

We have family time every day here, but if yours doesn’t live with you, maybe you could use Fridays for family time, if this will help you.

I’ll also tell you about a tool that can save a ton of time from Friday’s floor cleaning task. I have a lot of hardwood and other hard floors, and also a pack of boys and a dog. So cleaning floors used to take up what felt like half my day on Fridays.

Luckily, a steam mop is a huge helper that cuts this task from tedious chore to so fast and effective it is almost fun to clean floors.

These are not all made equal, however. I love the well-designed Luna Plus steam mop system, especially because of its handy extra uses in the bathroom. This baby can save time on the floors on Fridays, and the tub and tile on Tuesdays, too.

It cleans twice as well as you can, and in half the time!

Saturday

Sew on Saturdays.
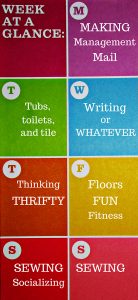
Here are some ideas to get you started thinking about your own themes for every day of the week.

Here are some ideas to get you started thinking about your own themes for every day of the week.

I would advise against any temptation to have Saturday shopping as a theme! That is based on my own opinions, however; you should do what makes you happy.

If you normally shop on Saturdays, could you move to using thrifty Thursdays for this? Then you could save money for more sewing equipment and supplies and a whole day of the week for sewing. I’d love to help you save time AND money, so do consider this option.

Some folks might like to theme their Saturdays for socializing. I do this some weeks myself.

Sunday

Sew on Sundays, too!

It is fortunate that there are two days of the week beginning with S! And it makes perfect sense when theming your days to plan two days of sewing, if you want to make more time to sew.

Of course you could also devote all or part of either Saturday or Sunday to Service or as your Sabbath day of rest and reflection.

And wait, there’s more!

This series will be continued to part three, next week, because I’ll like to show you a few more ways to make more time. And I’ll share a video I am working on for you, where I’ll give you more details and inspiration about all the ideas from this series.

Until then, happy sewing. I hope these tricks can help you to make more time for sewing this week, and I hope you get to enjoy making something you’ll love.

Scrap-Fabric Keychain!

Scrap-Fabric Keychain!

If there’s one thing I’m interested in regarding sewing, it’s finding new ways to use my leftover fabric. In fact, if you’ve been keeping up with my posts (I won’t hate you forever because you haven’t! Honest!), it’s a concept that’s been explored already. But I still have fabric at my disposal, so the idea of how to use those pieces continues as a subject worth looking into.

So, for today’s post, I’m going to give you yet another way to use your leftover fabric — even if that leftover fabric is fairly small! Need proof? The project I’ll use for an example was made out of ONE fabric block that was less than ten inches in either direction. Sound good? Then let’s dive into this project, which for the record, is a keychain!

What you’ll need:

  • One fabric block. The size varies depending on what shape you want to make your keychain — and what size you want your keychain to be — but you don’t need anything over 10″ x 10″. Also, remember that flimsy fabric might not keep your keychain shape too well, so try something that’s sturdy — maybe even felt.
  • Key ring. It isn’t really a keychain if you can’t hang a key on it!
  • Sewing essentials like needle, thread, and straight pins, as usual!

What you’ll do:

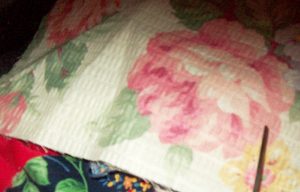
Step One:  Choose your fabric, keeping in mind the guidelines about size and texture. You should also note that your shapes for your keychain will only be so big, so you should consider that size. If your final goal is a one-inch shape, for instance, you should pick a fabric that’ll look good when cut down to that size. I changed my fabric choice on this detail because with my initial decision, I would’ve potentially had part of a flower, a whole lot of plain color, or scattered bits that didn’t really look that fantastic to me. It might be something you want to consider as well!

I changed my fabric choice on this detail because with my initial decision, I would’ve potentially had part of a flower, a whole lot of plain color, or scattered bits that didn’t really look that fantastic to me.

I changed my fabric choice on this detail because with my initial decision, I would’ve potentially had part of a flower, a whole lot of plain color, or scattered bits that didn’t really look that fantastic to me.

Also, decide what shape you want your keychain to be. For me, I went with a heart because it was simple and traditional, but there are plenty of other options. Once you know your shape, you can create a stencil, or use an existing stencil, to make sure your fabric is going to be cut in the right way.

Cut it out

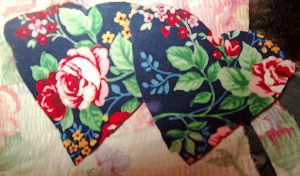
Step Two: Cut out your shapes! This was a perk to choosing a heart because you can make one by only cutting one side of the heart, as many of us might have learned in childhood. I don’t need to cut both sides if I fold the fabric in half, and I ended up only having to make that folded cut once for both sides of my keychain by folding the fabric into fourths. That way, with one swooping I-want-a-heart-shape cut, I got two bits of fabric that admittedly needed a bit of tailoring, but were good starting places for my heart.

With 1 swooping I-want-a-heart-shape cut, I got 2 bits of fabric that admittedly needed a bit of tailoring, but were good starting places for my heart.

With 1 swooping I-want-a-heart-shape cut, I got 2 bits of fabric that admittedly needed a bit of tailoring, but were good starting places for my heart.

Whether you find a simple method to make both pieces at once or use a stencil, cut two shapes out of the block of fabric — one for the keychain’s front side and one for the back. Make sure they’re even enough so that too much excess material doesn’t show on either side and that you’ve accomplished cutting the shape you wanted — or at least one you can live with! Also, remember to cut a line of fabric that is a couple of inches long and wide enough to suit your purpose (maybe ¼”). This will be your loop to put the keyring through. NOTE: These numbers can vary depending on what size you want your keychain to be!

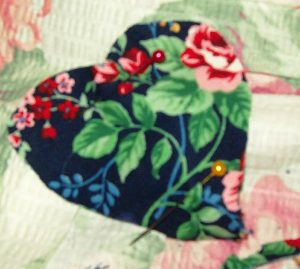
Step Three: Once your shapes are cut and trimmed, it’s time to start planning your sewing. Even though this is a small project, it could still pay to have straight pins keeping your work in place, so you might want to break out a couple! Be sure before you pin or sew that your main fabric pieces are together with their patterned sides facing outward, and don’t forget to fold that additional line of fabric and place the tips of both ends between the two shapes.

Be sure before you pin or sew that your main fabric pieces are together with their patterned sides facing outward.

Be sure before you pin or sew that your main fabric pieces are together with their patterned sides facing outward.

Put a ring on it

You might think about going ahead and adding your keyring here as well so that you don’t have to put your fabric through the stress of being twisted through the keyring. To do that, you’d just need to loop the line of fabric through the ring before you pin it between the shaped fabric pieces for sewing.

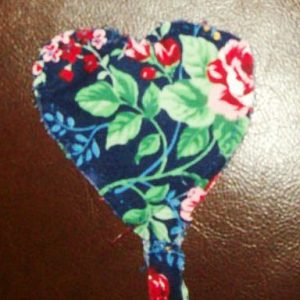
Step Four: Sew! Since this is a keychain, the process won’t take long! And be sure to cut off the excess thread when you finish!

Sew! Since this is a keychain, the process won’t take long!

Sew! Since this is a keychain, the process won’t take long!

Step Five: Hang a key on it and enjoy!

Beginner Sewing Project: Felt Flower Pincushion

Beginner Sewing Project: Felt Flower Pincushion

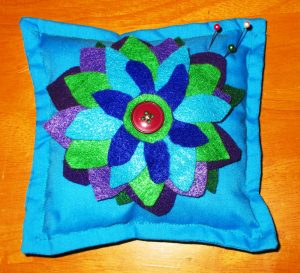
Felt Flower Pillow Pincushion

Felt Flower Pillow Pincushion

A pincushion is one of the first things you need for sewing. You will love yours if it is a pretty one and you make it yourself.  This project is super easy and it makes a perfect first project at your new machine.  This pincushion is a generous size and you won’t find one quite as nice for sale at the store.

If you are not an absolute beginner, you can whip up this pretty pincushion quickly for yourself or for a friend.  This makes a sweet gift.  You could even make these for friends who don’t sew by filling with lavender flowers instead of stuffing so that they can enjoy it as a pretty sachet instead.

Even non-beginners appreciate a fast project. Making one or a few of these might be a nice pick-me-up on an otherwise dreary afternoon.

Though it does make a pretty sachet, this project was designed as a pincushion, and it is my favorite of the many in my room. I sewed snaps on the back of mine and made a permanent place for it on my sewing room organizer curtains.

Pin it

Speaking of pins, here’s an important word to the wise: All pins are not created equal!  I highly recommend you further beautify this pincushion with head pins.  Really, I can’t stress this enough- do yourself a favor and arm yourself with this kind of pin. Pearl or flower head pins are easy to see, find, and remove from your project while sewing. Plus, they are pretty!

To make this beginner project pincushion, you need:

Two six-inch fabric squares

Felt scraps, for cutting petals.  I made mine using purples, greens, and blues.  You could make a more realistic flower using all one color of felt, or perhaps several shades of the same color.

A button for the flower center

Embroidery thread

Polyester fluff or other stuffing

To make the flower:

I cut my petals into pointy football shapes.  I tapered the petals at both ends to reduce bulk behind the button center.

Six graduated layers of six petals each make a nice, full flower.  Use the six largest petals for the back layer, stepping down to the smallest set of six petals for the front layer.  Also cut a small, one-inch circle of felt to place in front of your smallest layer of petals as the flower center.

Cut a three inch backing circle from the same color of felt as the back layer of petals and assemble all layers atop this circle and stitch them down by hand through the center.  Then place the button at the flower center and sew the button down using embroidery thread in a contrasting color.  I used a metallic silver thread in this example.

Now, set the flower aside.

Assembling the pincushion

Place the right sides of the 6″ squares together.  Sew around the square, leaving an opening for turning. Be sure to back-stitch the beginning and end of this seam.

After you’ve done that, clip off the tiny corner triangles outside of your seam, and turn the pincushion right side out. Use a point turner or other tool to push the corners out well.

Now stuff.  Stuff it nice and full, and then top-stitch to close your opening. I like to continue the top-stitching and go all around the entire square using matching thread.

Center your flower on top of the pincushion. Affix it by hand-stitching the backing circle to the cushion.  The larger petals will prevent these stitches from showing.

And now you made a pretty pincushion and completed this easy project that fast.

What will you make next?