

The essential quilting ruler types are long/strip rulers, square/trim rulers, small trim rulers, triangle/HST rulers, curved/appliqué rulers, and machine/longarm rulers. Each one solves a specific cutting or guiding job, and knowing which to reach for saves you time, fabric, and frustration. According to Missouri Star’s quilting ruler guide, most quilters build their collection around two workhorses first, then add specialty tools as projects demand.
Your practical starter set is three to five rulers: a 6" x 24" strip ruler, a 10" or 12.5" square, and a small 3" x 6" trim ruler. Add a triangle/HST ruler and a curved ruler when your projects call for them.
Here’s how each category maps to its main job:
- Long/strip rulers (6" x 24" or 6.5" x 24.5"): cutting yardage into strips and borders
- Square/trim rulers (4.5"–12.5"): squaring up blocks and sub-cutting strips
- Small trim rulers (3" x 6" or 3" x 7"): trimming dog ears, small units, and tiny blocks
- Triangle/HST rulers: cutting half-square triangles, Flying Geese, and angle units
- Curved/appliqué rulers: guiding rotary cuts along curves and French-curve shapes
- Machine/longarm rulers: guiding machine movement during ruler-foot quilting
Pro Tip: Buy the long strip ruler and the large square first. You will use them on nearly every project before you ever need anything else.
Key Takeaways
The two most important rulers for any quilter are a 6" x 24" long rectangular ruler and a 10" or 12.5" square, with specialty rulers added only as specific projects require them.
| Point | Details |
|---|---|
| Start with two workhorses | A 6" x 24" strip ruler and a 10"–12.5" square cover most beginner cutting tasks. |
| Match thickness to the task | Use ~1/8" rulers for rotary cutting; use ~1/4" rulers for machine/ruler-foot quilting. |
| Longarm rulers guide stitching | Longarm rulers direct machine movement, not fabric cutting, and require a matching ruler foot. |
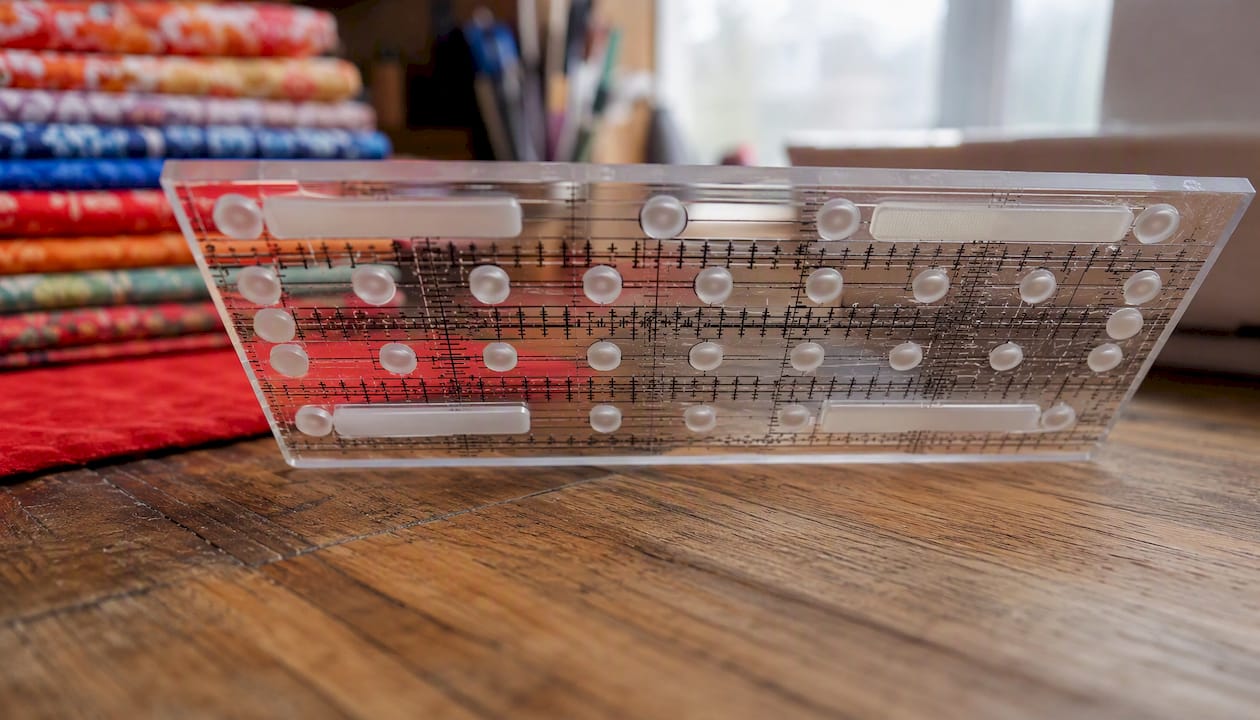
| Non-slip features matter | Embedded gripper dots or silicone strips prevent ruler sliding and improve cut accuracy. |
| Sewingmachinesplus for machines and accessories | Sewingmachinesplus offers quilting machines, ruler-foot compatible accessories, and personalized consultations. |
Table of Contents
- What Are the Different Quilting Ruler Types?
- What sizes, materials, and markings should you look for?
- How do you cut accurately and safely with quilting rulers?
- What makes longarm ruler quilting different?
- How do you choose the right rulers for your projects?
- How do you care for and store quilting rulers?
- A practical path to building your ruler collection
- Quilting rulers at Sewingmachinesplus
- Sources
- FAQ
What Are the Different Quilting Ruler Types?
Quilting rulers are clear acrylic tools with laser-etched grid lines that let you measure, mark, and cut fabric with a rotary cutter and self-healing mat. The transparency is the point: you see the fabric underneath, align a line, and cut cleanly without guessing.
Long/strip (rectangular) rulers
A 6" x 24" or 6.5" x 24.5" rectangular ruler is the single most-used tool in most quilters’ kits. You reach for it every time you cut strips from a folded length of fabric, trim borders, or cut binding. The extra length lets you cut across a full folded width of quilting cotton in one pass. Some quilters also keep a narrower 3.5" x 24" version for cutting binding strips specifically.
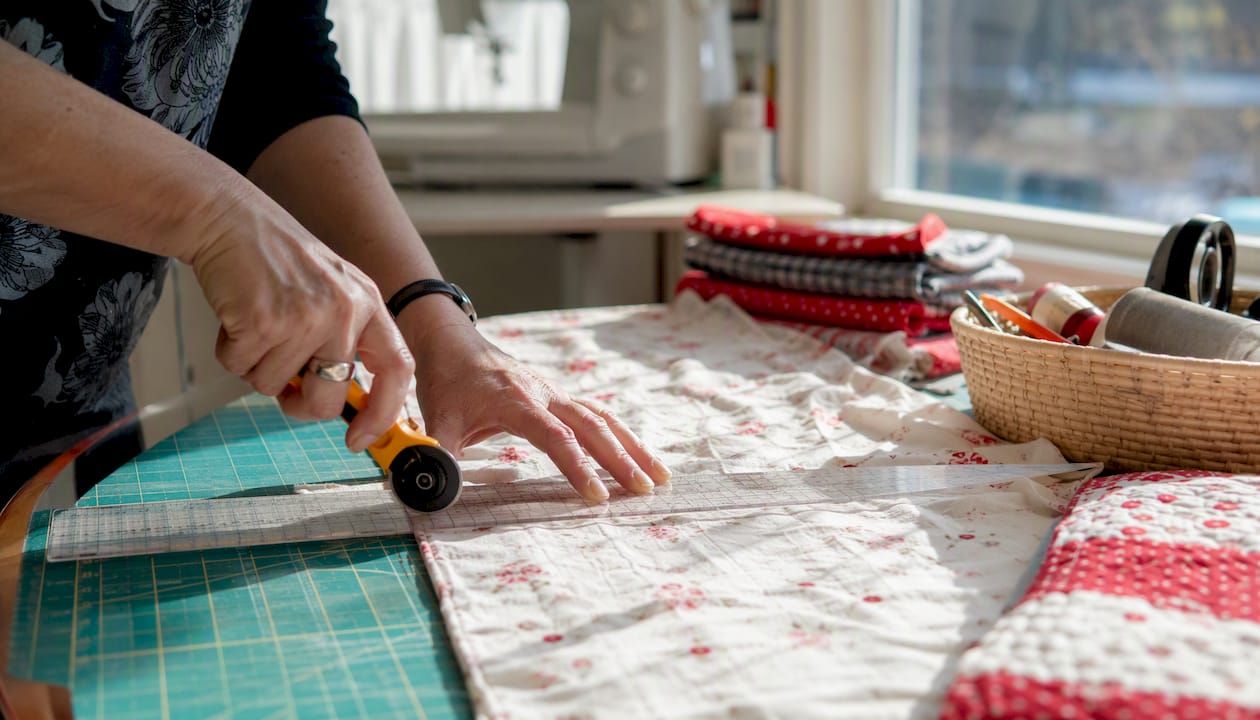
The one trade-off: very long rulers can wobble mid-cut if your hand stays at the top. The fix is simple and covered in the technique section below.
Square and rectangle rulers
Square rulers in the 4.5"–12.5" range are the go-to for squaring up finished blocks, sub-cutting strips into squares, and fussy-cutting a specific motif from printed fabric. The diagonal lines etched across most square rulers help you find the center of a block and trim triangle points accurately. Common sizes: 4.5", 6.5", 9.5", 10", and 12.5".
A 10" or 12.5" square is the second ruler most authorities recommend for beginners, right after the 6" x 24" strip ruler.
Small trim rulers and mini-squares
A 3" x 6" or 3" x 7" ruler handles the jobs that a large ruler makes awkward: trimming dog ears off triangle units, cleaning up small half-square triangles, and squaring tiny blocks. Mini-squares in the 2.5"–4.5" range serve the same purpose. These are inexpensive and genuinely useful once you start making blocks with lots of triangle points.
Triangle/HST and specialty angle rulers
Dedicated triangle rulers and HST (half-square triangle) templates let you cut triangle units directly from strips without drawing diagonal lines on every square. Triangle rulers and Flying Geese templates speed up multi-unit triangle piecing and reduce fabric waste compared with the draw-and-sew method. A 60° triangle ruler handles equilateral triangles for tumbling block and hexagon-adjacent patterns. A QST (quarter-square triangle) ruler cuts the larger triangles used in hourglass blocks.
Curved/appliqué rulers and French-curve types
Curved rulers guide your rotary cutter along a smooth arc, which is otherwise nearly impossible to cut freehand. French-curve rulers offer multiple arc radii on one tool. These are specialty purchases best acquired when a specific project requires curved piecing or appliqué.
Machine/longarm rulers
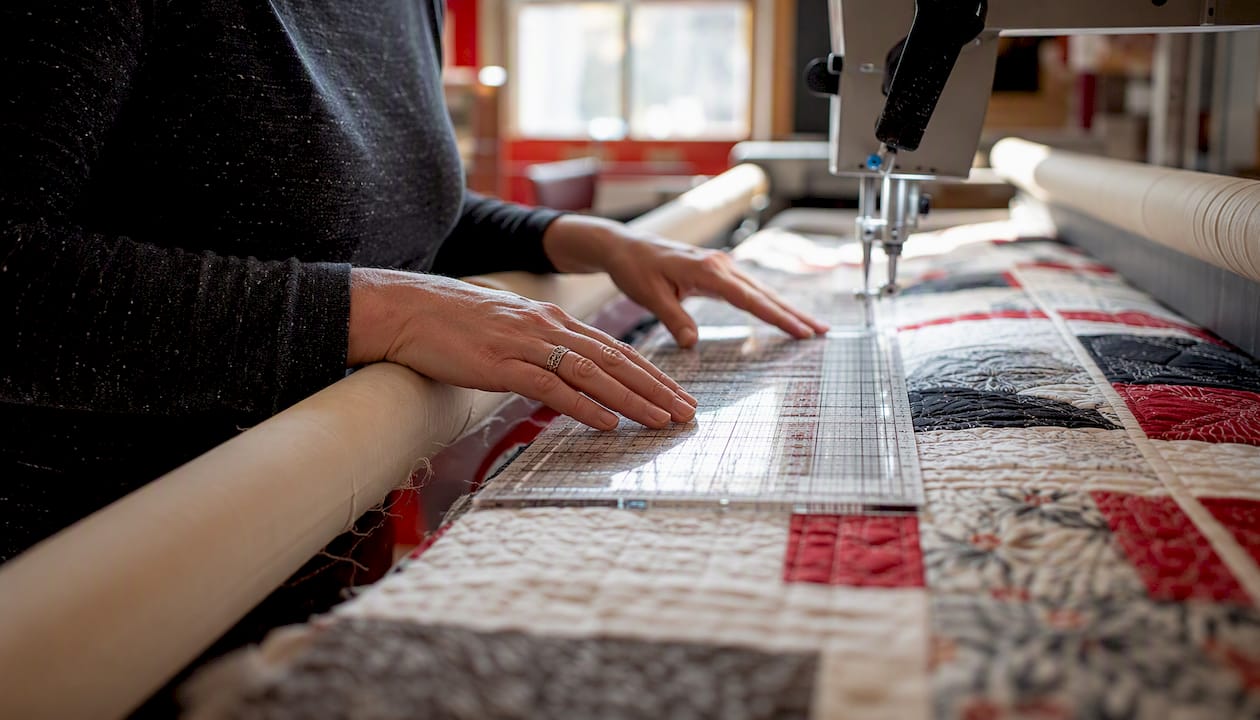
These are thicker than standard rotary-cutting rulers, typically around 1/4" thick, and they work with a ruler foot on a home machine or longarm. Their job is to guide the machine’s movement during quilting, not to measure or cut fabric. They look similar to cutting rulers but are not interchangeable with them for safety reasons explained later.
Specialty circle and appliqué systems
Circle systems like the Creative Grids Circle Savvy use graduated slot-cut guides to cut clean circles without tracing templates. These are project-specific purchases. If you make a lot of appliqué circles or cathedral windows, a circle system pays for itself quickly. Otherwise, it sits in a drawer.
| Ruler type | Best for | Common sizes |
|---|---|---|
| Long/strip rectangular | Cutting strips, borders, binding | 6" x 24", 6.5" x 24.5" |
| Square | Squaring blocks, sub-cutting | 4.5", 6.5", 10", 12.5" |
| Small trim/mini-square | Dog ears, small units | 3" x 6", 3" x 7", 2.5"–4.5" |
| Triangle/HST | Half-square triangles, Flying Geese | Varies by finished unit size |
| Curved/French-curve | Curved piecing, appliqué | Multiple arc radii on one ruler |
| Machine/longarm | Ruler-foot quilting | 2"–4" wide, various lengths |
Pro Tip: Triangle rulers are sized by the finished unit, not the cut size. Check the ruler’s label against your pattern’s finished HST measurement before you buy.
What sizes, materials, and markings should you look for?
Materials and transparency
Nearly all quilting rulers are made from clear acrylic. The clarity lets you see the fabric grain, printed lines, and seam allowances beneath the ruler while you cut. Laser-etched lines are more durable than printed ones and maintain visibility with use.
Thickness and what it means for safety
Ruler thickness is not a cosmetic detail. Rotary-cutting rulers are typically around 1/8" thick, which keeps them low against the mat and lets the rotary cutter ride cleanly along the edge. Machine/longarm rulers are around 1/4" thick because the ruler foot on a sewing or longarm machine is designed to ride against that height. APQS advises using a 1/4"-thick ruler with a true 1/4" ruler foot on longarm machines and warns against using thin rotary-cutting rulers with a machine: a slipped ruler or needle strike can break a needle and damage machine timing.
| Thickness | Use | Safety note |
|---|---|---|
| ~1/8" | Rotary cutting with a cutter and mat | Not safe for machine/ruler-foot use |
| ~1/4" | Machine-guided quilting with a ruler foot | Required for longarm and home ruler-foot work |
Markings to check before you buy
- Dual-direction numbers: measurements readable from both ends of the ruler so you don’t have to flip it
- 1/8" and 1/4" grids: finer grids let you trim to exact seam allowances
- 45° and 60° angle lines: built-in angle guides for mitered corners and triangle cuts
- Center/diagonal lines: critical on square rulers for finding block centers and trimming HST points
- Color contrast: yellow or black lines on clear acrylic show up better on both light and dark fabrics
Non-slip features
Creative Grids’ embedded gripper dots on the ruler underside prevent sliding during rotary cutting without requiring a separate grip product. Silicone strips serve the same purpose on other brands. If your ruler doesn’t have built-in grip, you can add adhesive non-slip dots, though they add a small amount of thickness. Non-slip features matter most on long rulers and when cutting through multiple fabric layers.
How do you cut accurately and safely with quilting rulers?
Accurate cutting comes down to mat placement, hand position, and a consistent cutting motion. Here’s the sequence for cutting a strip from a length of fabric and sub-cutting it into squares:
- Press and fold your fabric selvage to selvage on a self-healing mat. Align the fold with a horizontal grid line on the mat.
- Square the raw edge by placing your long ruler perpendicular to the fold, aligning a vertical line on the ruler with the fold, and trimming a thin sliver off the uneven edge.
- Measure your strip width by sliding the ruler to the right (or left, depending on your dominant hand) and aligning the ruler’s measurement line with the squared edge.
- Place your hand near the bottom of the ruler, not the top. Press firmly with spread fingers.
- Begin the cut from the fold upward. When you reach the midpoint of the ruler, stop, move your hand to the middle of the ruler, and finish the cut. This hand-shift prevents the ruler from wobbling and keeps the strip width consistent.
- Open the strip and check it at the fold point. A V-shape at the fold means the fabric wasn’t aligned correctly; refold and re-cut.
- Sub-cut into squares by rotating the strip 90°, squaring one end, and cutting at your target measurement.
Pro Tip: Always cut away from your body and keep your fingertips curled under the ruler edge. A rotary cutter blade is sharp enough to cut through multiple fabric layers without much pressure, which means it cuts skin just as easily.
Squaring up blocks
Place your square ruler diagonally over the finished block, aligning the ruler’s diagonal line with a seam or the block’s center. Trim two sides, rotate 180°, and trim the remaining two sides. Check the block measurement against your ruler before trimming: you can only take fabric away, not add it back.
What makes longarm ruler quilting different?
Longarm rulers serve a fundamentally different purpose than rotary-cutting rulers. APQS explains that longarm rulers primarily guide machine movement: you hold the ruler against the quilt top and move the machine head along its edge to stitch a straight line, gentle curve, or geometric shape. The ruler is a stitching guide, not a cutting guide.
That advice is practical for two reasons. First, straight-line ruler work (grids, crosshatching, and echo lines) is the foundation of most ruler-guided quilting designs. Second, curved rulers with multiple arc radii give you flexibility across many design styles without requiring a separate ruler for each curve radius.
What to buy first as a longarmer
- One straight ruler sized for your machine’s throat space (typically 2"–4" wide and 12"–18" long)
- One curved/French-curve style ruler with multiple arc options
- A ruler base or ruler foot that matches your machine’s specifications
Before buying any ruler, confirm your machine’s ruler foot height. The foot must match the ruler’s thickness (around 1/4") so the ruler sits snugly against the foot without slipping underneath it. A ruler that slips under the foot puts the needle at risk of striking the ruler’s edge, which can break the needle and throw off the machine’s timing.
Pro Tip: If you’re new to ruler work on a longarm, practice on a small quilt sandwich pinned to a foam board before moving to a loaded quilt. Straight lines first, then gentle curves.
How do you choose the right rulers for your projects?
A short checklist before you buy:
- What blocks are you making? Strip-pieced patterns need a long rectangular ruler. HST-heavy patterns benefit from a dedicated triangle ruler. Curved patterns need a curved ruler.
- What are your typical block sizes? A 12.5" square ruler won’t help you square a 4" block. Match the ruler size to your most common block size.
- Are you cutting or machine quilting? Rotary cutting needs thin rulers (~1/8"). Ruler-foot work needs thick rulers (~1/4"). Never mix them.
- What’s your storage situation? Long rulers need flat, horizontal storage. If space is tight, prioritize versatile sizes over specialty shapes.
- What’s your budget? A mid-range ruler with laser-etched lines and embedded grip is a better investment than a cheap ruler with printed markings that fade.
Starter kit for beginners
- 6" x 24" long rectangular ruler (strip cutting and borders)
- 10" or 12.5" square ruler (squaring blocks and sub-cutting)
- 3" x 6" small trim ruler (dog ears and small units)
- Triangle/HST ruler sized for your most common HST (add when you start a triangle-heavy project)
- One upgrade for intermediate quilters: a 6.5" x 6.5" square for fussy cutting and small block work
Budget vs. premium
Budget rulers (under $15) often have printed markings and no built-in grip. They work, but the markings wear over time and the ruler slides more. Premium rulers ($20–$40+) typically offer laser-etched lines, embedded non-slip dots, and thicker acrylic that resists warping. For a beginner buying one or two rulers, a mid-range option with etched lines is the right balance. For longarm use, don’t compromise on thickness or grip: the safety stakes are higher.
How do you care for and store quilting rulers?
Rulers are durable, but a few simple habits keep them accurate and scratch-free for years.
- Clean with mild soap and a soft cloth. Avoid acetone, alcohol, or harsh solvents: they can cloud the acrylic and damage laser-etched lines.
- Store flat, not standing on edge. Acrylic can warp over time if stored vertically, especially in warm rooms or near a sunny window.
- Separate rulers with soft liners (a folded piece of flannel works well) to prevent scratches between rulers stored in a stack.
- Keep rulers away from heat. A car trunk in summer or a shelf above a radiator can warp acrylic permanently.
- Check for warping periodically by laying the ruler flat on your cutting mat. Any rocking or gap between the ruler and mat means the ruler has warped and should be retired. A warped ruler produces inaccurate cuts.
- Protect edges during transport by wrapping rulers in a soft sleeve or a rolled piece of batting. Chipped edges catch on fabric and can deflect a rotary cutter blade.
A practical path to building your ruler collection
Start with the three workhorses: the 6" x 24" strip ruler, the 12.5" square, and a small 3" x 6" trim ruler. Those three cover the vast majority of cutting tasks in most quilt patterns. Practice straight cuts and block squaring until the technique feels automatic, then add a triangle ruler when your first HST-heavy project arrives.
Specialty rulers are genuinely useful, but only for the projects that need them. A circle system, a Flying Geese template, or a set of longarm curves are smart purchases when you have a specific project in mind. Buying them speculatively usually means they sit unused.
If you’re moving into ruler-foot quilting on a home machine or longarm, the jump from rotary-cutting rulers to machine rulers is a real equipment shift, not just a size change. Check your machine’s ruler foot compatibility before buying any longarm ruler set. Sewingmachinesplus carries a range of machines and accessories and offers personalized consultations to help you match the right ruler foot and ruler thickness to your specific machine.
Quilting rulers at Sewingmachinesplus
Sewingmachinesplus gives you access to a wide selection of quilting machines, accessories, and cutting tools, all from a 50+ year authorized dealer with over 175,000 positive customer reviews. Whether you’re setting up your first cutting station or upgrading to a longarm setup with ruler-foot capability, you’ll find machines and accessories matched to your skill level and budget.
Free shipping on orders over $49, a price match guarantee, and financing options make it straightforward to get the right equipment without overspending. If you’re not sure which machine works with a specific ruler foot or which starter bundle makes sense for your projects, the team at Sewingmachinesplus offers personalized consultations to point you in the right direction. Browse the full range and get your questions answered today.
Sources
- How to choose the perfect quilters ruler - Articles | Plaid Online
- Creative Grids Specialty Rulers | Linda’s
- Quick Guide to Quilting Rulers
- The Complete Guide to Quilting Rulers — Which One to Buy in 2026
FAQ
Which quilting ruler is best for beginners?
A 6" x 24" rectangular ruler paired with a 10" or 12.5" square ruler covers nearly every beginner cutting task. Most quilting authorities recommend starting with these two before adding any specialty rulers.
What are the different types of quilting rulers?
The main types are long/strip rectangular rulers, square/trim rulers, small trim rulers, triangle/HST rulers, curved/appliqué rulers, and machine/longarm rulers. Each type handles a specific cutting or machine-guiding job.
Can you use a regular rotary-cutting ruler for longarm quilting?
No. Standard rotary-cutting rulers are about 1/8" thick, which is too thin for ruler-foot work. Longarm quilting requires a ruler approximately 1/4" thick so the ruler foot rides correctly against the edge; a thin ruler can slip under the foot and cause a needle strike.
What is the 60/30/10 rule for quilting?
It’s a design principle for fabric selection, not a ruler or cutting technique.
What does “squaring up” a quilt block mean?
Squaring up means trimming a finished block to its exact target measurement so all four sides are straight and the corners are true 90° angles. You use a square ruler aligned to the block’s diagonal or seam lines, then trim two sides, rotate, and trim the remaining two.
