

If you’re just getting started, buy a single-needle or combo machine and let your hoop size and weekly project volume make the rest of the decision for you. Skip multi-needle setups unless you’re already stitching caps or bags in batches. That single filter cuts through most of the confusion. The checklist further down turns it into an actual purchase.
TL;DR:
- Single-needle and combo machines are ideal for beginners, with low-cost options around a few hundred dollars and limited features suitable for small projects.
- Hoop size primarily determines the maximum design size, with 4x4 and 5x7 hoops fitting most hobbyist needs, while larger hoops enter commercial pricing.
- Speed matters more for dense designs, but registration accuracy and stabilization are more critical for stitch quality than raw speed alone.
- Additional accessories like magnetic hoops, stabilizers, and quality needles significantly influence output and can prevent common beginner mistakes.
- Multi-needle machines become cost-effective only once weekly order volume reaches 30 to 50 items, due to faster production and reduced color-change downtime.
Table of Contents
- Embroidery Machine Buying Guide: Matching Machine Type to Your Projects
- What Features Actually Matter When You Compare Models?
- What Accessories Do You Need Beyond the Machine Itself?
- What Should You Budget For, Beyond the Sticker Price?
- How Do You Actually Choose? A Step-by-Step Checklist
- How Sewing Machines Plus Helps You Buy With Confidence
- Hobby or Business? Choose the Project, Not the Price Tag
- Start Comparing Machines and Financing Options
- Sources
- FAQ
Embroidery Machine Buying Guide: Matching Machine Type to Your Projects
Before you compare specs, you need to know which category you’re even shopping in. Home embroidery machines split into a few architectures, and each one quietly assumes a different kind of user.
Single-needle and combo machines are where nearly every beginner should start. A combo machine sews regular seams and embroiders designs from the same head, which keeps costs down and gives you one machine to learn instead of two. You’ll thread one color at a time, which is slower on multicolor designs, but for monogramming, small-batch gifts, and learning how hooping actually works, that trade-off barely matters. Needle Down frames the whole first purchase around exactly this logic: figure out your field size, your budget, and whether you need combo capability before you look at anything else.
Multi-needle machines thread several spools at once and jump between colors automatically, which is the whole point once you’re filling orders instead of finishing projects at your own pace. Free-arm and cap-frame options on these machines also open up hats, cuffs, and bag panels, which flatbed-only machines simply can’t hoop properly. That distinction between flatbed and tubular or free-arm design matters more than most first-time buyers realize.
Here’s how the categories typically break down by intended use:
- Single-needle combo: hobbyists, monogramming, gift work, learning curve friendly
- Embroidery-only single-needle: crafters who already own a separate sewing machine
- Multi-needle (4 to 10 needle): home businesses filling repeat orders, cap and bag work
- Commercial multi-needle: shops running daily production runs
Entry combo machines usually start in the low hundreds of dollars, while multi-needle units climb into the thousands. The upgrade path most makers follow isn’t buying a second machine right away. It’s adding magnetic hoops to speed up hooping on the machine they already own, then building a relationship with a dealer who can service the machine as their needs change.
What Features Actually Matter When You Compare Models?
Specs sheets make every machine sound impressive. Only a handful of features change your day-to-day experience enough to justify paying more for them.
Hoop size (the embroidery field) decides what you can stitch, full stop. A 4x4 hoop handles small logos and monogramming fine, but you’ll outgrow it fast if you ever want to do a full jacket back or an oversized patch. A 5x7 hoop covers most garment work without pushing you into commercial-machine pricing, and Needle Down specifically recommends sizing up to 5x7 if garment backs or larger patches are even a maybe for your future projects. Machines with 7.9x11 fields and larger start entering multi-needle territory and commercial price ranges.
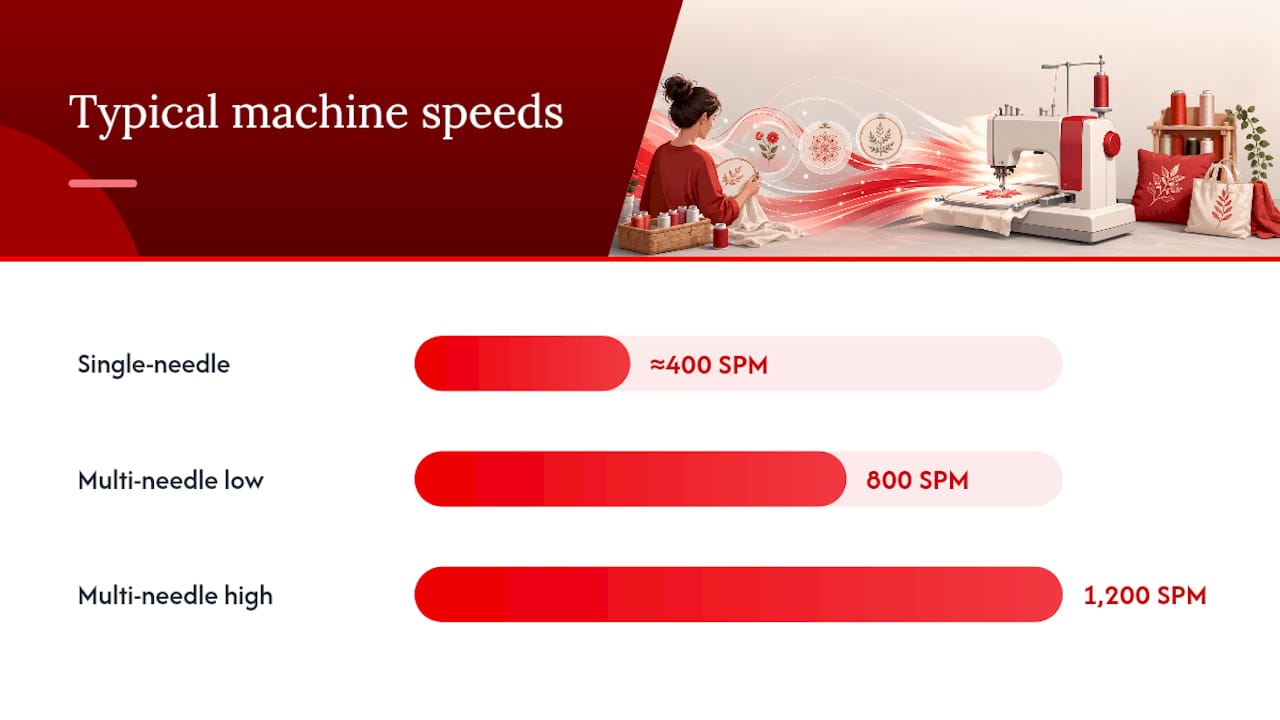
Speed (stitches per minute) matters more on dense designs than beginners expect. Single-needle home machines typically run around 400 SPM, while commercial and multi-needle units run 800 to 1,200 SPM, according to a technical comparison from DrDTG. That gap shows up as real time on the table when you’re stitching a dense, multicolor design rather than a simple three-color logo.
Pro Tip: Speed only helps if registration holds up. A machine that runs fast but drifts off-alignment on dense fills will cost you more thread and rework than a slower, steadier one.
A few automation features are worth paying for:
- Automatic thread trimming (cuts jump stitches without you reaching for scissors)
- Built-in needle threader (saves real time across a multi-hour project)
- Auto-tension adjustment (fewer puckered or loose stitches on fabric changes)
File compatibility matters just as much as hardware. Most machines read PES, DST, or JEF formats, and USB transfer is standard, while Wi-Fi transfer is becoming common on mid-range and higher models. Practical Textile’s buying guide puts file transfer and touchscreen usability right alongside hoop size as top priorities, and that lines up with what Good Housekeeping found testing 13 machines: ease of use, included accessories, and connectivity drove satisfaction as much as raw capability did.
Frame construction and motor quality are harder to judge on paper, which is exactly why dealer relationships and warranty terms matter. A machine backed by a dealer who stocks parts and offers real training is a different purchase than the same specs sold with no service network behind them.
What Accessories Do You Need Beyond the Machine Itself?
The machine is maybe half the budget. What you feed it determines whether your stitches actually look professional.
- Stabilizer. Cutaway stabilizer suits stretchy knits and structured garments; tearaway works for wovens and simpler backing needs. Get a mixed pack before committing to one type.
- Hoops. Machines ship with one or two standard hoops, but aftermarket magnetic hoops speed up hooping dramatically and are worth adding early, not later.
- Thread. 40wt polyester or rayon covers most embroidery work; specialty metallic threads need a slower speed setting and often a larger-eye needle.
- Bobbin thread. A lighter 60wt bobbin thread reduces bulk on the underside and helps designs lie flatter, which is why many home embroiderers standardize on it early.
- Needles. Sharp-point needles for wovens, ballpoint for knits, and metallic-specific needles when you’re running specialty thread.
- Extras. A dedicated hooping station, temporary adhesive spray, curved snips, and a spare bobbin case will save you more frustration than any single machine feature.
Stabilizer choice and hoop tension cause more beginner mistakes than any hardware limitation. Practitioner guidance on single-needle versus multi-needle machines points to exactly this: get the thread and stabilizer pairing right, and stitch quality improves more than switching to a pricier machine ever would.
What Should You Budget For, Beyond the Sticker Price?
Machine price is the number you see first. It’s rarely the number that determines whether the purchase pays off.
Here’s roughly what different buyer tiers get:
- Entry combo machines: basic 4x4 hoop, limited built-in designs, USB transfer
- Mid-range dedicated embroidery machines: 5x7 hoops, larger design libraries, touchscreen editing, Wi-Fi transfer
- Multi-needle home-business machines: automatic color changes, cap frames, faster SPM, dealer service plans included
A detailed cost breakdown is worth reading before you set a number in your head, because the ongoing costs add up fast: thread per finished piece, stabilizer consumed per hoop-out, and periodic maintenance like cleaning and tension checks.
Financing and dealer-backed warranty coverage matter more at the mid-range and multi-needle tiers, where a repair without local support can sideline your business for weeks. That’s also where training becomes a real cost consideration, not a nice extra.
There’s a fairly clean ROI signal for when multi-needle stops being overkill. Once you’re consistently running 30 to 50 orders a week, the math flips. Production estimates from Needle Down put single-needle output around 3 to 4 pieces per hour on a standard five-color design, while multi-needle machines roughly double that to 6 to 7 pieces per hour, largely by cutting color-change downtime instead of adding raw speed.
How Do You Actually Choose? A Step-by-Step Checklist
Theory only gets you so far. Here’s the sequence that turns research into an actual purchase.
- List your projects first. Monogrammed towels need a different machine than cap embroidery or jacket backs.
- Pick your hoop size based on the largest project you’ll realistically do regularly, not the biggest one you might do once.
- Choose single-needle, combo, or multi-needle based on the volume math above, not on which machine looks most impressive in a showroom.
- Test-stitch a demo using a multicolor design, not the machine’s own preloaded sample, which is tuned to look flawless.
- Confirm service and parts availability before you buy, not after something breaks.
When you’re talking to a dealer, ask directly: What’s covered under warranty, and for how long? Is training included or extra? What financing options exist? What’s the return policy if the machine doesn’t fit your workflow? A dealer who answers these clearly, without hedging, is telling you something about how they’ll handle you after the sale.
Watch for a few red flags during a demo: skipped stitches on a quick direction change, visible needle deflection on dense fills, or a hooping process that fights you even with correct tension.
Pro Tip: Bring your own fabric and your own design file to any demo. A machine that looks perfect on the store’s sample fabric can behave completely differently on the stretch knit or heavyweight canvas you’ll actually be running at home.
How Sewing Machines Plus Helps You Buy With Confidence
Choosing between single-needle and multi-needle, or deciding whether a 5x7 hoop covers your next two years of projects, is easier with someone who sells these machines every day walking you through it. Sewing Machines Plus offers personalized consultations built around your actual project list, not a generic spec sheet, plus financing options that spread the cost of a mid-range or multi-needle machine without forcing you to buy down a tier. Its cost breakdown resource and buying checklists exist for exactly the research phase you’re in right now, and a price match guarantee means you’re not leaving money on the table by asking questions first.
Hobby or Business? Choose the Project, Not the Price Tag
Buying for the project you actually have, not the business you might someday run, is the single decision that saves people the most money. Start with a single-needle or combo machine, add magnetic hoops when hooping becomes your bottleneck, and only move to multi-needle once order volume makes color-change downtime a real cost. Portability and dealer support pull in opposite directions at the high end, and I’d rather see a new maker keep both options open than lock into commercial gear before they know what their weekly output actually looks like.
— Chris
Start Comparing Machines and Financing Options
You don’t have to figure out hoop sizes, stitch speeds, and file formats alone. Pairing a selection of single-needle, combo, and multi-needle machines with personalized consultations can help match machine to project instead of guessing from a spec sheet. Price match guarantees and financing options may be available to help size up to the machine that fits your volume without overpaying or overcommitting. Free shipping on qualifying orders can cover most accessory and consumable restocks. Visit the Sewing Machines Plus shopping page to compare current embroidery machine models, or browse a compact multi-needle option if your project list already points toward production volume. Book a consultation before you buy, not after you’re stuck with the wrong hoop size.
Sources
- The best embroidery machines (Good Housekeeping)
- First Embroidery Machine Buying Guide: Four Decisions | Needle Down
- Best Computerized Embroidery Machines of 2026: Expert Reviews & Buying Guide (Practical Textile)
FAQ
What’s the Best Embroidery Machine for a Beginner?
A single-needle or combo machine with a 4x4 or 5x7 hoop is the best starting point for most beginners, since it keeps the learning curve manageable while covering monogramming and small projects. Good Housekeeping’s testing found that ease of use and included accessories mattered as much as raw specs for new users.
Is Owning an Embroidery Machine Profitable?
It can be, but profitability depends on volume, not the machine alone. Multi-needle machines only pay off once you’re consistently running 30 to 50 orders a week, since that’s where doubled hourly output from reduced color-change downtime actually offsets the higher purchase price.
What Do I Need to Buy Besides the Machine?
You’ll need stabilizer, hoops beyond whatever ships with the machine, embroidery thread, lighter-weight bobbin thread, and needles sized to your fabric. A hooping station and adhesive spray aren’t required but save real time once you’re working regularly.
How Much Does a Decent Embroidery Machine Cost?
Entry-level combo machines start in the low hundreds of dollars, while mid-range dedicated embroidery machines with larger hoops and Wi-Fi transfer cost more, and multi-needle home-business machines run into the thousands. Sewing Machines Plus lists current pricing directly on its site, and a full cost breakdown covers what to expect at each tier including thread and stabilizer costs.
